American Homebrewers Association Releases Step-by-Step Brew-in-a-Bag All-Grain Guide
Learn how to run a Brew‑in‑a‑Bag all‑grain brew day from gear and water math to mash temps, efficiencies, and cleanup.

Lead The American Homebrewers Association (AHA) has distilled a full all‑grain Brew‑in‑a‑Bag (BIAB) workflow into a practical step‑by‑step guide that walks you from equipment through packaging. This article turns that tutorial into a compact, community‑focused roadmap so you can brew smarter, save gear, and dial in recipes faster.
1. What is BIAB
BIAB is a single‑vessel all‑grain method that contains the grist in a large mesh bag so you mash and boil in the same kettle. As Northern Brewer puts it, “Think: all‑grain brewing meets a giant tea bag.” That single‑kettle approach removes the need for a separate mash tun and simplifies your setup while keeping full mash control.
2. Why choose BIAB
Choose BIAB if you want the control of all‑grain but have limited space, time, or budget, the AHA says it’s “perfect for the homebrewer who wants the control of all‑grain brewing, but has space, time, or budget limitations.” It’s also the fastest route for extract brewers to move to 100% malt while keeping sanitizing, fermentation, and packaging routines unchanged.
- Fermenter and airlock
- Boil pot / kettle
- BIAB bag / reusable brew bag
- Spoon and large strainer/colander (for small batches)
- Folding digital thermometer
- Hydrometer
- Cleaner and sanitizer
- Wort chiller (optional)
- Bottling or kegging equipment
3. Gather supplies (essential equipment)
Before you brew, ensure you have the basics AHA lists plus a few BIAB‑specific items:
Northern Brewer adds practical kit options from stovetop 3‑gal rigs to pulley systems for 5‑gal batches; Blog Homebrewing recommends a mesh bag large enough for 10–12 lbs. of grain for 5‑gal batches.
4. Clean and sanitize
Debris and residual organisms will spoil a batch, so clean thoroughly and sanitize anything that contacts wort after the boil. The AHA bluntly warns: “Debris on equipment can harbor microorganisms that can spoil a batch of beer, even with proper sanitization.” Make cleaning part of your routine before heating strike water.
5. Secure the grain bag
Before you add grist, ensure the bag is secured so it won’t slip or invert under the grain weight. The AHA says to “Ensure that the bag will not come un‑secured once the grains have been added.” Plan how you’ll lift and drain the bag, strainers for small kettles and a locking ratchet pulley for larger 5‑gal sets make life easier.
6. Strike water volumes: AHA example and options
AHA provides an explicit example for its Ruabeoir recipe: “For this recipe, we will assume 8.5 gal (32.2 L) are needed to produce 7‑gallons of pre‑boil wort.” That figure is tied to that recipe’s grain bill, absorption, and boil‑off rate; your volumes will vary. If your kettle won’t hold that no‑sparge volume or you prefer a sparge, follow AHA’s guidance: “Note: If your kettle is not big enough for no‑sparge mashing, or you’d prefer to add a sparge step, review the AHA’s Guide to Brew in a Bag (BIAB) for details.”
7. Heat strike water and expect the temperature drop
Heat your strike water to account for the heat sink of the grain. The AHA notes: “When the grains are added, the water temperature typically drops 8‑12°F, which will bring the mash down to the target mash temperature of 152°F (66.7°C).” Use that rule of thumb to set your strike temp higher so the mash rests at your target.
8. Mash in and rest
“Mashing, which is mixing crushed grain malt, or grist, with hot water and letting it sit for about an hour to create wort,” is the core enzymatic step (YouTube). Stir to eliminate dough balls, monitor temperature, and hold the mash at your target (AHA’s example target: 152°F / 66.7°C). Plan an hour for conversion, and consider mash thickness depending on your recipe and equipment.
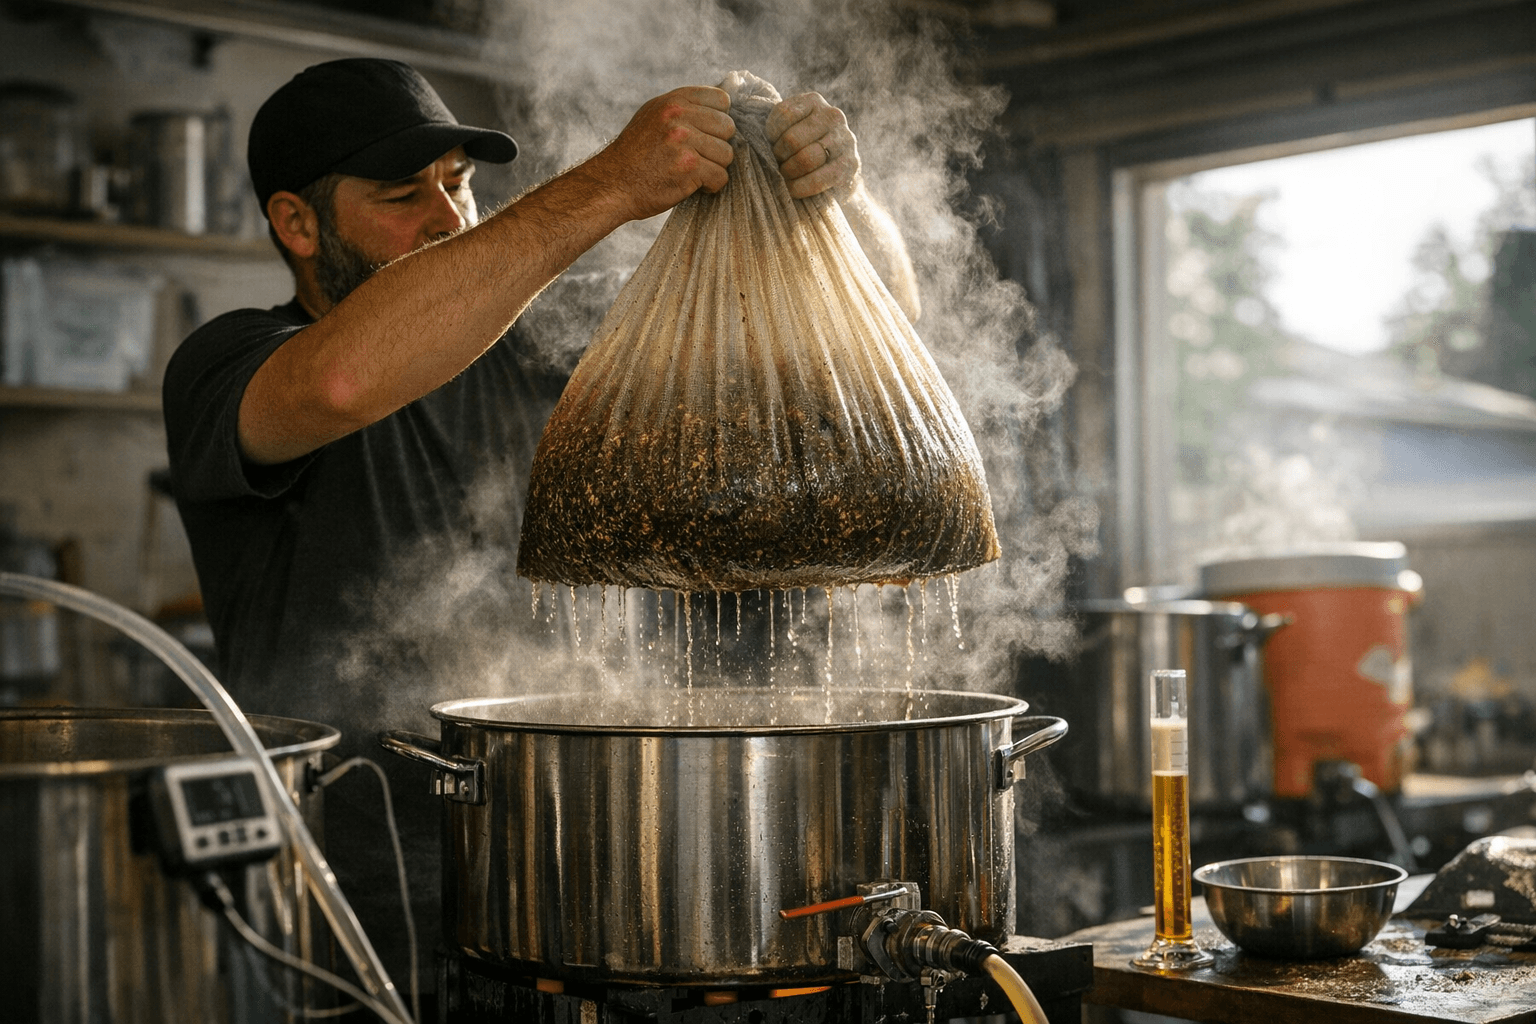
9. Lauter / remove the grain bag
Remove the bag and let it drain to separate wort from spent grist; in BIAB the bag removal replaces a sparge. Blog Homebrewing describes a practical partial‑sparge routine: “I’ll usually start with 7 gallons. At mash out, I suspend the bag over the kettle to drain. While the wort is coming up to boil temp, I ladle 160‑170 degree water over the bag to rinse the grain and bring my boil volume to 7 gallons.” That ladle rinse is a hybrid approach if you need extra pre‑boil volume or efficiency.
10. Boil and plan for break and volume loss
Ballastpoint reminds you to plan for losses during boil and chilling: “Most recipes assume that you are operating a brewhouse at around 80% efficiency and that you will be boiling about 7 gallons of wort to achieve a target batch volume of 5 gallons.” Expect break and trub losses, Ballastpoint cautions that “break material (proteins that separate from the wort during the boil and cool down) in the effort to leave this crud behind you will lose about a gallon.” Note too that Ballastpoint quantifies BIAB efficiency: “Since BIAB is generally about 65% efficient, you’ll need to add 15‑20% more base malt to hit your target original gravity.”
11. Cool, pitch yeast, ferment, and package
After the boil cool quickly (wort chiller optional) and transfer to fermenter, pitch an appropriate yeast starter, and ferment as your recipe directs. As the YouTube tutorial explains, “boiling the wort, cooling the wort, pitching yeast, fermenting and packaging. These steps are conducted just as you would with a batch of extract homebrew.” Sanitizing, siphoning, and packaging don’t change just because you brewed all‑grain.
12. Clean up, compost spent grain, and keep notes
Finish your brew day by moving spent grain out of the bag and cleaning equipment. The YouTube close emphasizes practical record keeping: “At this point, it's time to have a homebrew. Move that spent grain from the mesh bag into the garbage or compost. Clean up some equipment and take some notes. Having a written record of things like water volumes, temperature, gravity, and tasty notes that you can refer back to on subsequent brew days is the best way to learn, and the fastest way to become a better brewer.” Log details and tasting impressions to dial in future batches.
13. Scaling, hardware choices, and back‑saving tricks
BIAB scales easily: Northern Brewer points out you can do 3‑gal stovetop batches with a strainer or full 5‑gal batches using a pulley to lift the heavy grain bag. If you want to avoid heavy lifting, add a locking ratchet pulley to your outdoor setup; for small pots use a double‑mesh strainer. Choose equipment that fits your batch size and physical comfort.
14. Efficiency, recipe adjustments, and real‑world alternatives
If you’re converting extract recipes or multi‑vessel recipes, adjust grain amounts for BIAB efficiency. Use Ballastpoint’s rule of thumb: BIAB ≈65% efficiency, so add about 15–20% more base malt compared to recipes designed for ~80% brewhouse efficiency. Alternatively, use the ladle rinse technique or a short sparge to claw back efficiency if you prefer not to increase grain.
15. Further reading and where to go next
AHA and Ballastpoint both recommend John Palmer’s How To Brew for deeper mash and water chemistry math; Ballastpoint also cites Charlie Papazian’s Joy of Homebrewing as foundational. AHA points readers to the full AHA Guide to Brew in a Bag (BIAB) for kettle‑size or sparge decisions, and Northern Brewer offers starter kits if you want a bundled, tested hardware path.
Closing practical wisdom BIAB gives you full all‑grain control with the minimum of kit: plan your water volumes to match your kettle, expect a 8–12°F mash drop and aim for 152°F, and account for lower BIAB efficiency (≈65%) when scaling recipes. Clean and document every brew day, those notes are the fastest route to consistently better beer. Start simple, use a single recipe like the AHA’s Ruabeoir example to practice the math, and then tweak mash temps, grain bills, and rinse routines until your OG and flavor track where you want.
This article was produced by Prism’s automated news system from verified source data, official records, and press releases, then run through automated quality and moderation checks before publishing. The system is built and supervised by the people who set the standards it runs under. Read our full AI policy.
Did this article answer your question?