The complete miniature-painting workflow from table-ready to display
Learn a full, practical miniature-painting workflow from choosing models to advanced techniques and repeatable table-ready routines. Tips for pacing, gear, priming, shading, basing and leveling up.
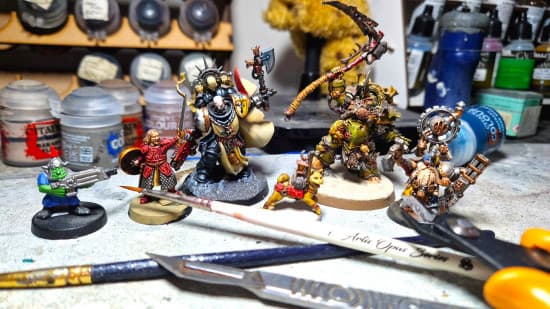
1. Choosing miniatures
Pick models that match your goals: starter infantry or single-display sculpts. Larger, simpler models teach fundamentals faster; intricate sculpts show off techniques but demand patience. Consider material (plastic, resin, metal) because cleaning and glue/priming choices differ, and match scale to your game or display plans so conversions and basing fit the table.
2. Essential tools
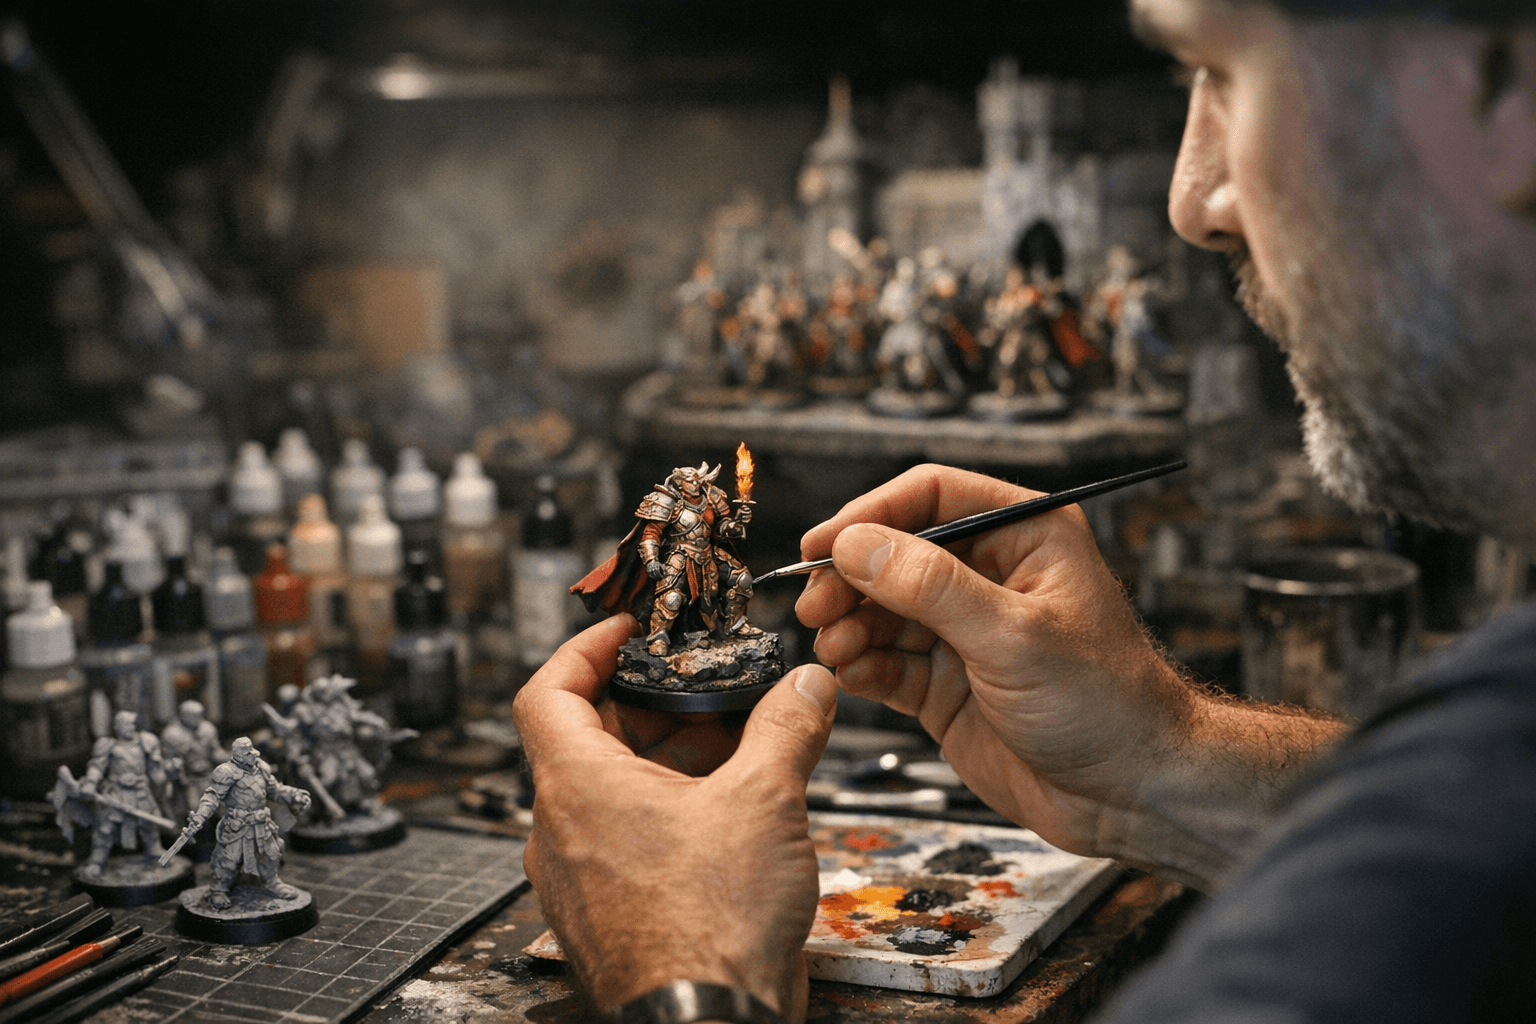
Assemble a core kit: a few synthetic/sable brushes (00–2 for detail, a size 3–6 for blocking/drybrushing), quality acrylics, a wet palette, a selection of primers (brush and spray), hobby clippers, files, hobby knife, and superglue/plastic cement. Keep a cheap larger brush for varnish and a fine liner for freehand; label and rotate brushes to avoid premature wear. A simple painting handle or grip and a daylight lamp with good CRI will massively cut down eye-strain and mistakes.
3. Safe build and sub-assembly practices
Work in a well-ventilated area and use a mask for resin dust or superglue fumes. Sub-assemble: clean mold lines first, then glue major seams and leave delicate bits off (weapons, cloaks, heads) to paint separately, this saves hard-to-reach spots and reduces clipping/priming mistakes. Use pinning for heavy or fragile parts, and gap-fill with putty before priming so you don’t sand paint later.
4. Priming (brush and spray options)
Choose a primer color for the final look: grey for neutral tones, black for darker shading, white for bright colors and true hues, or a light zenithal spray to give instant depth. Spray primers give even coverage quickly; brush-on primers are indispensable for touch-ups and indoor work. Apply multiple thin coats rather than one heavy pass and always check for missed recesses before the first paint layer.
5. Thinning paints correctly
Thin acrylics to a consistency like single cream or milk depending on pigment: most base layers around 1:1 paint to thinner or slightly thinner works, while glazes and layers use more medium. Use a wet palette to keep paints workable and prevent waste; thin in small increments and test on a palate card. Thinner paint lets you build opaque coverage with smooth transitions and reduces brush strokes.
6. Basecoating
Block in the main colors with a smooth, even basecoat, airbrush or large brush for big areas, fine brush for details. For consistent results, start with mid-tones rather than extremes; you’ll add shadows and highlights later. Consider a quick zenithal undercoat (light from above) to predefine where shadows and highlights should sit and speed subsequent shading.
7. Shading (washes)
Use washes or thinned paint to define recesses and add instant depth; apply controlled amounts and wick excess with a clean brush. For broader control, pin-wash (apply only to recesses) or glaze shadows with transparent layers for smoother transitions. Avoid heavy pooling on flat surfaces by tilting the model and cleaning up runs while wet.
8. Layering and edge highlights
Build highlights with progressively lighter, thin layers, stopping short of full contrast to keep transitions smooth. Edge highlights use a fine brush and deliberate strokes on corners and ridges to sell form, a small, steady hand and a high-quality point make these crisp. For table-ready models focus on readable, slightly exaggerated highlights; for display pieces tone them finer and subtler.
9. Basic basing
Pick a base style that complements the model: textured sand and drybrushed rocks for battlefields, static grass tufts for fields, or simple painted rims for gaming neatness. Glue texture, prime it with the model or separately, then paint and drybrush layers for depth; finish with a few tufts or scatter for interest. Seal with matte varnish and clean the base rim to make your army look cohesive on the table.
10. Intermediate techniques: glazing and simple freehand
Glazing is thin, translucent paint layers that adjust color and smooth transitions; you’ll need patience and multiple passes to shift hues without losing detail. Practice simple freehand like stripes, squad markings, and small sigils using a well-pointed brush and slow, confident strokes, templates or chalk pencils help with symmetry. These intermediate skills make units pop and let you add character without full display-level commitment.
11. Advanced techniques: blending and color theory
Wet blending and feathering give feather-smooth transitions between tones but need speed and practice; blend on the miniature or on a palette depending on drying time. Learn basic color theory, warm vs cool lights, complementary contrasts, and how saturation affects perceived brightness, to intentionally choose schemes that read at table distance. Advanced glazing refines tones after blending and non-metallic metal (NMM) uses carefully placed highlights and reflections to mimic metal without metallic paint.
12. Non-metallic metals (NMM) basics
NMM simulates reflective metal by painting controlled highlight spots and reflected light, map your light source first, then place crisp highlights and midtone gradients. Use cool greys and blues for steel, warmer browns and golds for brass, and practice on test pieces; consistent reflections across nearby surfaces sell the effect. Expect NMM to be time-consuming but highly rewarding for display models and photo work.
13. Two golden rules: avoid burnout and keep goals realistic
Pace projects to avoid burnout: short, focused sessions and bite-sized targets (one figure, one squad) keep momentum and fun. Set realistic outcomes per model, table-ready in evenings, display pieces over weeks, and don’t chase perfection on every miniature. Celebrate progress: learning techniques is cumulative, and small wins keep you painting.
- Clean and sub-assemble parts for access and durability.
- Prime (thin coats, correct color).
- Basecoat main colors with thinned paint.
- Shade with targeted washes or glazes.
- Layer mid-tones and add edge highlights for readability.
- Varnish selectively and finish basing (texture, paint, tufts).
14. Repeatable step-by-step workflow for table-ready results
This pipeline keeps you efficient and produces consistent tabletop armies you can finish on schedule.
15. Leveling up and community relevance
Join painting nights, local clubs or online groups to swap critique, trade recipes, and see diverse styles; community playtests and club displays are great motivation. Pair this workflow with short video tutorials and product reviews to fill gaps, quick focused vids are perfect for learning a single skill and reviewing brushes, inks, or primers before you buy.
Our two cents? Start simple, finish models, and trade perfection for consistency. Build techniques into routine projects, reserve ambitious experiments for weekends, and enjoy the small victories, painting is practice and play, and both make better models.
This article was produced by Prism’s automated news system from verified source data, official records, and press releases, then run through automated quality and moderation checks before publishing. The system is built and supervised by the people who set the standards it runs under. Read our full AI policy.
Did this article answer your question?


