BonsaiOutlet Publishes Illustrated Late-Winter Repotting Guide for Hobbyists
Late‑winter repotting made simple: repot before spring growth with three clear steps, the exact soil/root percentages to follow, and a compact tool shopping list with prices.

Late winter is your prep window: repot early so your bonsai wakes into spring with refreshed soil and free roots. BonsaiOutlet’s illustrated late‑winter repotting material focuses on timing, gentle removal, root work, soil replacement and aftercare, and it gives precise, actionable rules: remove about one‑third of old soil, and when pruning roots avoid removing more than 60% of total root mass. Laughlin captures the urgency well: “We’re at the critical point where most bonsai are about to leaf out if they haven’t already. This is when the bonsai are the healthiest for repotting and cutting back roots.”
1. Timing: why late winter/early spring matters
Repot just before active growth, the guide’s core calendar advice aligns across sources: spring is when sap moves, roots start growing and buds swell, and it’s the only safe season to repot conifers. If a tree arrived by mail, wait: “let it rest 2 weeks in bright shade before any major work” so the plant can acclimate. Laughlin reinforces frequency decisions: repot young bonsai each year and allow more developed specimens to go longer between repots.
2. Pre‑repot checklist and safety rules
Before you touch soil, confirm the tree is in the late‑winter/early‑spring window and has had any required acclimation. Handle the trunk carefully during extraction: “Gently slide your pre‑bonsai out of its nursery pot. Tap the sides to loosen it, or trace around the edge with your chopstick. Always support the trunk, Never pull too hard.” These simple cautions reduce torn roots and stress.
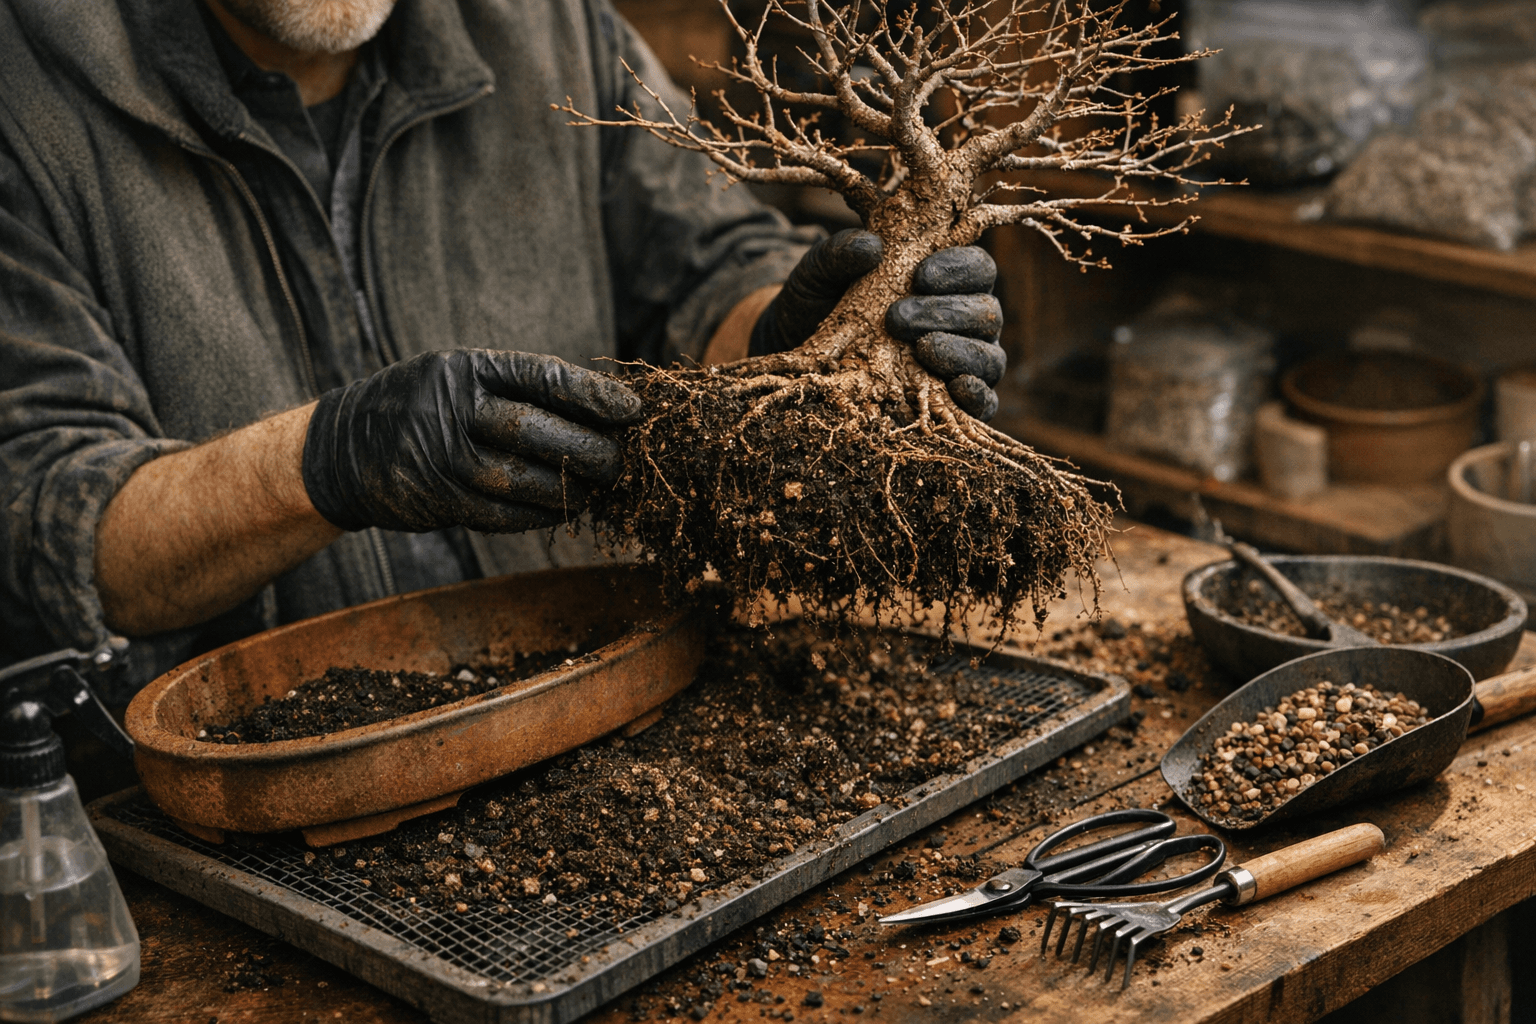
3. Step 1, Remove the tree from its pot
Remove ties and wires first if present; Bonsai‑nbf’s workflow explicitly starts by cutting any securing wire. For stubborn root balls, use a transplanting sickle/scythe (a curved, sharp cutting edge) to saw around the pot edge so you lift the root mass intact rather than tearing it apart. The BonsaiOutlet step list emphasizes gentle extraction methods, tapping, tracing with a chopstick, and supporting the trunk, to protect the trunk flare and root collar.
4. Step 2, Loosen the roots and remove old soil
Work from the edges toward the center with a chopstick: “Use your chopstick to tease out the outer roots, working from edges toward the center.” Remove about one‑third of the old soil while keeping roots damp so the root ball still retains moisture and structure. For the bottom and downward roots, a three‑pronged root rake is useful to scrape away soil and expose roots, for deep pots you may first need to cut off a bottom portion of the root ball with a curved sickle or saw.
5. Step 3, Trim roots with restraint
Trim long or circling roots but preserve fine feeder roots: “With your Tinyroots shears, trim long or circling roots, but keep the fine feeder roots. They're the lifeline. Avoid removing more than 60% of the total root mass.” Use scissors or hand snips for lateral roots; bent‑nose tweezers and a root hook help untangle and position roots. The guide’s numeric limits are deliberate: remove enough material to reseat the tree in a ceramic pot, but never reduce the root system beyond safe thresholds.
6. Seating the tree, soil replacement and settling
Seat the root mass in the new pot using fresh bonsai soil; use a chopstick to settle soil between roots and to remove air pockets. The chopstick is a repeated staple in the guide: essential for loosening soil, settling mix between roots and removing trapped air. BonsaiOutlet also recommends targeted feeding hardware: a Fertilizer Basket holds slow‑release pellets at the root zone to reduce runoff, deter critters and keep the surface tidy.
7. Tools: what to buy (compact starter gear to pro upgrades)
BonsaiOutlet lists simple, effective items and Bonsai‑nbf expands to professional tools. Core small items the guide mentions include Tinyroots Red‑Handled Shears (compact, sharp for precise cuts), a chopstick, and the Fertilizer Basket + sample fertilizer. For a one‑stop kit, an eight‑piece tool kit (snips, three‑pronged rakes, sickle and pliers) is available for $69.95. For heavier cuts, Laughlin recommends Okatsune heavy‑duty hand snips: “They’re top‑notch Japanese shears that are great for cutting heavy roots and getting the root ball back down to where you want it,” and they’re sold for $40. Individual sickles, three‑pronged root rakes and root hooks generally sell for around $10 each.
8. Professional technique additions (tools and workflows)
If you want to work like a pro, add a root hook, transplanting sickle/scythe, three‑pronged root rake and bent‑nose tweezers to your bench. Bonsai‑nbf’s workflow advises cutting wires first, then sawing around the pot edge to free the root ball intact, using a three‑pronged rake to clean the bottom, and using root hooks and tweezers to untangle roots. Watch bonsai master Boon Manakitivipart demonstrate these steps to see how the tools are used in real time.
9. Pot selection basics
Pot choice should support the composition: color, shape, size and overall design matter to the finished display. Bonsai Empire’s pot‑selection guidance underpins the aesthetic choice: size must fit the trimmed root mass and the intended style of the tree, while color and shape complete the visual pairing. Pay attention to how much root mass you retain, the one‑third soil removal and under‑60% root pruning rules determine how large a pot you need.
10. Aftercare and the philosophy of seasonal work
Aftercare in the guide emphasizes setting the stage: “Think of today as setting the stage, not finishing the show. With success, you'll cycle through these seasons again and again, each pass a chance to do the right task at the right time. Small, well‑timed steps beat big, rushed ones, every time.” The guide includes a printed quick guide and a detailed downloadable instructional book so you can reference aftercare steps; the Fertilizer Basket is offered as part of targeted post‑repot feeding. Specific watering schedules and mix formulas aren’t enumerated in the excerpts, so use the printed/digital materials for full aftercare checklists.
11. Frequency and long‑term perspective
Repotting renews the tree: Laughlin frames it as lifecycle care, “Repotting is like renewing the life of the tree and giving it a chance to live a lot longer than it would growing in the ground,” and it’s part of why “you have 1,000 year bonsai – repotting helps bonsai roots not wrap around the pot, get old and stop feeding the tree.” Use the rule of thumb: repot young material annually to encourage healthy root structure; allow more mature specimens longer intervals between repots.
12. Resources, demos and what BonsaiOutlet provides
BonsaiOutlet’s illustrated guide is available as a printed quick guide and a downloadable detailed instruction book that walks through each stage with images and steps. The retail and teaching material mentions Tinyroots Red‑Handled Shears, chopstick, Fertilizer Basket + sample fertilizer and the eight‑piece kit; Bonsai‑nbf notes the $69.95 kit and the $40 Okatsune snips as clear price anchors. For visual learners, watch the demonstration by Boon Manakitivipart to see tool handling and root arrangement in action.
Final point This late‑winter refresher pairs exact, measurable do’s and don’ts, remove about one‑third of old soil, never lop off more than 60% of root mass, let newly shipped trees rest 2 weeks, with a compact tool path from a chopstick to Okatsune snips. Follow the sequence, use restraint, and remember the guide’s central idea: repotting is preparation for the season to come, not an instant makeover. Do the right task at the right time, and your tree will reward you through the growing year.
Know something we missed? Have a correction or additional information?
Submit a Tip