How to Remove Rust From Boat Stainless Steel Fittings and Rails
Surface rust on your lifelines isn't failed steel; it's a breached chromium oxide layer — and five targeted methods can fix it before you leave the dock.
The morning before a passage is the wrong time to notice your stainless lifelines look like a rust-belt guardrail. That orange-brown film running down the stanchions and pooling on the deck is called tea staining, and it's one of the most misread problems in boatyard maintenance. Most sailors scrub at it with whatever's at hand, seal it under a coat of polish, and sail away satisfied — until the pitting starts. Understanding what's actually happening to the metal, and in what order to attack it, is what separates a fix that lasts a season from one that lasts a decade.
Why "Stainless" Is a Promise, Not a Guarantee
Stainless steel is not rust-proof. It is corrosion-resistant because its chromium content reacts with atmospheric oxygen to form a thin, self-healing chromium oxide film across the surface. That passive layer, a few nanometers thick, is all that stands between your 316 stanchion base and the iron beneath it. When salt sits in crevices or under dirt, the passive film breaks down locally, the steel goes "active," and you see tea staining, rust spots, and eventually pitting corrosion. The chlorides in seawater are particularly aggressive because they displace oxygen from the surface, starving the film of what it needs to regenerate.
Simple exposure to water and oxygen is normally sufficient to build a robust oxide film on 304 and 316 stainless. However, grinding and drilling can often start corrosion, caused by either overheating or the transfer of bits of iron from a contaminated drill or grinding wheel. The same applies any time a carbon steel tool touches your marine hardware. Those microscopic iron particles embed in the stainless surface and rust independently, long before the base metal itself is compromised.
316 vs. Chrome-Plated: Know What You're Cleaning
Before reaching for any cleaner, identify what you're actually dealing with. Marine-grade stainless steel fittings are vastly different from chrome-plated equipment, and it pays to know what is plated in order to maintain it properly. 316 stainless steel contains molybdenum, which enhances its corrosion resistance in chloride-rich environments — it is the standard for lifelines, stanchions, cleats, and chainplates on a proper bluewater boat. Chrome-plated hardware, common on budget deck gear, has a thin decorative layer over a base metal that is neither 304 nor 316; once the plating chips or wears, the base corrodes rapidly and the repair calculus changes entirely. Aggressive acid treatments designed to restore stainless passivation can strip chrome plating entirely, so confirm your material before proceeding.
The Remediation Shootout: Five Methods Compared
Method 1: Pantry acids (white vinegar / bicarbonate paste)
For fresh tea staining caught early, diluted white vinegar or a paste of bicarbonate and water will lift surface oxidation without threatening the passive layer. Cost is negligible; a spray bottle of white vinegar sits below $2. You can paint or sponge on a five percent solution of oxalic acid to the area and leave it to work for at least five minutes, at which point the oxalic acid digests the rust and turns it into a white powder that can be brushed off — that same principle explains why mild organic acids do the light work. Vinegar and bicarb don't actively rebuild the chromium oxide layer; they clean the surface and leave passivation to happen naturally through oxygen exposure. Dwell time: 5 to 10 minutes. Best for: first-season staining on well-maintained hardware.
Method 2: Oxalic acid cleaners
The reason Bar Keepers Friend works so well is because the active ingredient is oxalic acid. It's one of the most accessible mid-range treatments available, sold in most grocery stores for under $5, and tests show that the most effective cleaners usually contain phosphoric acid or oxalic acid, with pastes being preferable since a jar of runny cleaner can spill easily and any acid must be thoroughly rinsed, as the acid can harm gelcoat. Oxalic acid converts iron oxide back to soluble iron salts, which rinse clear. It does not, however, perform the deeper passivation step; the protective layer has to re-form on its own after treatment. Dwell time: 5 to 15 minutes. Best for: moderate staining on stanchions and rails, particularly where rust has leached onto adjacent gelcoat or deck.
Method 3: Phosphoric acid (naval jelly / acid gel)
For heavier rust or early pitting, phosphoric acid is the heavy-hitter. Phosphoric acid removes rust faster than citric acid. Sold as naval jelly or in marine-grade gel formulations, it converts iron oxide to iron phosphate, leaving a grey primer-like residue that rinses away. The gel format is critical on vertical surfaces like lifeline stanchions and pushpit rails, as it clings rather than running down onto gelcoat. Cost runs $8 to $20 depending on brand and volume. The critical caveat: phosphoric acid is not a passivating agent. Rinse completely and follow with a passivation step, or the corrosion cycle will restart within weeks. Dwell time: 10 to 20 minutes depending on severity. Best for: stubborn orange pitting on cleats, chain stoppers, and anchor rollers.
Method 4: Citric acid passivation
This is the step most DIY guides skip, and skipping it is why the rust comes back. In cases where grinding and drilling have started corrosion, natural oxidation, polishing, and even common rust removal acids are not enough to stop the process. To cure this, a specific process is needed to leach away iron from the surface and from a microscopic layer below, following industry standards ASTM A967 and AMS 2700, which describe two general processes: 25 to 45 percent nitric acid, or 4 to 10 percent citric acid. For the DIY sailor, citric acid is the clear choice. It's non-toxic, easier to dispose of, and works on the same 304 and 316 grades found on virtually every production sailboat. Citric acid passivation ensures a clean, corrosion-resistant surface by leaching free iron from the surface and promoting the formation of a new, stable chromium oxide film. You can mix your own from food-grade citric acid powder (a 10% solution by weight, roughly 100g per litre of warm water) for a few dollars, or buy a purpose-made passivating gel for $15 to $30 from marine chandleries. Apply after any acid cleaning step, allow 20 to 30 minutes of contact time, then rinse thoroughly. Passivation with citric acid is recommended at least once a year for stainless that keeps rusting up after polishing.
Method 5: Mechanical polishing
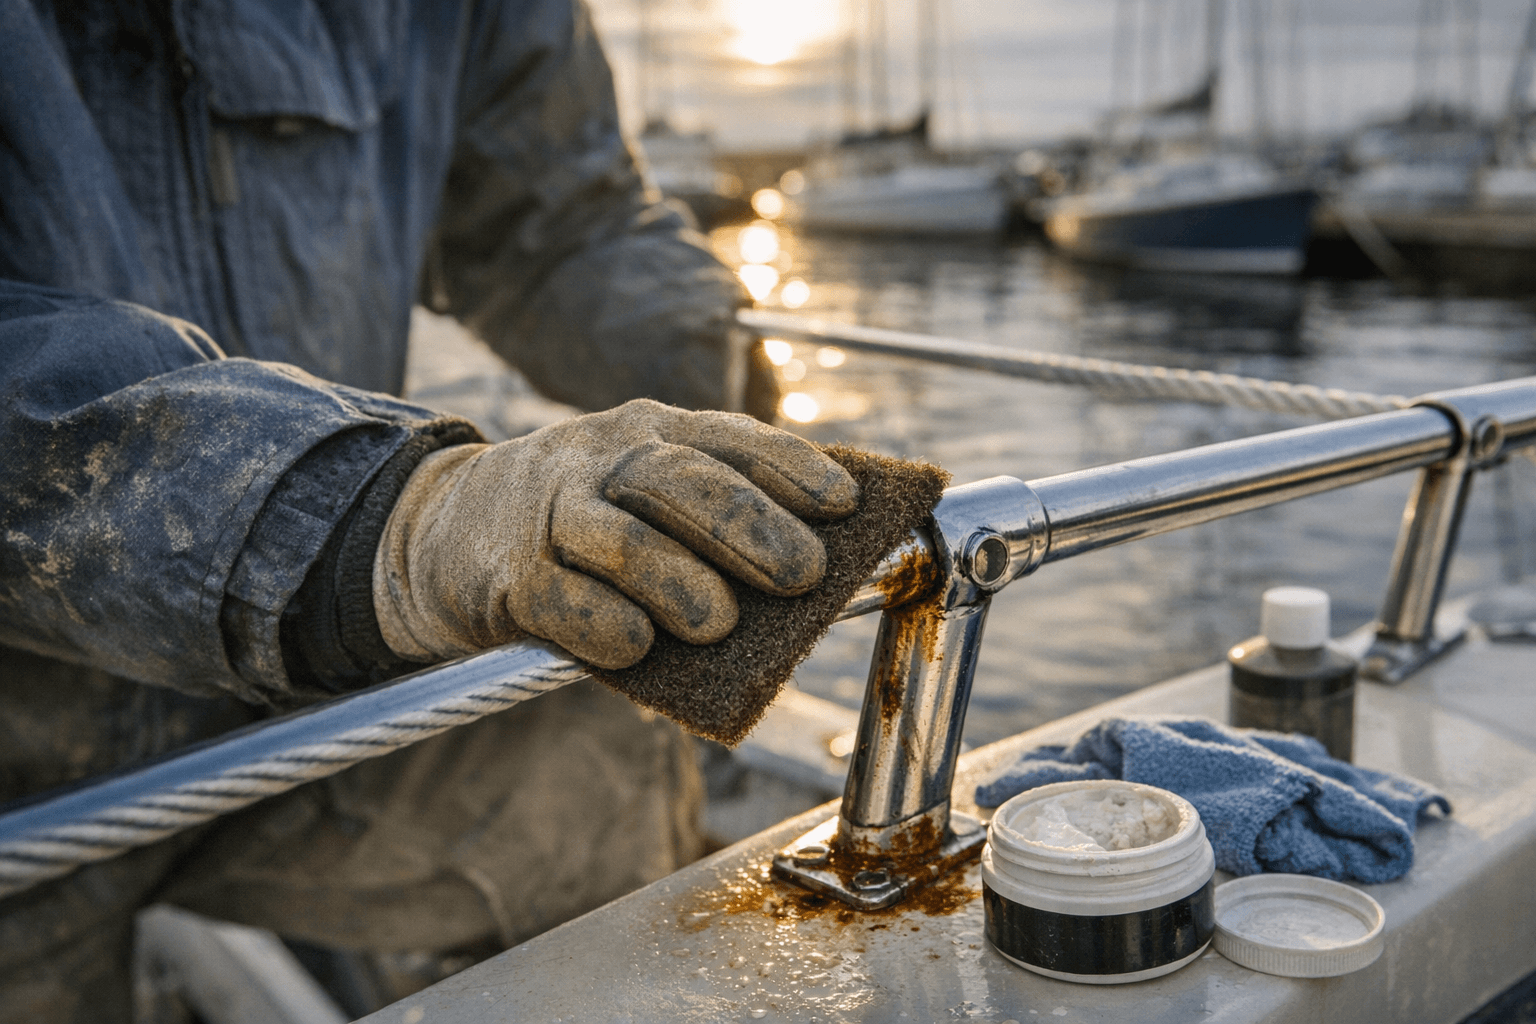
Polishing otherwise rough or irregular stainless steel minimises surface staining because polishing removes micro-pits where corrosion gets its start. Working through progressively finer abrasive pads (from 400-grit wet-dry down to a non-scratch finishing pad), then buffing with a metal polish compound, closes the microscopic surface texture where chlorides congregate. The labour cost is high for a full set of rails, and it's rarely necessary on hardware that hasn't been physically damaged; but on scratched or heavily weathered stanchions, a polish step before passivation produces dramatically better long-term results. A buffing kit with compound runs $20 to $40; the time investment on a full lifeline run is several hours.
What Never to Do: The Abrasive Trap
Steel wire brushes, sandpaper, or steel wool should never be used on marine stainless steel. This isn't squeamishness about scratches; it's chemistry. Steel wool and carbon steel brushes leave particles embedded on the surface that will rust and stain it. Those embedded carbon steel fragments become independent corrosion sites, creating surface rust on hardware that was otherwise sound. The same applies to grinding work performed nearby: any saw or grinder used in proximity to stainless railing will contaminate the area, causing iron particles to be airborne and rusting wherever they land. Chlorine bleach is equally destructive; it attacks the passive layer directly and can cause pitting that acid treatments cannot reverse.
Prevention Protocol: The Four-Step System
Beating tea staining long-term comes down to consistency, not chemistry.
1. Rinse after every saltwater day. A fresh-water hose-down after sailing removes chloride deposits before they can breach the passive layer.
Focus on rail bases, stanchion feet, cleats, and any fitting with a crevice where salt water pools and oxygen is excluded.
2. Tool segregation. Keep a dedicated set of stainless-only brushes, pads, and polishing cloths.
Never use the same grinding wheel or wire brush on carbon steel and stainless in the same session. Label them and store them separately.
3. Post-grinding protocol. If grinding, welding, or cutting has occurred anywhere near the boat's stainless hardware, treat the contaminated surfaces immediately: flush with copious fresh water, clean with an oxalic acid cleaner, and follow with a citric acid passivation.
Don't wait for visible rust to appear; the iron particles are already there.
4. Protective barrier, every season. After any cleaning and passivation cycle, apply a thin protective layer: marine wax, a purpose-made corrosion inhibitor, or a light coat of oil on hidden fasteners.
This slows chloride access to the passive film and buys weeks of protection between maintenance intervals.
Hardware with deep pitting or through-corrosion at load-bearing points (chainplates, lifeline swages, stanchion bases) is a different conversation entirely; no surface treatment substitutes for inspection and replacement when structural integrity is at stake. But for the vast majority of surface rust that shows up before a sailing trip, the damage is cosmetic, the chemistry is reversible, and the cost of putting it right properly is measured in an afternoon and a $30 parts-store run. The passive layer rebuilt correctly today is the reason those same rails still look clean in three years.
This article was produced by Prism’s automated news system from verified source data, official records, and press releases, then run through automated quality and moderation checks before publishing. The system is built and supervised by the people who set the standards it runs under. Read our full AI policy.
Know something we missed? Have a correction or additional information?
Submit a Tip