Rebuilding Natasha’s electrical panel for safer, clearer cruising
Natasha’s panel stopped being a patch job, so Bert Vermeer rebuilt it as a clearer system with separated loads, labeled breakers, and instant-at-a-glance status.

When patching stops making sense
Natasha’s old electrical panel had reached the point where every fix created another compromise. On the 1978 Islander Bahama 30, the wiring had turned into a rat’s nest after years of additions by previous owners, and many of the original breakers were doing double or triple duty for gear like water pumps and GPS plotters. Once a panel gets that tangled, the job is no longer to hide the mess behind a new faceplate. The real task is to redesign the system so the boat makes sense again.
That is the useful lesson in Bert Vermeer’s rebuild: a tired panel is not just worn out, it is often structurally wrong for how the boat is actually used. Natasha’s panel became a custom project because the old arrangement could not be sensibly patched into safety or clarity. On an older production boat, that is often the moment when rebuilding starts to look less ambitious than trying to keep a bad layout alive.
Designing around the boat, not the catalog
Vermeer chose to build a completely new panel because off-the-shelf panels from Blue Sea Systems, West Marine, and others did not fit Natasha’s limited space or the capacity he needed. That decision matters more than it sounds like it does. A custom panel is not just about getting more breakers into the same footprint, it is about matching the panel to the boat’s actual layout, service access, and electrical priorities.
Natasha is a 1978 Islander Bahama 30, a model now out of production that shares its hull design with the Islander 30 Mk II. That older-boat reality is exactly why a catalog solution often falls short. The original article makes the point clearly: once you are working inside an older hull, the best answer may be to stop forcing modern parts into an outdated shape and instead build a panel that fits the boat’s geometry and the owner’s cruising plan.
The first job was sorting the loads
Before choosing hardware, Vermeer calculated the amperage loads for each device. That is the step that keeps a custom panel from becoming a pretty but dangerous accessory. Once the loads were known, he selected Blue Sea Systems C-Series single-pole circuit breakers, which gave the project a properly sized protection scheme instead of the grab-bag logic that had evolved over the years.
He also separated critical circuits so one failure would not snowball into a larger outage. The VHF radio, GPS plotter, and propane control were among the loads he isolated, which is exactly the kind of decision that makes a cruising boat easier to live with offshore or at anchor. If one branch trips, the whole electrical system should not go dark along with it.
A practical way to think about the sequence is this:
- identify every load on the boat
- calculate its amperage draw
- group circuits by function, not by where the old wire happened to land
- choose breakers that match the loads and the space available
- leave room for future service instead of packing the panel edge to edge
That is the difference between replacing parts and rebuilding architecture.
Making the panel readable at a glance
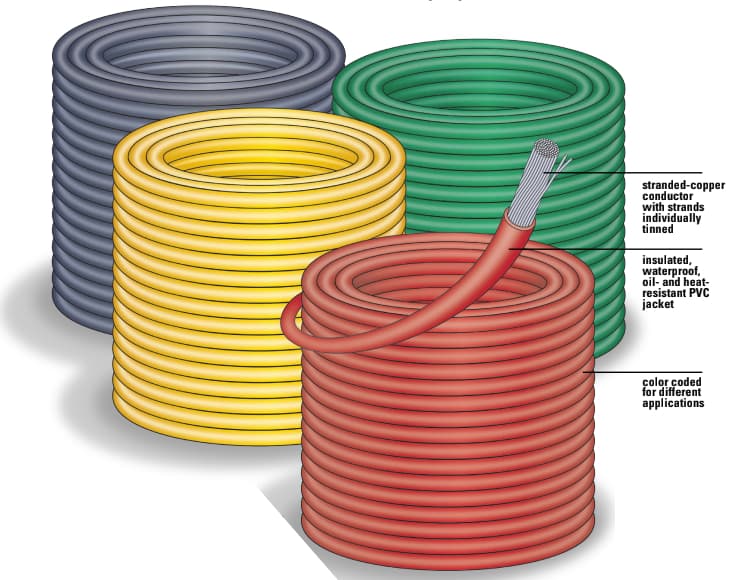
Vermeer did not stop at breakers. He added LED indicator lights so the crew could see what was energized without opening the system up and tracing wires by hand. The color coding, green, amber, and red, is a small detail that pays off every time someone reaches for a switch in low light or wants to know immediately which circuits are live.
That kind of visual clarity is especially valuable on a cruising boat, where multiple people may use the system and not everyone will remember the same sequence of switches. Blue Sea Systems sells LED indicator lights in red, green, and amber, which lines up neatly with Vermeer’s approach to making the panel more legible to the person standing in front of it. The result is not just cleaner appearance. It is a panel that communicates.
Adding visibility where the system needs it most
The plan also included a battery monitor, and Vermeer chose the Xantrex LinkLite Battery Monitor. That is another smart refit move, because once you are opening up the electrical system, it makes sense to add visibility instead of only replacing worn hardware. A battery monitor turns the panel from a passive distribution point into an information center, helping the skipper understand what the bank is doing instead of guessing.
That is the deeper pattern in this rebuild. Every time Vermeer had a chance to add a component, he used it to reduce ambiguity. Breakers were no longer overloaded. Circuits were no longer bundled into a mystery box. Status was no longer hidden. On a boat, that kind of clarity saves time at anchor and stress underway.
Why the standards matter
This panel rebuild also sits inside a larger marine-safety framework. ABYC E-11 covers AC and DC electrical systems on boats, including load calculations, panelboards, overcurrent protection, grounding and bonding, and wiring. ABYC recommends compliance with E-11 for systems and equipment manufactured or installed after July 31, 2004, which makes the panel’s emphasis on load planning and circuit protection more than a personal preference.
For a DIY sailor, that is the takeaway worth carrying into the next refit. A custom panel is not an excuse to improvise. It is a chance to bring an older boat closer to a clear, recognized standard of electrical practice while still respecting the realities of an older hull and limited space.
Part of a longer modernization
Natasha’s panel was not an isolated project. Vermeer’s 2005 vacation log says the boat was purchased in early winter 2001 and had already received substantial upgrades by then, including new standing and running rigging, a 130% genoa on Harken furling gear, cockpit-led controls, a re-wired mast, a new pressure water system, a holding tank, interior lighting, stereo, VHF radio, and other improvements. That long list tells you something important about the boat’s evolution: the electrical panel was one stage in a broader, multi-year effort to turn a 1978 cruiser into a better cruising platform.
That is why this rebuild lands so well as a workshop-level example. It shows the sequence that matters most on an older boat: assess the mess, calculate the loads, decide what must be isolated, choose hardware that fits the boat instead of fighting it, and build for legibility and future service. When the old panel has become a rat’s nest, the answer is not one more patch. It is a cleaner system that finally lets Natasha’s wiring make sense again.
Know something we missed? Have a correction or additional information?
Submit a Tip