Find Tuna Faster Using Key Environmental Signals Offshore and Coastal
Temperature breaks, bird activity, and bait concentrations aren't lucky guesses — they're readable signals that put you on tuna faster than any single waypoint ever will.
The difference between a crew that limits out on yellowfin before noon and one that runs 60 miles of blue water without a hookup often comes down to one thing: knowing what to look for before you ever leave the dock. Tuna don't scatter randomly across the ocean. They stack where the ocean gives them what they need — bait, oxygen-rich water, and thermal edges that corral prey. Once you learn to read those signals, the water stops looking like a featureless expanse and starts looking like a map.
Temperature Breaks: The Single Most Important Feature on Your Screen
No environmental signal produces tuna more reliably than a sharp temperature break. These are the boundaries where two water masses of different temperatures converge, and they function like underwater walls that bait cannot easily cross. Bluefin, yellowfin, and albacore all use these edges to ambush concentrated prey, which means a break that shows a 4- to 6-degree differential over a short lateral distance is worth investigating even before you mark a single fish on the sounder.
Your starting point is sea surface temperature (SST) charts pulled before departure. Satellite SST overlays, available through services like Hilton's Realtime Navigator, Terrafin, and Roff's Ocean Fishing Forecasts, give you a composite picture updated daily or near-daily. Look for tight color gradients on the chart — that compressed color banding represents a strong temperature gradient on the water. Once offshore, your chartplotter's SST readout lets you run the edge in real time, watching for the exact degree where warm blue water meets the cooler green. That degree marker is where you slow down, deploy a spread, and start watching the surface.
Not all breaks are equal. A dirty, foam-lined edge where current systems collide is often more productive than a clean break with no surface debris, because floating weed lines and slick edges trap bait and create ambush structure. Work parallel to the break rather than crossing it repeatedly, and pay close attention to corners or points where the edge bends — those inflection points concentrate bait even further.
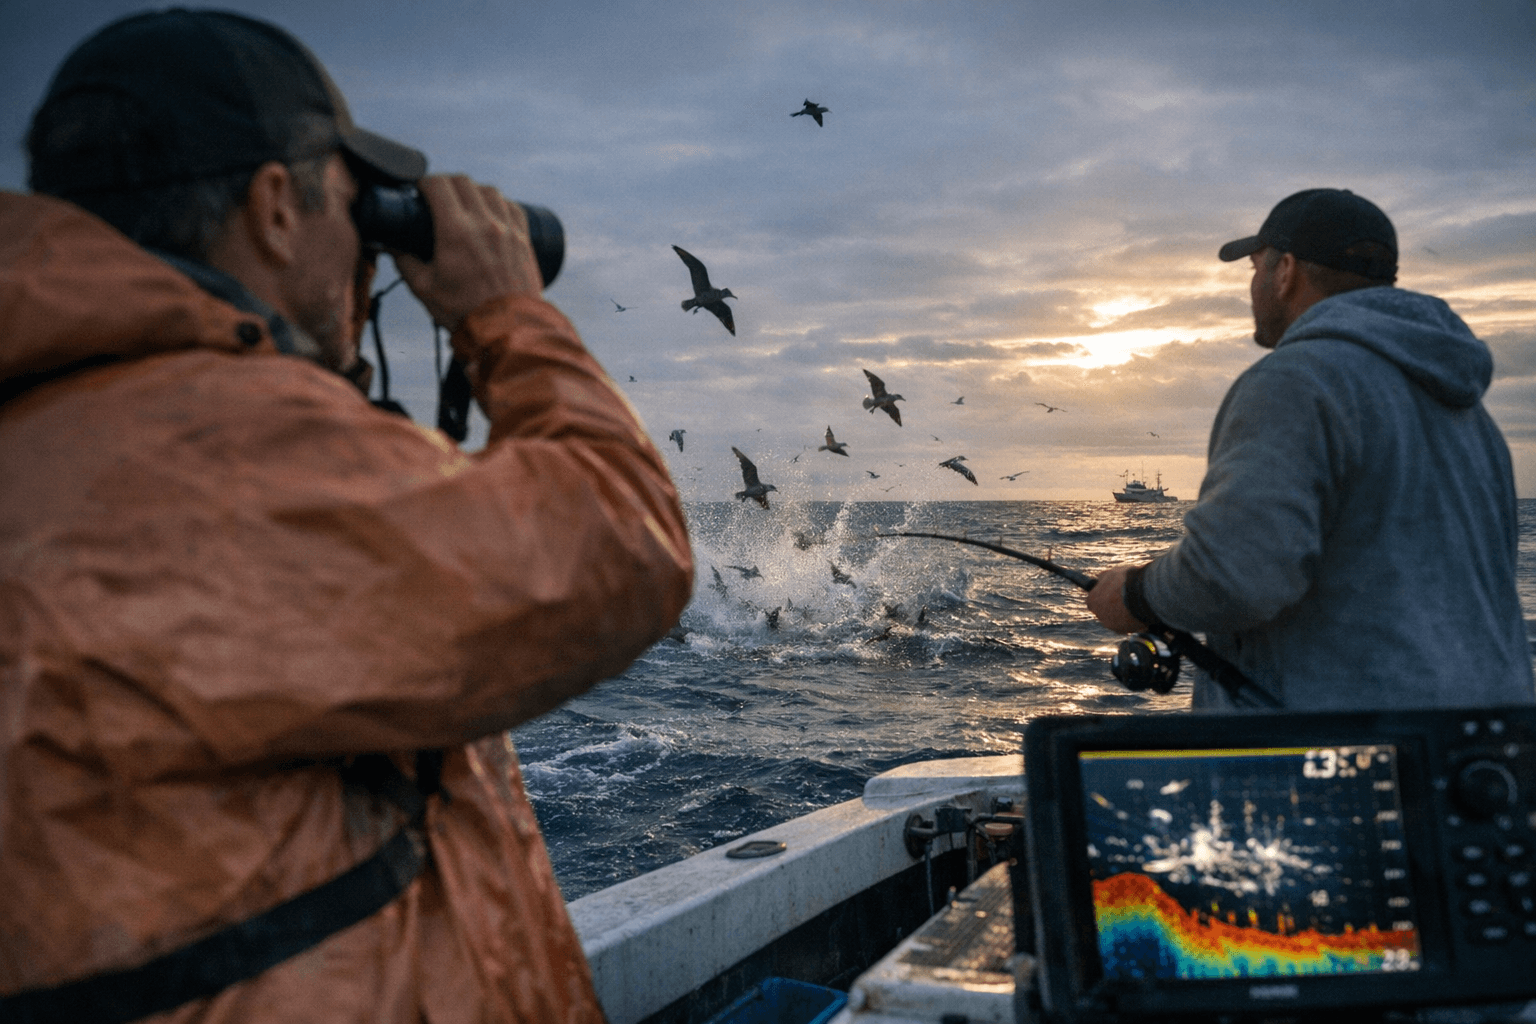
What the Birds Are Telling You
Experienced offshore captains treat frigatebirds, shearwaters, and diving terns as real-time sonar. When tuna push bait to the surface, seabirds are often the first indicator visible from miles away. A working flock — birds diving repeatedly in a tight area rather than drifting or circling lazily — signals active feeding below.
The species of bird matters. Frigatebirds, with their distinctive forked tails and long wingspans, often hover over subsurface activity without diving, acting more as sentinels than participants. Shearwaters and petrels flying in low, fast lines across the water are following bait schools. When you see different species working the same area simultaneously, treat it as a high-confidence signal: something significant is happening beneath the surface.
Approach a working bird school from downwind and downsea so you don't drive through the bait. Cut the throttle well outside the activity, assess the direction the fish are moving, and position ahead of them rather than into the middle of the melee. Driving through a blitz once can scatter the school and end the bite for everyone within range.
Reading Bait and Surface Activity
Tuna don't congregate without bait, and understanding what bait species you're dealing with changes how you fish. Sardines, anchovies, squid, flying fish, and mackerel each behave differently at the surface and require different presentations. Balled-up bait sitting tight and nervous on the surface usually means predators are working from below — slow down and look for flashes, spraying baitfish, or the purple-blue backs of tuna breaking the surface.
Subsurface bait arches on your fishfinder tell a deeper story. A solid red arch at 80 to 150 feet with tuna marks suspended just above it is a textbook setup for vertical jigging or dropping live baits. Diffuse, scattered bait marks without predator marks above them often indicate bait that has already been pushed through — the tuna have moved on, and so should you.
Flying fish are a particularly useful indicator offshore. Yellowfin in warm blue water frequently herd flying fish, and when you start seeing flying fish erupting out of the water ahead of your bow in numbers, slow down and look at the temperature readout. You're often sitting right on productive water.
Offshore Structure: Canyons, Seamounts, and Current Edges
Underwater topography concentrates the same upwelling and current interactions that produce temperature breaks at the surface. Submarine canyons along the Atlantic shelf edge — Hudson Canyon, Norfolk Canyon, Baltimore Canyon among them — funnel the Gulf Stream in ways that push nutrient-rich cold water up against warm offshore water. The result is a persistent edge that attracts bait and tuna season after season.
Seamounts function similarly in Pacific and open-Atlantic fisheries. The upwelling around a seamount's peak creates localized productivity that holds albacore and yellowfin reliably enough that long-range boats target specific named banks on every trip. Korona Bank, Tanner Bank, and the Cortez Ridge are the kind of coordinates that experienced long-range crews mark permanently in their plotters.
Current edges tied to the Gulf Stream or California Current are worth following laterally even when no temperature break is visible at the surface. A color change in the water, from greenish-blue to deep cobalt, often marks the current boundary more clearly than any SST reading, particularly on overcast days when satellite data is cloudy and older.
Putting the Signals Together
The most productive tuna spots offshore are almost always intersections of multiple signals, not single features. A temperature break that lines up with a color change, a floating weed line, active bird life, and bottom structure beneath it is about as good as offshore fishing gets. Learning to synthesize these signals simultaneously, rather than chasing each one individually, is what separates consistently productive captains from those who run on luck.
Before each trip, layer your SST charts against bathymetric maps and recent catch reports from nearby ports. Identify two or three candidate areas where multiple signals overlap, then run to your best candidate first. If the signs aren't there when you arrive, don't anchor to a single waypoint: trust the water reading and follow the edge. Tuna move, and so should you.
The ocean is constantly giving you information. The anglers who find fish first are simply the ones who learned to listen.
This article was produced by Prism’s automated news system from verified source data, official records, and press releases, then run through automated quality and moderation checks before publishing. The system is built and supervised by the people who set the standards it runs under. Read our full AI policy.
Did this article answer your question?


