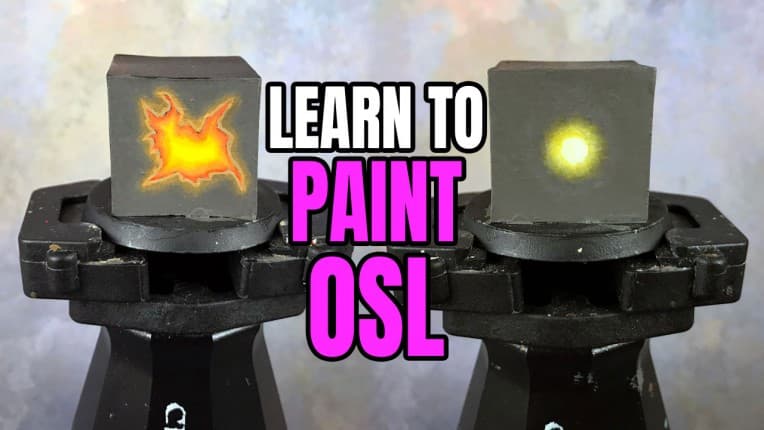
How to Achieve Easy OSL Glow Effects Using Speedpaints
Speedpaint Nuclear Sunrise turns OSL from an airbrush-only skill into something any hobbyist can pull off with a few careful glazes.
OSL gets thrown around a lot in hobby spaces, often as shorthand for any lighting effect that looks dramatic or fancy. But before you pick up a brush, it's worth getting the definition straight, because the technique only makes sense once you understand what you're actually simulating.
As Goonhammer's keewa explains in the Hobby 102 tutorial "Easy OSL Glow with Speedpaints," "OSL is a much pithier way of saying 'Object-Source Lighting,' i.e, that the light on the object comes from an element of the object. This is distinct from, and separate to, simple 'dramatic lighting,' although the two are often conflated in online hobby spaces in such a way that the initialism is used as a stand-in for any kind of fancy or dramatic lighting. Here, though, we need to be clearer in our terms, hence the particular discussion over what is and what isn't OSL."
That distinction matters practically, not just semantically. If the light source isn't actually part of the model — a candle, a plasma coil, a glowing axe blade, a shoulder lamp — then what you're painting isn't OSL. Keep that in mind as you look at your own models and identify where the technique applies.
What counts as OSL on your models
The clearest examples are models with obvious internal light sources. A Genestealer Acolyte Hybrid with a shoulder-mounted lamp casting an orange glow on the surrounding surfaces. A Goblin Shamaness with magical flames. Berekh Stornbrow with a dark orange, dimly glowing axe blade. In each case, the light originates from a part of the model itself and then illuminates nearby surfaces, which is exactly what you're trying to represent with paint.
Keewa puts it simply regarding models with magical flames: "The various magical flames on these models cast a soft-ish glow on nearby surfaces – the source of the light is on the object, thus it is Object Source Lighting." The test is always the same: does the light come from the model? If yes, you've got a candidate for OSL.
Why Speedpaints make this accessible
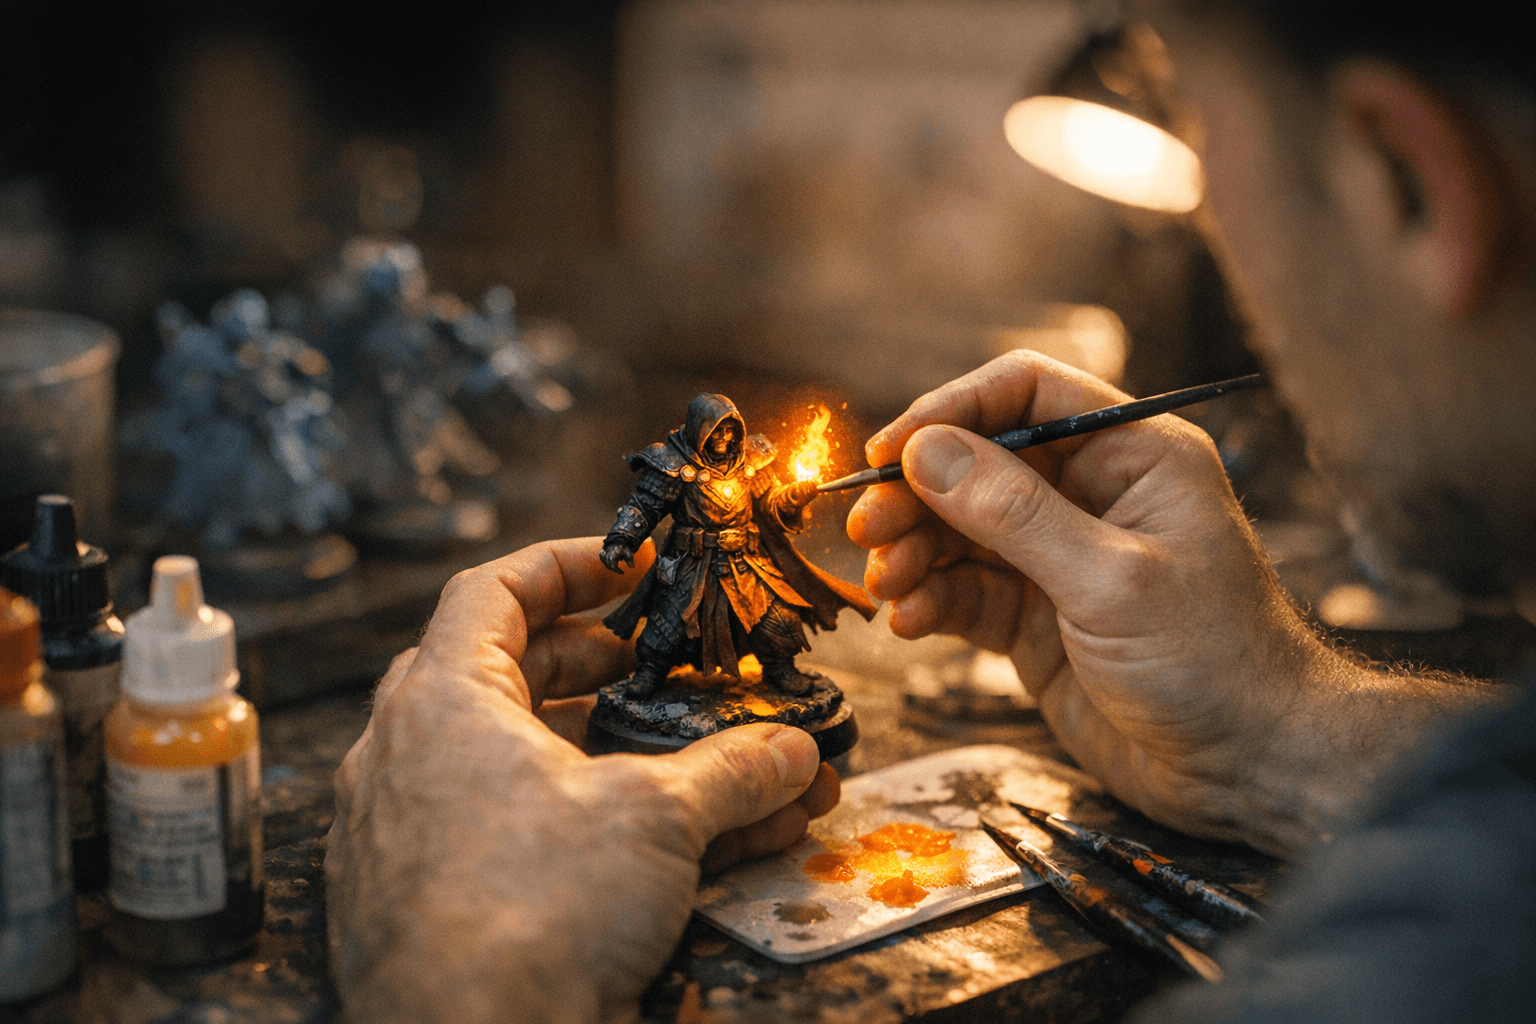
Traditional OSL done properly with an airbrush is genuinely complex work — gradients, masking, multiple passes, colour theory applied with precision. That's not what this technique is. The whole point of using Speedpaints here is to lower the barrier to entry while still producing a convincing, readable result.
As keewa states directly: "Speedpaints are really useful to create a low-effort OSL glow through glazing." The key property that makes them suited to this is their translucency. When thinned and applied as a glaze, a Speedpaint deposits a thin, semi-transparent layer of colour over whatever is underneath. You're not obscuring your base coat or highlights; you're tinting them with the hue of the light source. That hue shift is what sells the illusion.
The specific product keewa uses throughout this tutorial is Speedpaint Nuclear Sunrise, a warm orange tone that works across multiple model types. It appears on the Goblin Shamaness, where it glazes the shoulder highlights to simulate the warm cast of magical flames, and on Berekh Stornbrow, where it reads as the ambient glow from a dark orange axe blade.
The technique: glazing for hue-shifted highlights
The application is straightforward but requires restraint, particularly when the light source itself is dim or desaturated.
On the Goblin Shamaness, the Nuclear Sunrise glaze creates "soft hue-shifted highlights on shoulder," pulling the colour of the existing highlights toward the warm orange of the flames. The result is subtle but legible: the shoulder reads as if it's being lit from nearby.
The Berekh Stornbrow example is where keewa's guidance on subtlety becomes critical. The axe blade on that model isn't a blazing light source. It's dark orange, glowing only faintly. To represent that accurately, the OSL on surrounding surfaces needs to be correspondingly restrained: "on Berekh Stornbrow I glazed a little Nuclear Sunrise on the parts that would receive a slight glow from the axe blade, taking care not to overdo it – the axe blade isn't glowing brightly, it's a dark orange, so in order to read correctly the OSL glow needs to be very slight, only a minor hue-change on the required parts."
This is arguably the most important principle in the whole tutorial. The intensity of your OSL glaze should match the intensity of the light source you're representing. Overdo it and you undermine the realism of the effect; the surrounding surfaces end up looking brighter than the source itself, which reads as wrong even to viewers who couldn't articulate why.
Applying this to your own work
The practical workflow keewa demonstrates comes down to a few key decisions:
- Identify the light source on your model (lamp, flame, glowing weapon, plasma coil) and note its colour.
- Select a Speedpaint that matches or complements that hue — Nuclear Sunrise for warm orange sources, but the principle extends to any colour.
- Apply the glaze thinly to the surfaces that would physically receive light from that source: the underside of armour plates, the shoulder closest to a flame, the hand gripping a glowing weapon.
- Calibrate the intensity of the glaze to the brightness of the source. A dim, dark orange blade warrants only a minor hue shift. A blazing magical flame can carry a more saturated glaze.
- Build up in layers rather than trying to nail it in one pass; glazes are forgiving precisely because they're transparent.
The Genestealer Acolyte Hybrid demonstrates a straightforward application of these principles. The shoulder-mounted lamp on that model has a clear directional cast, and the orange glow falls on the nearby armour surfaces exactly as physics would suggest. That kind of spatial thinking — where is the light, what surfaces does it hit, how bright is it — is what separates convincing OSL from an arbitrary colour smear.
Where this technique ends
Keewa is upfront about the limits of this approach. Speedpaint glazing gets you clean, readable OSL with minimal equipment and effort. It isn't a substitute for the full airbrush workflow when you need hard-edged gradients or high-contrast glow effects: "You can certainly go further and produce more complicated OSL with an airbrush (and I often do) but that is somewhat outside the scope of this particular article."
That's a useful framing. If your goal is a competition-level centrepiece with dramatic, saturated OSL radiating across an entire model, this technique is a foundation rather than a final destination. But for getting solid, convincing glow effects onto a battle-ready model without a compressor on your desk, Speedpaint glazing punches well above its weight class.
The Nuclear Sunrise results across three very different models — a Goblin Shamaness, a Genestealer Acolyte Hybrid, and Berekh Stornbrow — demonstrate how adaptable the approach is. One pot of paint, applied with restraint and an understanding of where the light actually falls, produces OSL that reads correctly at arm's length and holds up under closer inspection. That's a strong return on what is, in practice, a pretty small investment of time and materials.
This article was produced by Prism’s automated news system from verified source data, official records, and press releases, then run through automated quality and moderation checks before publishing. The system is built and supervised by the people who set the standards it runs under. Read our full AI policy.
Did this article answer your question?