BoatUS Details Selecting, Sizing and Installing Boat DC-to-AC Inverters
BoatUS lays out a clear, boat‑centric path: choose pure‑sine for sensitive gear, size for both running and start loads, and wire/fuse an inverter to your battery bank for safe, reliable AC aboard.
Start here: BoatUS’ how‑to is built for practical installs on recreational boats, pick the inverter type, size it to the appliance starting and running loads, and wire it so the battery bank and protection gear won’t fail when you actually use the gear. Below I break BoatUS’ steps into a boat‑by‑boat checklist you can follow in a single weekend, with the safety items you really can’t skip.
1. inverter basics: pure‑sine vs. modified wave
BoatUS explains the fundamental tradeoff: pure‑sine inverters replicate utility power and are the safe choice for sensitive electronics, AC motors, and inverter‑fed chargers, while modified‑wave units can run simple tools and incandescent loads more cheaply. Use BoatUS’ guidance to match the waveform to the loads you’ll run, computers, chartplotters, and variable‑speed pumps demand pure‑sine to avoid noise, nuisance trips, or premature failure. BoatUS emphasizes that the decision affects downstream wiring and battery sizing because pure‑sine inverters tend to be slightly less efficient but protect expensive gear.
2. sizing for running and starting loads
BoatUS stresses that proper sizing starts with two numbers for every appliance: continuous (running) watts and peak (starting) watts. Record the rated running watts on the label and add the quoted motor starting surge, BoatUS warns many buys fail because they ignore that surge. BoatUS recommends tallying total continuous wattage and ensuring the inverter’s continuous rating comfortably exceeds that figure while the inverter’s surge rating covers motor starts; leaving margin avoids tripping and protects the inverter.
3. continuous rating vs. surge capacity
BoatUS differentiates continuous power rating (what the inverter can sustain) from surge capacity (short bursts it can handle for motor starts). Match the inverter’s continuous rating to your calculated running load, and confirm its short‑term surge rating is high enough for simultaneous starts (e.g., refrigerator compressor plus pump). BoatUS recommends a safety buffer, don’t spec an inverter that runs at its maximum continuous rating for extended periods, because heat and battery drain shorten component life.
4. battery bank capacity implications
BoatUS ties inverter selection directly to battery bank amp‑hours and usable depth of discharge: bigger inverters pull more current and shorten runtime. When sizing batteries, BoatUS advises converting anticipated AC watt‑hours into DC amp‑hours accounting for inverter efficiency, plan for realistic inefficiencies and higher draw during motor starts. BoatUS also highlights that a small battery bank paired with a large inverter can result in rapid voltage drop and frequent inverter cutouts, so balance inverter size to battery capacity, not just appliance needs.
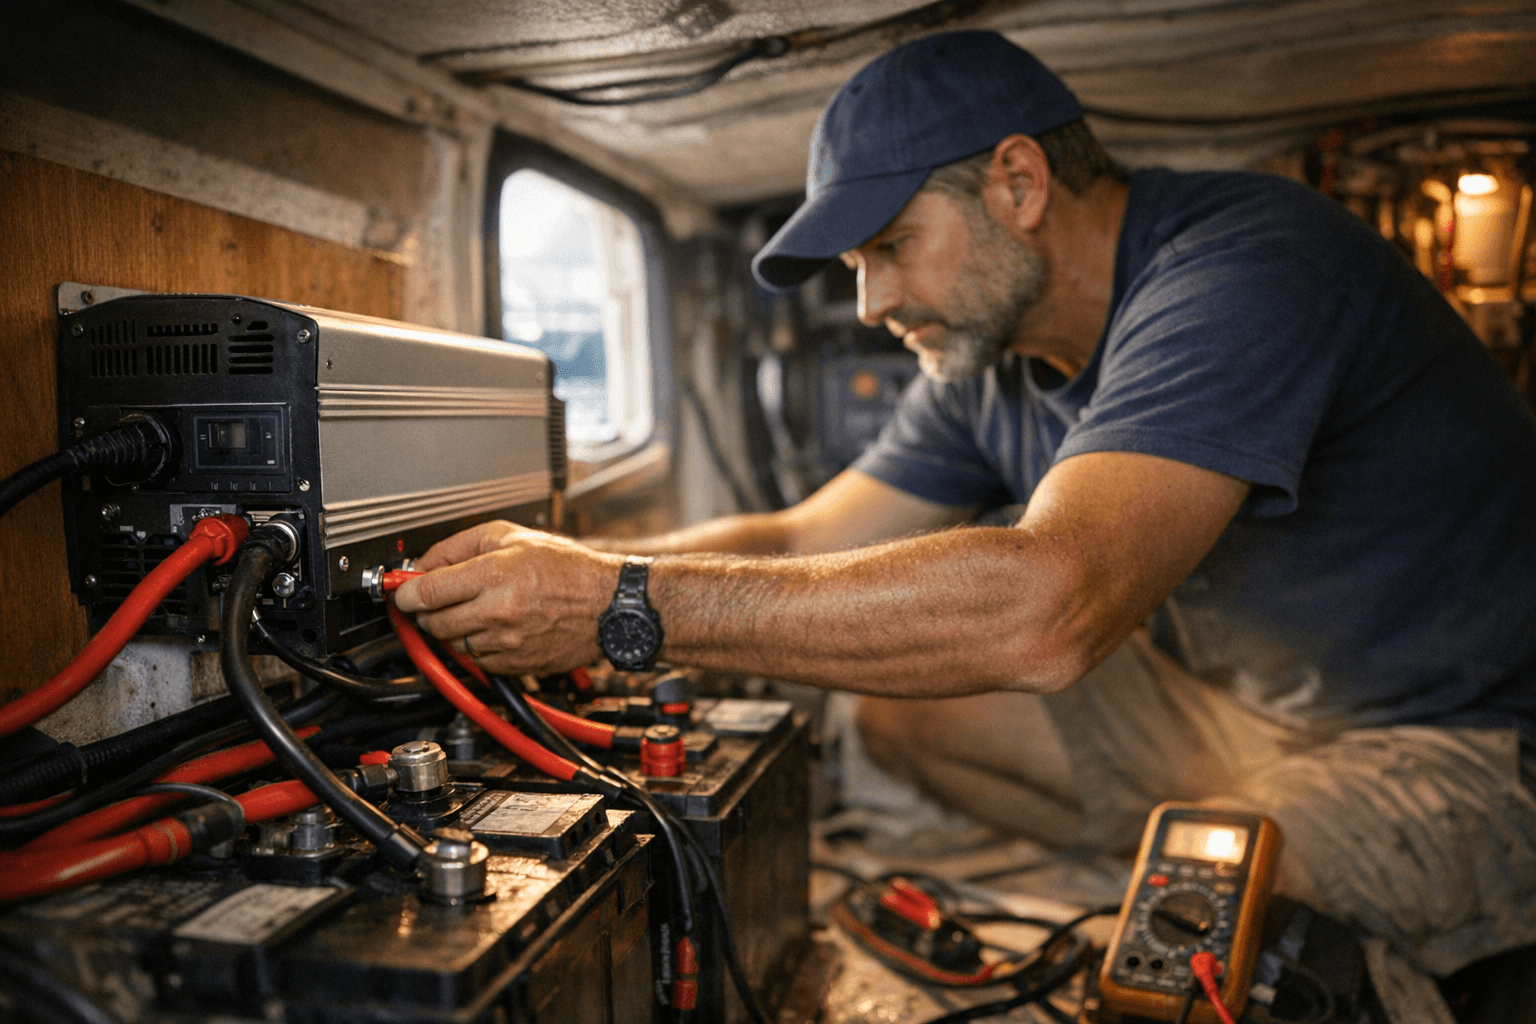
5. cabling: minimize voltage drop and heat
BoatUS is explicit: DC cable sizing is not optional. Use short, heavy cables between batteries and the inverter to limit voltage drop and heat buildup; run the shortest direct route practical and avoid thin, long runs that waste power and stress the inverter. BoatUS advises placing the DC fuse within inches of the battery positive terminal (see next item) and securing cables away from moving parts and chafe points. Proper cable lugs, crimping tools, and heat‑shrink or heat‑sealed terminations are part of a durable installation BoatUS recommends.
6. fuse and circuit protection
BoatUS covers protection on both the DC and AC sides: fit a DC fuse or breaker sized to the inverter’s maximum DC input current as close to the battery as possible to protect the cable and boat from a short. On the AC side, BoatUS recommends appropriate circuit‑breaker protection for the inverter’s output circuits to protect appliances and to conform with standard marine practices. BoatUS also flags the need for manufacturer‑recommended disconnects and remote‑off switches so you can safely isolate the inverter.
7. mounting, ventilation, and location
BoatUS recommends mounting the inverter on a solid, vibration‑resistant surface with space for airflow, don’t bury it in a locker or flush‑mount without clearance. Locate the inverter near the batteries to shorten DC runs but not in a bilge where splash, fuel fumes, or corrosion will shorten life; BoatUS priorities are short cables, dry environment, and accessible remote switch wiring. Leave the manufacturer‑specified clearance for cooling and keep the inverter away from heat sources and direct sunlight to maintain safe operating temperatures.
8. grounding and bonding
BoatUS underscores following the inverter manufacturer’s grounding instructions and integrating the unit into the boat’s electrical bonding system the same way other AC equipment is treated. Proper grounding avoids stray currents, reduces noise, and helps the inverter’s protective devices operate correctly. BoatUS recommends that installers confirm the inverter’s AC bonding arrangement matches the boat’s shore power and generator arrangements to prevent ground‑fault surprises.
9. coordination with chargers and shore power
BoatUS instructs you to plan how the inverter will coexist with the battery charger and shore power: use a transfer device or follow the inverter manufacturer’s recommended configuration so the inverter won’t backfeed shore power or conflict with an onboard charger. BoatUS notes that switching behavior (auto transfer, inverter pass‑through, or dedicated transfer switches) matters when you rely on shore power and when charging batteries while running AC loads. Make sure manual or automatic transfer controls are wired as BoatUS suggests to avoid nuisance trips or unsafe backfeed.
10. commissioning and testing
BoatUS lays out a stepwise commissioning routine: verify DC fuse is installed at the battery, connect DC cables and turn the inverter on with no load, confirm stable output voltage, then apply small loads and monitor voltage, inverter temperature, and battery voltage under load. BoatUS recommends testing motor starts and larger appliances one at a time to observe surge handling and that protections operate as expected. Keep a multimeter on hand and record voltage readings to spot excessive voltage drop or unstable battery voltage.
11. common pitfalls and practical tips
BoatUS’ practical warnings are the most useful part: don’t skimp on DC cable size, don’t ignore surge ratings, don’t mount the inverter where it will get wet, and don’t pair a large inverter with a tiny battery bank. BoatUS also advises planning for maintenance access and labeling DC and AC disconnects so the next owner or cruiser knows what was changed. Practical tip from BoatUS: install the fuse at the battery, leave clearance for ventilation, and buy a remote on/off switch kit if you’ll be accessing a locker.
12. next steps and a reader note
If you’re planning an install on a small cruiser or outboard‑powered weekend boat, follow BoatUS’ checklist, select waveform first, size for running and starting loads second, then match wiring and fusing to the battery bank. If you complete an install this season, share one clear photo and your boat type with Sailing DIY’s desk (one image and two lines of setup notes) so we can feature a real‑world install and call out what went right, real installations help others avoid the common mistakes BoatUS outlines.
Final point: doing the inverter homework BoatUS lays out, pick the right waveform, account for starting surges, right‑size the battery bank, and wire/fuse exactly as advised, turns an inverter from a risky add‑on into reliable AC aboard, safeguarding electronics and keeping the lights on when you need them.
Know something we missed? Have a correction or additional information?
Submit a Tip

