Build durable, photogenic Labubu dioramas for display and photos
A practical guide to building sturdy, photo-ready Labubu dioramas using safe materials and lighting. Includes a full seaside tabletop project and display, lighting, and photography tips.

Labubu figures shine when staged, a well-built diorama protects the figure, tells a story, and elevates photos for contests or collections. This practical how-to walks through scale choices, safe materials, construction techniques, lighting and display options, and a complete seaside tabletop project you can build on a weekend.
Start with scale and safety. Decide on a working reference, many builders use 1:12 or 1:18 to match props to your Labubu figures. Use water-based acrylic paints only, and avoid solvent-based adhesives or paints near vinyl or plush finishes. When in doubt, spot-test on a hidden area and keep wax paper or plastic between wet materials and figures while drying.
Choose a sturdy base: plywood, MDF, or XPS foam are common. For structures, basswood, foamboard, and cardboard work well; terrain comes from sculpting foam, modeling clay, lightweight spackle, or plaster cloth. Ground texture uses fine sand, static grass, flocking, or small gravel. For water effects, use gloss medium or a clear two-part epoxy resin, following safety, ventilation, and PPE guidance. Adhesives that pair well with diorama materials include PVA (white glue), low-temp hot glue for delicate pieces, and silicone for water work. Seal exposed terrain with a matte or satin acrylic varnish.
You’ll need basic tools: a hobby knife, small saw for wood bases, cutting mat, sandpaper, files, sculpting tools, brushes and sponges, tweezers and clamps, masking tape, and small LED strips or puck lights for display lighting. Plan your layout with thumbnail sketches showing figure placement, foreground, middleground, and background, and design removable mounting so figures can be taken off the base safely for cleaning.
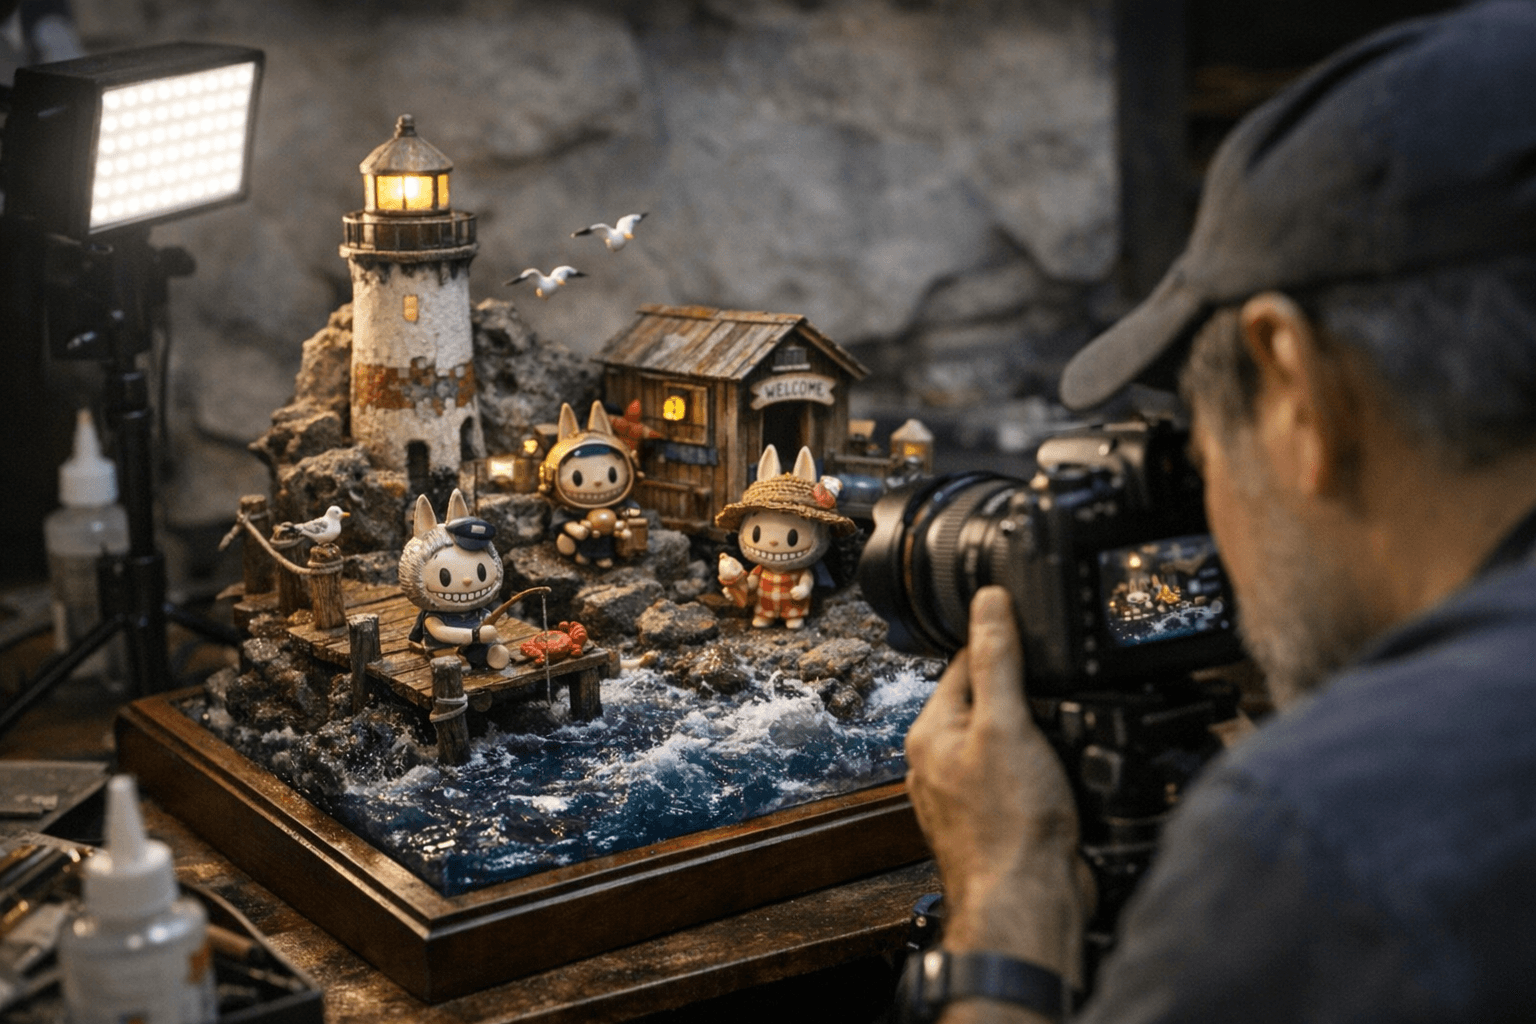
Follow this sample seaside tabletop diorama plan (approx. 30 x 20 x 10 cm). Materials include a 30 x 20 cm, 12 mm plywood base; 20 mm XPS foam for rocks and seabed; lightweight spackle; fine sand and small pebbles; acrylic paints (white, blues, greys, browns); gloss medium or clear two-part epoxy resin for water; a small shell and driftwood; satin varnish, PVA glue, and low-temp hot glue. Seal plywood with a thin acrylic base coat to prevent warping, then glue a thin rear riser for stage depth. Cut and glue XPS to form a shoreline slope and rock outcrop, carve contours, and texture with spackle, pressing in pebbles and sand while wet. Prime with a medium grey-brown, add dark washes into crevices, and dry-brush progressively lighter tones. Mask the shoreline and build water in thin gloss or resin layers, adding white highlights between pours for wave detail. Place shells, driftwood, and tufts of static grass, varnish terrain, and secure your Labubu with museum putty or Blu Tack rather than adhesives that risk contact with finishes. Add an LED strip under the rear rim or a puck light to lift visibility, then install an acrylic or glass case to cut dust and handling risks.
For photography, shoot at figure eye level, use a tripod and remote shutter, soft diffuse light, and a small aperture or focus stacking for depth of field. Maintain dioramas away from direct sunlight and high humidity; dust gently with a soft brush or low-pressure compressed air. Consider motorized or fiber-optic accents only after practicing wiring and safety.
Our two cents? Start small, practice techniques on scraps, and build removable, protected displays that invite handling, photos, and swapping. A compact, finished scene beats a sprawling, unfinished one, and a little lighting goes a long way in making Labubu feel alive.
Know something we missed? Have a correction or additional information?
Submit a Tip