Install Rockstar Games Launcher on Steam Deck via Steam Desktop Client
Add the Rockstar Games Launcher installer to your Steam Deck via the Steam Desktop Client by using "Add a Non‑Steam Game..." and run the Windows installer (Rockstar-Games-Launcher.exe) from Downloads.
1. Context and intent
Pi My Life Up published a step‑by‑step guide aimed at handheld Linux users, specifically Steam Deck owners, who want to run the Rockstar Games Launcher and manage Rockstar titles on SteamOS. The goal shown in the guide is simple: add the Windows installer to your Steam Desktop Client library, then launch the installer and complete the launcher installation so you can manage Rockstar games on the Deck.
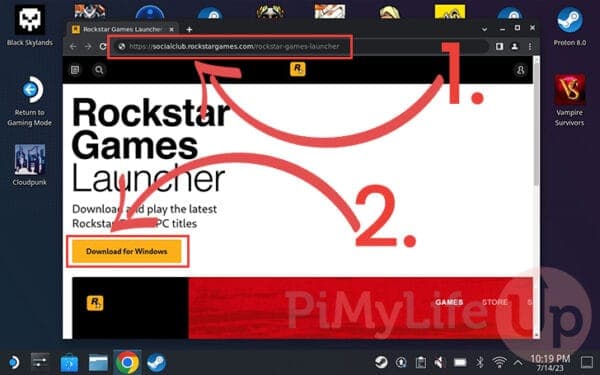
2. Preliminary: have the installer downloaded
The Pi My Life Up guide opens from the assumption that "Once you have downloaded the Rockstar Games Launcher installer, you will need to add it to your Steam Deck’s library." That installer appears in the guide as the file named Rockstar‑Games‑Launcher.exe and should already be in your Deck’s filesystem (the guide shows it being placed in Downloads). If you haven’t downloaded that .exe yet, get it on the Deck first, the procedure in this walkthrough begins after the download exists.
3. Open the Steam Desktop Client
To start, "open the Steam client by `clicking` the “`Steam`” icon on the desktop." Pi My Life Up’s screenshots and captions label this step "Open the Steam Desktop Client", which means you’re working from the SteamOS Desktop environment rather than Steam’s handheld mode. Click the Steam desktop icon exactly as shown so the Desktop Client is active before adding the installer.
4. Add the installer to the Steam Deck’s library
Once the Desktop Client is open, the guide tells you to "click the 'Add a Game' button (1.) in the bottom-left corner." From that menu, "click the 'Add a Non‑Steam Game...' (2.) button." The caption in the guide calls this sequence "Open the add a non‑steam game dialog." This creates an entry in your Steam library that points at the Windows installer rather than a Steam package.
5. Open the Add Non‑Steam Game dialog and browse
With the "Add Non‑Steam Game" dialog open, Pi My Life Up instructs you to "click the 'Browse...' button to begin adding the Rockstar Games Launcher to the Steam Deck library." The guide's screenshots include the dialog header `Add Non‑Steam Game` and the button label `Browse...`, so use that Browse control to invoke the file chooser and locate the installer you downloaded.
6. Find the installer in Downloads
The file browser step is explicit: "With the file browser open, change to the 'Downloads' folder (1.)." Once inside `Downloads`, "find and `click` the Rockstar Games Launcher installer (2.)." The guide repeats the folder label `Downloads` in its captions, so be sure you’re in that path before selecting the file.
7. Select and open the installer
After you have highlighted the .exe, follow the guide: "When the installer is selected, `click` the 'Open' button (3.)." The screenshot caption for this step is "Find and click the Rockstar Games Launcher Installer on your Steam Deck" and the file name displayed should read `Rockstar-Games-Launcher.exe`. Clicking `Open` returns you to the Add Non‑Steam Game dialog with the installer populated.
8. Add the installer to the Steam library
You should now see "the 'Rockstar-Games-Launcher.exe' file selected (1.)." At that point the guide says to "click the 'Add Selected Programs' (2.) button." After adding, the item appears in your Steam library, Pi My Life Up’s captions show the label `Rockstar-Games-Launcher` alongside a `Play` button in the library view, which is how you’ll start the installer from Steam.
9. Launch the installer and select language
"Upon starting the Rockstar Games Launcher installer on your Steam Deck, you will be asked to select the language you want to use." After choosing your language the guide instructs you to "click the 'Continue' button." The Pi My Life Up screenshots caption this as "Select installer language," so expect the typical Windows installer language screen before the installer proceeds.

10. Installer additional programs screen
The next screen "will list the additional programs installed alongside the Rockstar Games Launcher." To move forward the guide tells you to "click the 'CONTINUE' button." Note the capitalization in the original extract, the installer uses both `Continue` and `CONTINUE` in different places, follow the on‑screen `CONTINUE` when it appears to accept bundled components and progress.
11. License agreement and final install confirmation
Pi My Life Up shows that "To install the Rockstar Games Launcher to your Steam Deck, you must agree to a license agreement (1.)." After reading and accepting, the guide says to "click the 'CONTINUE' button (2.) to proceed." This step is numbered as step 17 in Pi My Life Up’s excerpt; agreeing to the EULA is required before the installer will run through the final copy/install steps.
12. Enabling Proton Compatibility (header only)
The Pi My Life Up guide contains a section headed "Enabling Proton Compatibility" but the provided excerpts do not include the body instructions under that header. The presence of the header signals the guide addresses Proton compatibility, but the exact Proton version, the Steam properties switches, or the step sequence are not present in the supplied material. Consult the full Pi My Life Up article for the precise Proton settings or follow Steam’s normal per‑game Compatibility > Force the use of a specific Steam Play compatibility tool if you need to set Proton manually.
13. Video walkthrough confirmation
A companion YouTube clip exists that mirrors this process; the only line quoted from that video in the source material is: "In this video, we will be showing you how you can install the Rockstar Games Launcher on to your Steam Deck." If you prefer a visual run‑through, seek that video to match Pi My Life Up’s screenshots with live clicks and confirmations.
14. What the guide explicitly does not show (and why that matters)
The Pi My Life Up extracts begin at step 6 and include steps 7–10 and 15–17 but omit steps 1–5 and 11–14 in the provided snippets, so the early setup details and the full Proton instructions are absent from the excerpt. That gap matters: the missing content may include pre‑install prerequisites, Desktop Mode entry instructions, or exact Proton recommendations, so don’t assume those details, check the full Pi My Life Up page before you proceed.
- If the launcher shows in your Steam library as `Rockstar-Games-Launcher` with a `Play` button, that `Play` entry is how you’ll re‑launch the installer or launcher from Games mode.
- The installer file used by the guide is `Rockstar-Games-Launcher.exe` and the Desktop Client Browse flow targets the `Downloads` folder, make sure the filename and folder match exactly.
- Expect multiple "Continue" screens: the guide shows both `Continue` and `CONTINUE` labels; click whichever appears to advance through language, bundled software, and license prompts.
15. Quick practical tips and gotchas (based on the guide’s flow)
Conclusion Pi My Life Up gives a concise Desktop‑mode method: add the Windows installer as a non‑Steam game, launch it from Steam, then accept the installer prompts (`Continue` / `CONTINUE`) and the license to install Rockstar Games Launcher from the Deck’s Downloads folder. The one clear caveat in the provided material is the incomplete Proton guidance, the guide includes an "Enabling Proton Compatibility" header but the necessary details aren’t in the supplied excerpt, so verify Proton settings in the full Pi My Life Up article before assuming the launcher will run without additional compatibility tweaks.
Know something we missed? Have a correction or additional information?
Submit a Tip