Weekend fiberglass repairs for boat owners: patch holes, blisters, delaminations
Fix small hull holes, blisters, and delaminations in a weekend using a grinder/Dremel, epoxy and cloth, basic PPE, and 2–4 hours of hands‑on work plus an overnight cure.
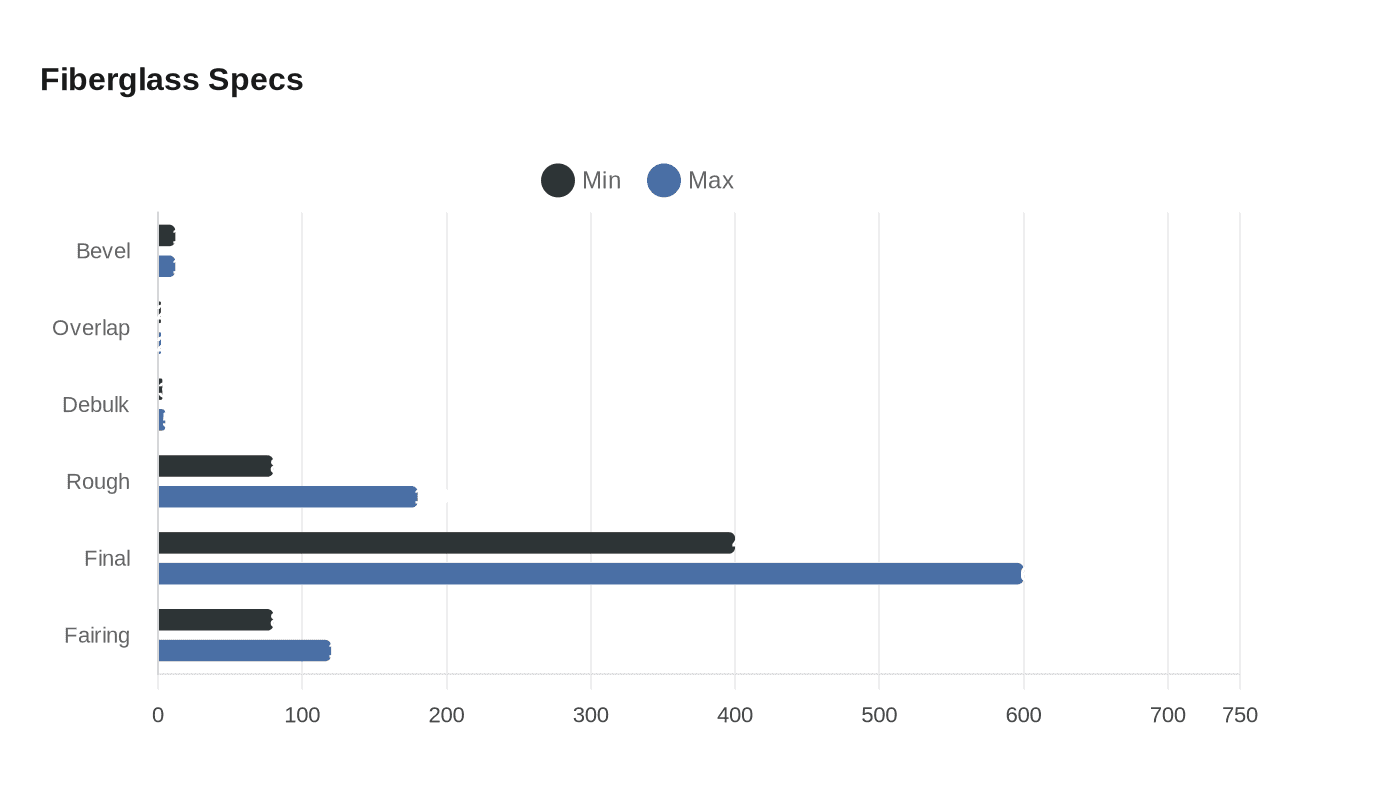
On weekend‑scale repairs, patching holes, blisters, and small delaminations, use a grinder or Dremel, pre‑cut fiberglass cloth, epoxy (or compatible resin), a plastic spreader/squeegee, a roller, and HEPA cleanup tools; expect a watertight laminate ready for fairing after hours to overnight of curing. Follow the 12:1 bevel, overlap patches at least 2 inches, debulk every 3–5 layers, and sand between 80–180 grit for roughing and up to 400–600 grit for final polish.
1. Safety first
Protect yourself and your boatyard crew. “Ventilation matters. Work outside or in a well‑ventilated area with fans.” Wear gloves and coveralls, “Gloves and coveralls protect your skin from glass shards and resin burns.” Use a respirator when sanding or mixing resin: “Respirators are a must when sanding or mixing resin.” Control dust and resin waste: “Clean up properly. Use a HEPA vacuum for dust and wipe everything down after,” and “Dispose of waste safely. Bag up resin‑soaked materials and follow local disposal guidelines.” Finally, carry basic first aid for resin splashes and fiberglass irritation: “Accidents happen. Know basic first aid for resin splashes or fiberglass irritation.”
2. Assess the damage
Outline the affected zone with a marker and run the coin‑tap test for delamination: Sea Tow recommends the coin tap method and looking for soft spots, water intrusion, moisture, or discoloration as red flags. If the damage penetrates only the gelcoat, a filler or gelcoat patch may suffice; Novielliyachts warns that “for deeper breaches, layer new fiberglass cloth.” For major structural failures, skip DIY and call a professional.
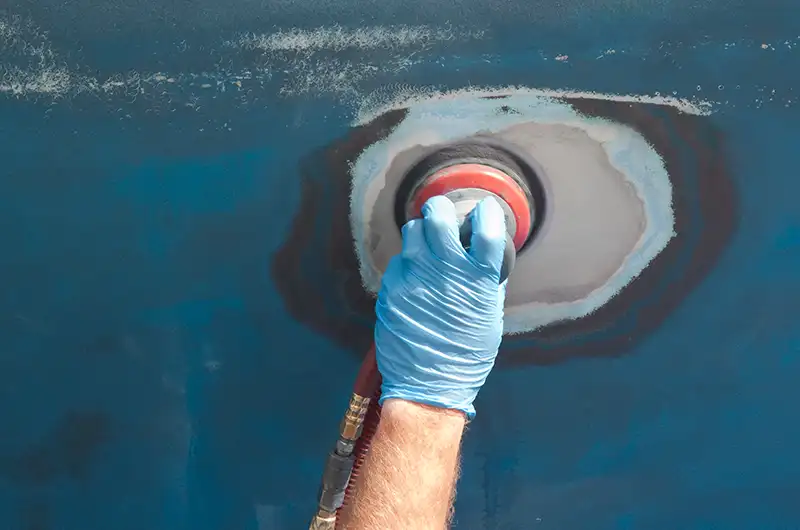
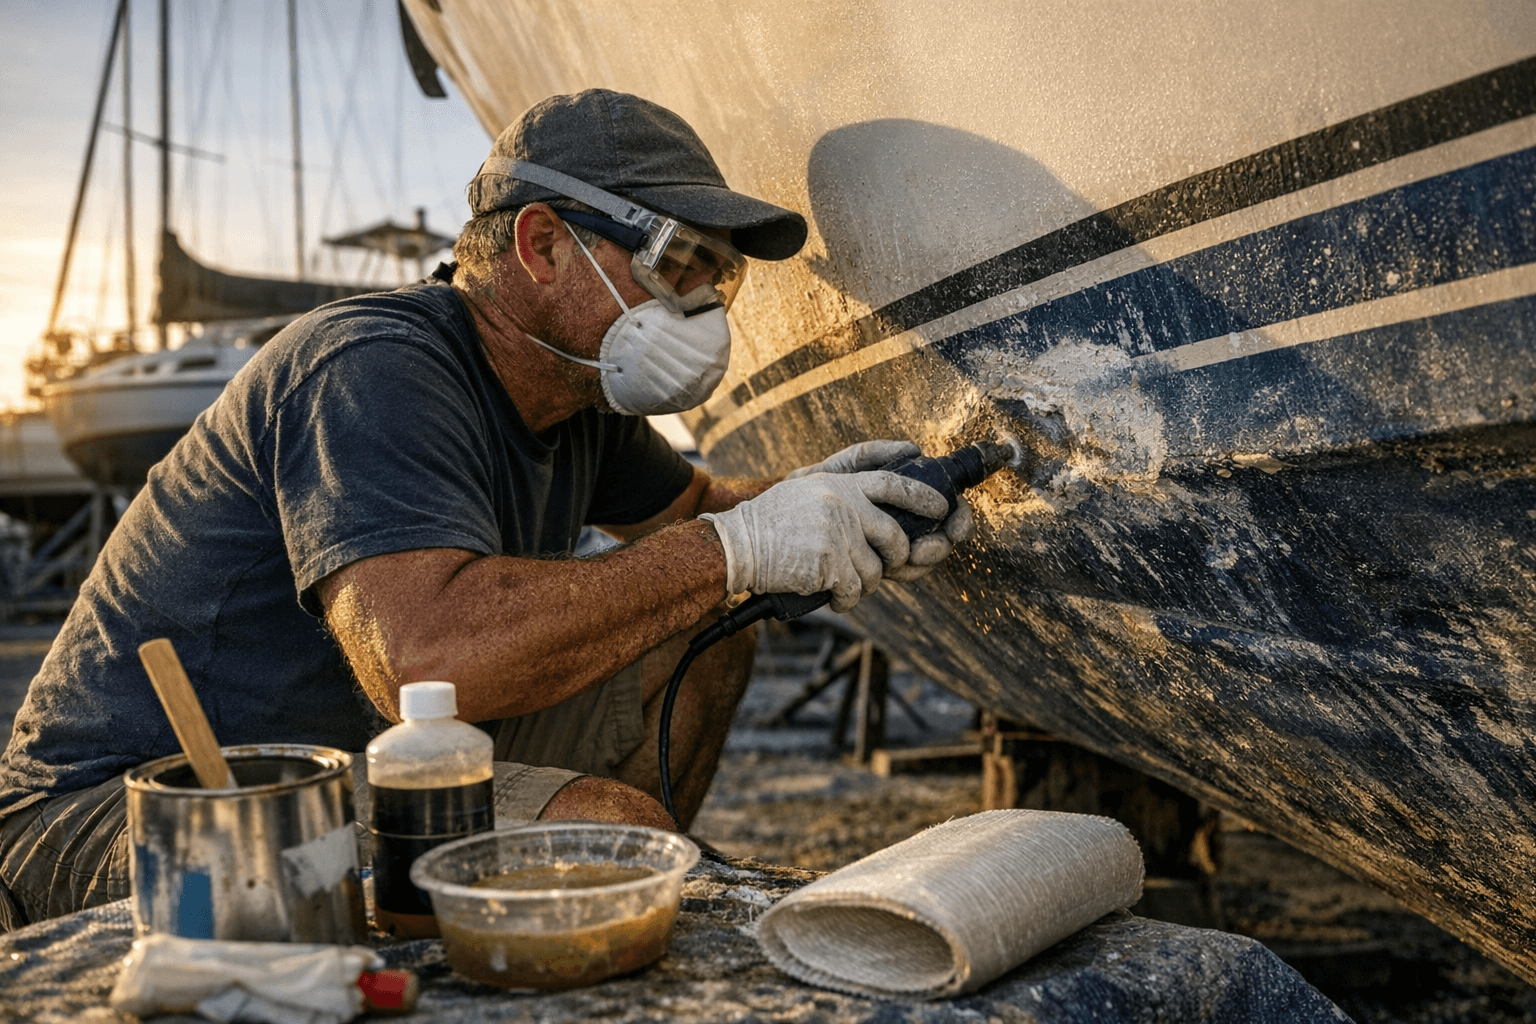
3. Surface preparation: clean, remove, and bevel
Start by cleaning with soap and water, then acetone or a marine cleaner. Remove loose or cracked laminate with a Dremel, grinder, or sharp knife and taper the edges; Sea Tow instructs a bevel of about 12:1 for structural patches and warns: “Don’t skip the bevel. It’s the difference between a solid repair and a future failure.” Rough the area with 80–180 grit to promote adhesion, noting Novielliyachts recommends 80–120 grit for final fairing sanding later.
4. Cut and fit the patch
Pre‑cut multiple layers of fiberglass cloth in decreasing sizes; Sea Tow says “the biggest patch should overlap the damage by at least 2 inches.” For holes, temporarily back the opening with foam or wood while you work from the outside. For sandwich repairs, cut the core first and check orientation on cores such as Nomex® Honeycomb, “be sure to check this,” Fibreglast warns, and pre‑cut each reinforcement ply to the taper you prepared.
5. Resin selection and mixing
Match resin to the hull’s original laminate and follow manufacturer directions: “Mix resin and hardener according to the manufacturer’s instructions.” Work in small batches to avoid premature cure. Practical Boat Owner’s Andy Pag emphasizes correct material pairing, “There’s an engineering tidiness to repairing a material with the same material”, and warns: “If it’s repaired with epoxy and a few years later gets pranged again in the same spot the next repairer might not realise that this patch of the polyester boat is epoxy and mustn’t be repaired with polyester.”
6. Wet‑out and application methods
Use the dry method (lay dry cloth, then wet it out on the hull) or pre‑wet on a release surface and transfer per West System techniques. “Wet out each layer of glassfibre cloth until you reach the correct thickness,” PBO advises. West System instructs using a plastic spreader or roller to smooth fabric and remove trapped air, and offers a two‑stage option with 879 Release Fabric to produce a smooth textured surface that won’t bond to the epoxy.
7. Layering, air removal, and debulking
When bonding from the outside, apply patches large‑to‑small so you don’t sand through inner plies: “By bonding the patch into place in a large‑to‑small‑piece sequence, you will eliminate the possibility of sanding through any of the cloth layers when fairing the surface,” West System explains. Use a squeegee or fiberglass roller to remove trapped air and excess resin. Fibreglast recommends compacting and debulking every 3–5 layers and notes the vacuum bagging technique is “the most uniform method,” though squeegees and rollers will suffice for most DIY jobs.
8. Vertical and tricky repairs
For vertical surfaces use thickened resin or spray adhesive to hold patches in place, as Sea Tow suggests. If you employ West System’s press‑in technique, you can lift a wet‑out patch and press it (plastic side out) into a beveled cavity, squeegee firmly to remove air, then remove excess before cure, a useful approach on complex contours.
9. Cure timing and patience
Let the resin fully cure, Sea Tow warns cure can take “hours or even overnight depending on humidity and temperature” and cautions you not to rush sanding. West System and Fibreglast repeat: allow the patch to “cure thoroughly” before removing release fabric or proceeding to fairing; premature sanding will gum up the surface and weaken the repair.
10. Fairing, sanding and finishing
Once cured, sand high spots and apply an epoxy fairing compound if needed, West System recommends epoxy thickened with 407 or 410 filler and applying the fairing compound while the epoxy is still tacky. Novielliyachts advises fairing and sanding with 80–120 grit, then moving up to finer grits (up to 400–600) for gelcoat gloss. Fibreglast recommends 1/32‑inch milled glass putty filler for marine repairs when leveling structural patches, and to grind high spots flush unless structural strength would be compromised.
11. Compatibility and long‑term thinking
Before you repair, identify the original laminate: Practical Boat Owner tells you to “sand it back to the glass surface”, gelcoat indicates a polyester hull; freshly ground epoxy and polyester smell different, and warns bluntly: “Get it wrong and it’ll need redoing within the year.” For Novelli Boats or hybrid composites, Novielliyachts adds a “Pro Tip” to check the owner’s manual or contact the builder for recommended materials.
12. Cleanup, tools, and a closing note
Use a HEPA vacuum and wipe everything down after work; bag resin‑soaked items for proper disposal. Key tools: Dremel, grinder, knives, plastic spreader, squeegee, fiberglass roller, release fabric (West System 879), West System fairing fillers 407/410, Fibreglast 1/32‑inch milled glass putty, HEPA vacuum, and backing materials like foam or wood. Remember Andy Pag’s plain warning that sanding fibreglass is “a horrible job”, the right PPE and cleanup make it tolerable.
Finish with this forward step: after your repair cures and you’ve achieved a smooth fairing and color match, consider bringing a cured panel or repair report to the next local composite clinic or yacht‑club maintenance night, sharing a finished sample is the quickest way to validate your technique and learn tricks to improve your next weekend repair.
Know something we missed? Have a correction or additional information?
Submit a Tip

