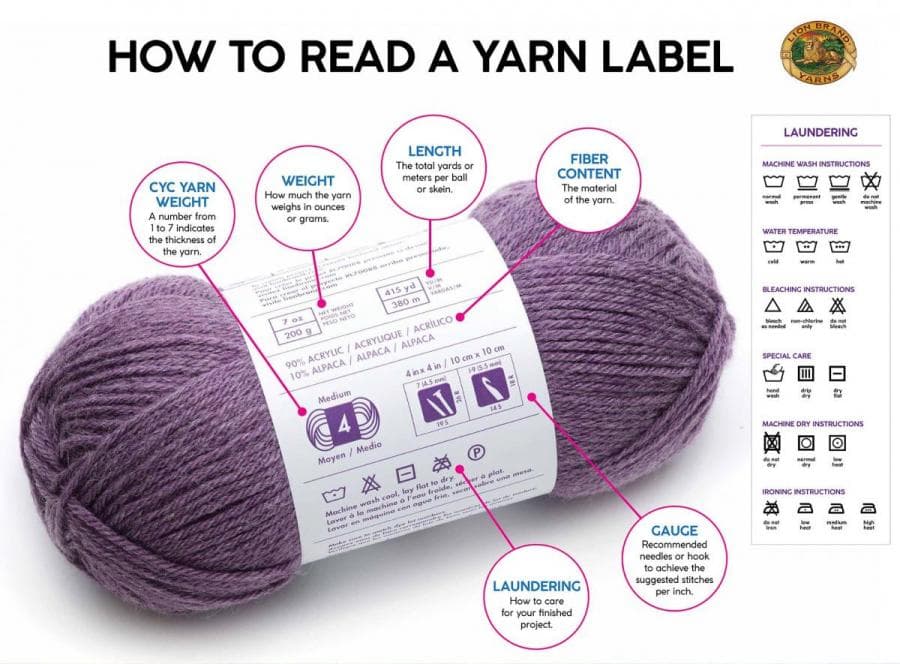
3 beginner-friendly crochet strap methods that stop bag stretching
Sagging bag straps usually come down to construction, not yarn. These 3 beginner-friendly fixes give you a sturdier handle before you waste time on another floppy finish.
Waistcoat stitch strap: the densest, most resistance-first fix
If your bag looks perfect until the strap starts drooping after a few wears, this is the kind of repair that saves the project. The waistcoat stitch strap is the densest of the three methods here, and that density is the whole point: it creates a thick fabric with a knitted-looking surface that fights sagging instead of relaxing into it. It is also beginner-friendly, which matters because the problem is usually in the construction, not in some mysterious mismatch between yarn and hook.
This is the strap to reach for when you want the finished bag to keep its shape without changing the overall design too much. The tutorial keeps the materials simple too: use the same yarn weight as the bag, a smaller hook, and a tapestry needle for attachment. Before you start, hold the yarn from one attachment point to the other and measure the finished length on your shoulder or across your body, so you are not guessing at the drop.
What makes this method especially practical is that it can be added after the bag is already done. That means you are not ripping out a whole project just because the original strap softened too much. If you like a clean, structured look and do not want a strap that behaves like a hammock after three outings, this dense stitch is the safest place to begin.
Braided i-cord strap: the clean rope look with built-in structure
The braided i-cord strap solves the same sagging problem from a different angle. Instead of relying on a dense fabric, it uses three layers of cord braided together, which gives the strap natural structure and a tidy rope-like appearance. It reads a little more polished than a flat strap, and it holds its own on bags that need a visible, intentional detail rather than a plain band.
This method is still approachable, but it asks for a bit more planning because the cord construction consumes extra yarn. The key number here is simple and easy to forget: multiply your target length by 3.5 to get the yarn tail length you need. That one measurement can spare you from the classic disaster of finishing a beautiful strap and realizing you do not have enough yarn to complete it.
Use the same yarn weight used in the bag, a smaller hook, and a tapestry needle for the attachment. The payoff is a strap that feels stable without looking bulky, especially if you want that smooth, braided profile instead of a flat crocheted band. It is a strong choice when you want the bag to feel sturdier in the hand and on the shoulder, but still keep a neat, refined finish.
Double-thickness strap: the easiest way to get a firm, two-layer band
The double-thickness strap is the most straightforward option for makers who want a sturdier strap without straying far from the bag design they already like. It folds in on itself to create a two-layer band that barely moves, which is exactly why it works so well on bags that have a habit of stretching out after a few wears. It gives you structure without asking for a whole new visual language.
This is the method that feels closest to a classic strap, just improved where it counts. The tutorial calls out stitch markers for the fold, which is a small detail but an important one, because keeping that fold clean is what makes the double layer behave properly. As with the other two methods, you only need the same yarn weight as the bag, a smaller hook, and a tapestry needle for attachment.
The measuring advice matters here just as much as in the other builds: hold the yarn from one attachment point to the other and decide the finished length by checking it on your shoulder or across your body before you commit. That habit turns the strap from a best guess into a controlled part of the bag, which is the difference between a project that looks good on the table and one that actually wears well. The hidden pro tip in the video is another clue that this is more than a stitch demo, it is a practical fix for a problem crocheters run into all the time. If you have ever finished a bag only to watch the handle give up its shape, this is the kind of method that lets you recover the project instead of living with a floppy strap.
This article was produced by Prism’s automated news system from verified source data, official records, and press releases, then run through automated quality and moderation checks before publishing. The system is built and supervised by the people who set the standards it runs under. Read our full AI policy.
Did this article answer your question?