Beginner-Friendly Octopus Keychain Crochet Tutorial Makes Amigurumi Accessible
Crocheting your first amigurumi is far less intimidating when the project fits in your palm — the Easy Octopus Keychain from I Love Crochet proves it.
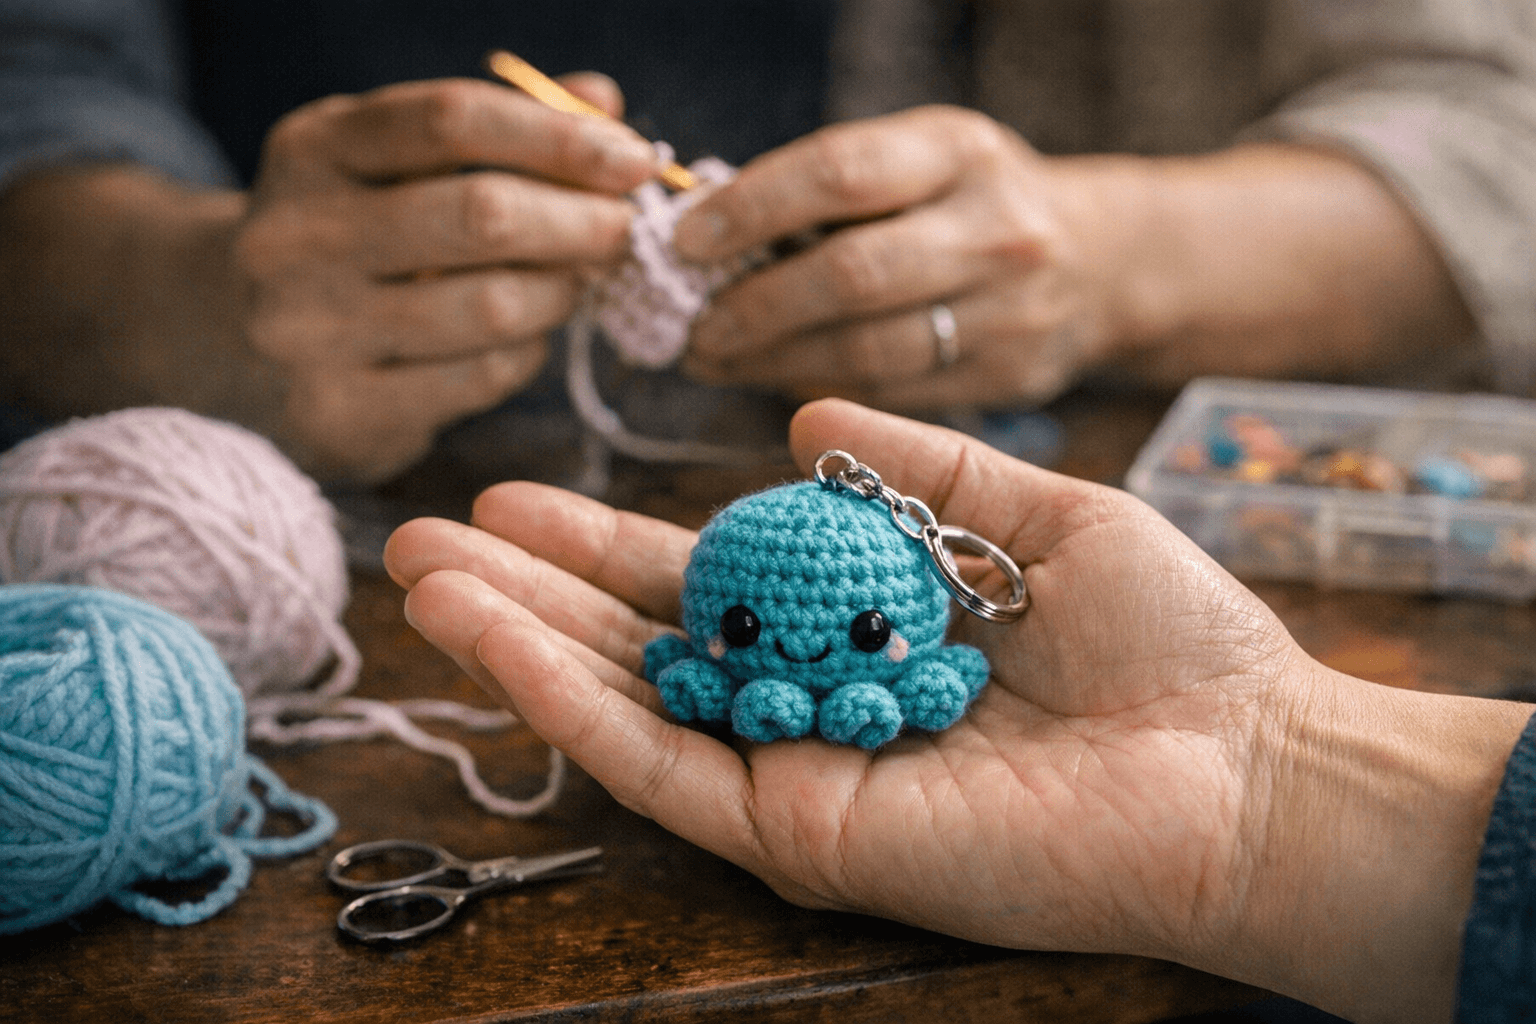
Amigurumi has a reputation for being fiddly: tiny hooks, fussy shaping, seemingly endless finishing work. The Easy Octopus Keychain tutorial from I Love Crochet flips that script. It's a compact, step-by-step project designed from the ground up for beginners, and it delivers one of the most satisfying first-amigurumi experiences you'll find. The finished piece is functional enough to clip to your keys or bag every day, and small enough to complete in a single sit-down session.
Why an Octopus Is the Perfect Beginner Amigurumi
The octopus shape is genuinely forgiving for new makers. The form works up quickly, and because the legs are crocheted directly onto the body, there's almost no sewing involved. That matters enormously when you're still building confidence. Sewing amigurumi pieces together is where a lot of beginners hit their first wall, so a design that sidesteps that problem entirely lets you stay in your flow. The basic structure features a round body and tentacles that can be styled in different directions for different looks. It's a shape that hides tension inconsistencies better than, say, a flat piece, which means your first attempt will actually look like an octopus.
The beginner-friendly project incorporates two styles of arms to choose from: the first is short and stubby featuring the popcorn stitch, while the other option is long and curly. That built-in choice is smart design. If you're brand new, you can go with whichever tentacle style feels more achievable. If you want to push yourself a little, the curly option gives you a chance to practice a more involved technique.
What You'll Need Before You Start
The materials list is short enough that you can probably raid your stash and come up with everything you need without buying a thing. The core supplies are medium worsted weight yarn in any color (about 15–16 yards), toy stuffing, a 3.5mm (E) crochet hook, a sewing needle, and a yarn needle. You'll also want safety eyes and some keychain hardware to make it functional.
Yarn choice is flexible. Any brand of worsted-weight acrylic yarn should work well, though due to variations among brands, the finished size may vary slightly. Cotton yarn works fine as well. Because the project can be made in any color, it's perfect for using up scrap yarn. This is the kind of project that turns that tangled pile of odd-yardage leftovers into something actually useful.
If you want a miniature version, that's entirely possible too. Miniature versions can be made using the same pattern with a 1.50mm hook and size 10 cotton crochet thread. Using a standard E/4 (3.5mm) hook, the finished keychain measures approximately 2 inches (5.1 cm) tall and 6 inches (15 cm) in circumference — compact enough to be a keychain, substantial enough to actually feel like something when you're done.
Key Techniques You'll Practice
The pattern is written in continuous rounds, and it helps to place a stitch marker at the beginning stitch of each round, moving it up at the start of each new round. This is one of those habits that feels fussy the first time and then becomes completely automatic. Without a stitch marker in continuous rounds, you will lose your place — it's not a matter of if, it's when.
At the end of each round, the stitch count for completion is noted in parentheses, so you always have a quick way to verify you're on track before moving forward. This kind of built-in error-checking is exactly what beginners need: catch a mistake at the end of a round rather than ten rounds later.
The yarn-under method was used when designing this piece; the yarn-over method can also be used, though it will likely create a slightly larger octopus. This is worth knowing upfront so you're not surprised if your finished size differs slightly from the pattern photos.
For the tentacles, the curly style is achieved through a chain followed by single crochet increases back along the chain. You can adjust the length of the legs by creating a longer or shorter chain and working a single crochet stitch in each chain back to the body. Shorter chains for stubbier legs, longer chains for the cascading spiral effect. Both read as intentional design choices.
Getting the Face Right
Eye placement makes or breaks amigurumi. Safety eyes are placed in Round 4 with 3 stitches between them. The trick most beginners learn the hard way: don't lock the backing onto your safety eyes until you're satisfied with their position. Place scrap pieces of yarn or stitch markers into the indicated stitches for eye placement until you've crocheted far enough past that point to insert the safety eyes without them getting in the way. This keeps your options open while you work the decrease rounds.
If safety eyes aren't available, embroidered eyes work perfectly well. Skipping safety eyes entirely is a valid choice; eyes can be softly embroidered for an extra gentle look, or left out for a minimalist style.
Assembling the Keychain
This is the step that turns a small stuffed creature into something you'll actually carry around. The finished octopus sits under 2 inches tall, making it the right size for a keychain; to convert it, attach keychain hardware to the top of the head. Hook a jump ring through the magic ring you started with, place the keychain hardware on, and close the jump ring.
On the finishing end-weaving side, don't rush it. The trickiest part of some versions of this project is working with finer materials, since strands can sometimes separate and the small hook size can slow your pace. Take your time weaving in those ends and securing the tentacles. A keychain lives a hard life clipped to a bag — all parts need to be secured firmly because keychains face daily pulling and friction.
Using It as a Jumping-Off Point
The pattern works just as well without the keychain hardware — as a standalone mini plush, a gift tag, or a bag charm. These pocket-sized creations work well as desk-mates, keychain charms, ornaments, or emotional support squishes. Once you've made one, the urge to make a dozen in different colors is completely normal. On average, an experienced maker can complete at least 3 to 4 octopi per hour, which makes them a genuinely viable craft fair item once you've got the pattern memorized.
The I Love Crochet tutorial demonstrates something important: amigurumi doesn't have to start with a complicated humanoid figure or a pattern that runs twenty pages. A single magic ring, a few rounds of increases and decreases, eight tentacles, and a jump ring — that's it. If you've been eyeing amigurumi from the sidelines, this is a very solid place to start.
This article was produced by Prism’s automated news system from verified source data, official records, and press releases, then run through automated quality and moderation checks before publishing. The system is built and supervised by the people who set the standards it runs under. Read our full AI policy.
Did this article answer your question?