Free Crochet Bow Bag Pattern Blends Fashion Style With Practical Construction
Built from three strands of acrylic held together, this free bow bag pattern gives intermediate crocheters a structured, fashion-forward accessory with serious customization range.
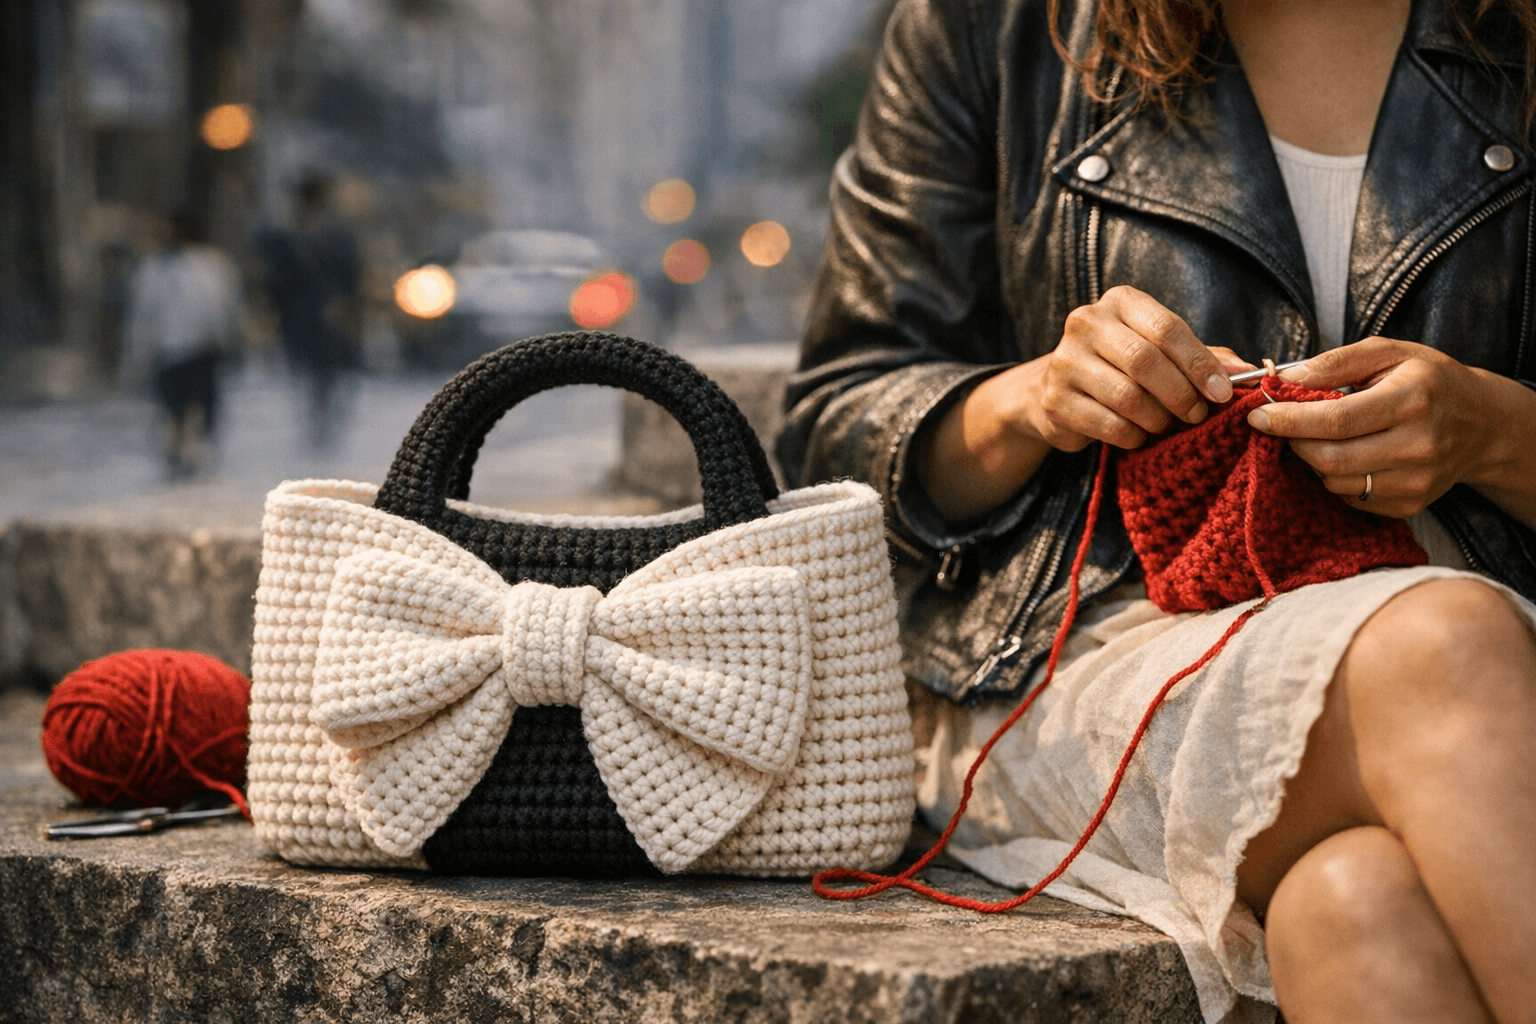
The bow bag trend has hit crocheted accessories hard, and DIYsCraftsy's Quick & Easy Crochet Bow Bag is the version actually worth your time. Not because of the bow (though the gathered center accent is genuinely flattering) but because the construction logic behind it gives you a durable, body-conscious bag you can resize, restyle, and sell.
Why Three Strands Change Everything
The structural decision that sets this pattern apart is holding three lightweight acrylic strands together throughout the bag body. Working triple strands simultaneously on a 4mm hook creates a dense, self-supporting fabric that holds its shape under daily use; no stiffener spray or interfacing required. This is the technique that separates a bag that slumps from one that stands on the counter. Acrylic is the right call here: it's consistent in weight, easy to source in coordinating colorways, and tolerant of the tension inconsistencies that surface when you're managing triple strands for the first time.
The pattern opens with a foundation chain of 33, which is DIYsCraftsy's sample size. From there, rounds build the bag body using a combination of single crochet (sc), half double crochet (hdc), and double crochet (dc). Standard stitches, but the multi-strand approach means every stitch lands with more presence than a single-strand equivalent. The instructions cover corner turns and body rounds in detail before finishing with the gathered bow center that defines the bag's whole look.
The Customization Map
This is where the pattern earns its real value. Every dimension ties back to an adjustable variable, which makes one base construction method capable of producing a full range of finished objects.
Foundation chain for width: The ch 33 starting chain sets bag width. Add chains in pairs to preserve stitch symmetry for a wider tote-style silhouette, or reduce for a compact clutch profile. Each additional pair of chains adds roughly an inch of width depending on your gauge.
Round count for height: Body round count controls height directly. The sample proportions produce a compact shoulder bag; adding rounds before bow assembly stretches toward a medium tote. A gauge swatch before you start saves you from a too-short finish.
Strap length: This is the adjustment most makers skip and then regret. A bag that hits at the hip carries completely differently than one that sits at the waist. Measure your desired drop against your body before you chain the strap, not after.
Bow size: The gathered bow center is assembled separately and attached, so you can scale it independently from the bag body. A smaller bow reads as minimalist; a larger, more exaggerated version pushes the bag into statement territory.
Lining options: A fabric lining isn't required, but a rectangle of cotton twill or canvas cut to the interior dimensions, whipstitched at the top edge, adds a clean finish and protects the interior from snag-prone contents like keys. No advanced sewing skills needed.
Yarn for Structure: Cotton vs. Acrylic
The pattern calls for lightweight acrylic for good reason. It's forgiving under triple-strand tension and maintains shape across temperature changes. Cotton is a legitimate substitute if you want a stiffer, denser result, but it changes the math. Cotton is heavier per yard and far less elastic, so triple-strand cotton produces a firmer fabric at a slightly smaller finished measurement for the same chain count. If you swap to cotton, add two to four foundation chains to compensate for reduced stretch, and expect a handle that actually suits market bags or structured totes.
A bamboo-acrylic blend splits the difference: some drape, some structure, and a slight sheen that elevates the look without the full rigidity of pure cotton.
Fit Test: Measure Before You Chain
Run this checklist before casting on so the finished bag actually works with your body:
- Cross-body drop: Measure from your shoulder to where you want the bag to rest (hip, waist, or below). This number sets your strap chain count.
- Bag body width: Hold a ruler across your torso at hip level. A bag wider than your hip swings when you walk; nine to twelve inches works for most shoulder-bag proportions.
- Bag body height: Stack your daily essentials (phone, wallet, keys) and measure the stack height. Add an inch for magnetic closure overlap, and you have your minimum body height.
- Bow proportion: Hold a rough loop of scrap yarn in a bow shape against a swatch the size of your planned bag face. If the bow center reaches both side edges, scale it down. If it disappears against the bag face, scale it up.
The Magnetic Closure: Installation and Safety
The optional magnetic snap is what pushes this bag from craft project to daily carry. DIYsCraftsy is specific about safe installation: prongs need to be secured firmly and then covered, either with a sewn fabric patch over the backing plate or a layer of felt encasing the prong feet. This isn't cosmetic. An unsecured closure can work loose over time, and exposed metal prongs can interfere with phone screens or demagnetize cards stored near the snap. A covered, firmly stitched closure protects both the bag and whatever is inside it.
Three Ways to Style the Same Pattern
The bag body stays identical across all three versions. The differences come entirely from yarn choice, bow scale, and strap length, which is the practical argument for keeping this construction in your regular rotation.
Coquette: Dusty rose or mauve acrylic, an oversized bow with the gathered center pulled tight, a short strap adjusted for a drop that rides just above the hip. A grosgrain ribbon tie at the bow center adds texture contrast without adding stitches.
Minimalist: Cream or oatmeal tonal yarn, a small flat bow with a narrow center knot, and a long strap set to true crossbody length. Skip decorative add-ons and let the stitch texture carry the design. The triple-strand fabric has enough surface interest to hold attention on its own.
Festival: Variegated or high-contrast neon acrylic, a medium bow, and the strap adjusted for waist-level wear with easy front access. The chunky triple-strand body reads as intentionally substantial at this gauge, which fits the aesthetic perfectly.
Seller Potential and Pattern Logic
DIYsCraftsy frames this explicitly as a pattern for makers who want to build a product line, not just finish a single object. The foundation chain adjustment alone means one construction method produces a mini bag, a standard shoulder bag, and a larger tote at three distinct price points. Add yarn colorway swaps and bow scaling, and a market table built around this single pattern becomes genuinely viable.
The fact that the pattern is free and fully documented with step-by-step round instructions removes the barrier that usually stops makers from attempting multi-strand work or magnetic hardware. The triple-strand technique looks intimidating before you try it. Work one test swatch to dial in tension before the foundation chain, and the bag body builds consistently from there. The construction knowledge transfers directly to every accessory project you take on after this one.
This article was produced by Prism’s automated news system from verified source data, official records, and press releases, then run through automated quality and moderation checks before publishing. The system is built and supervised by the people who set the standards it runs under. Read our full AI policy.
Did this article answer your question?