Free Herringbone Crochet Pattern Creates Dense, Woven-Look Fabric for Accessories
The herringbone stitch creates woven-look density that buyers associate with hand-knitting; a free two-row-repeat pattern makes it accessible to confident beginners.
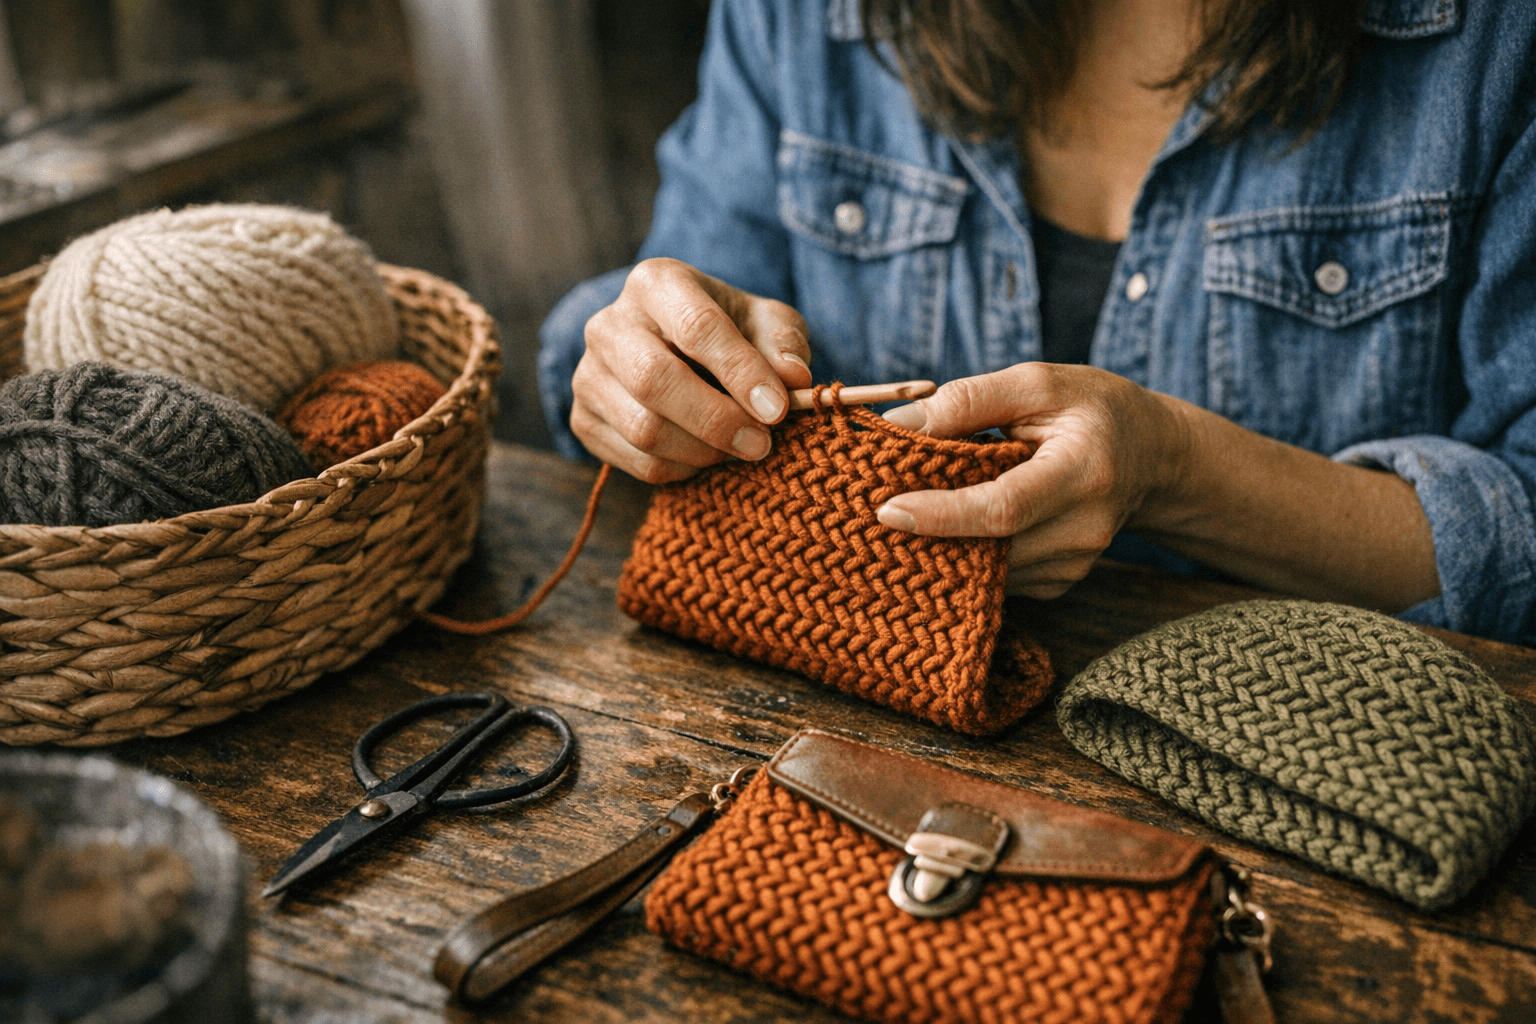
The stitch that makes crochet look like something it isn't is one of the craft's best-kept secrets. The herringbone stitch produces a diagonal, interlocked fabric so dense and structured that people who don't crochet will reach for it, feel the weight, and ask if you knitted it. For makers who sell at markets or simply want their finished objects to carry more visual authority, that misidentification is a feature, not a bug.
DIYsCraftsy's free herringbone stitch pattern brings this technique within reach, laying out a complete two-row repeat with step-by-step instructions, yarn and hook recommendations, and notes on how to adapt the stitch across project types. The entire thing costs nothing, and the time investment starts at a single 4-inch swatch.
Herringbone vs. Half-Double Crochet: When to Swap
Half-double crochet is the workhorse of wearable crochet: fast, flexible, and easy to memorize. But it has a soft, slightly open structure that reads as obviously crocheted. When a project calls for genuine density, a crisper drape, or a surface texture that stands out from the standard V-stitch grid, the herringbone stitch wins.
The difference comes down to construction. Where HDC creates rows of fairly uniform loops, the herringbone interlocks stitches diagonally, building a fabric that's thicker, more compressed, and visually reminiscent of woven tweed. The result holds its shape better off the hook, which matters enormously when you're working on structured accessories. If you want a scarf that lies flat and wraps with some weight behind it, or a hat brim that keeps its curve through wear and washing, herringbone delivers where HDC goes soft.
There's also a reversibility advantage: the herringbone stitch looks intentional on both sides of the fabric, which opens up design options for accessories worn with the "inside" showing. That's a structural quality HDC simply doesn't offer.
Three Projects Where Herringbone Earns Its Place
Dense winter scarf
The herringbone stitch's natural warmth and thickness make a winter scarf the obvious first project. Because the stitch is a two-row repeat, a long scarf becomes a meditative rhythm once the pattern is in your hands. The diagonal texture runs the length of the piece, giving it a directional quality that plain HDC or single crochet can't replicate. In bulky yarn, the finished object looks like something pulled from a boutique alpine outfitter's shelf.
Structured hat brim
A hat brim needs to hold specific geometry: it should curve, resist flopping, and sit cleanly at the fold. The herringbone stitch's density is ideal here. Work the brim section in herringbone before switching to a lighter stitch for the crown, and the brim stays structured through repeated wear. This use case highlights one of the stitch's underrated strengths: you don't have to commit an entire hat to herringbone. A single band or brim section is enough to introduce the texture where it matters most, and the transition reads as a deliberate design choice rather than a patchwork of techniques.
Modern throw or accent blanket
Scaled up to a throw, the herringbone stitch produces fabric that looks hand-woven rather than crocheted. The diagonal lines catch light differently than grid-based stitches, giving the finished piece a contemporary, almost Scandinavian quality. The two-row repeat adapts to width cleanly: adjusting your starting chain in multiples lets you size up or down without disrupting the pattern. For home decor projects including cushion covers and table runners, that adaptability is genuinely practical. The stitch's reversibility also means both sides of a cushion cover are presentable, which isn't something you can always count on with textured stitches.
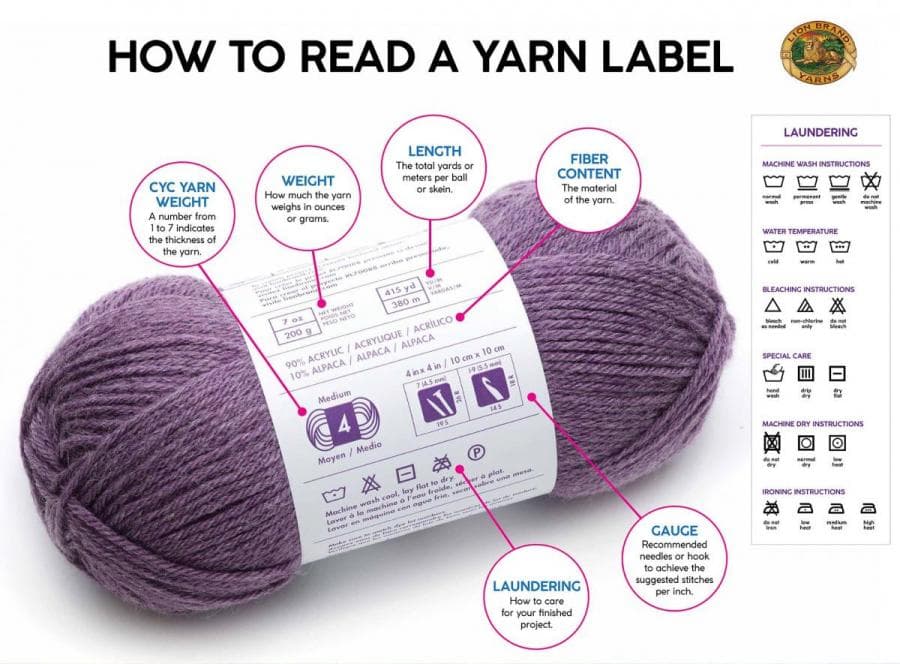
Technical Setup: Hook, Yarn, and Gauge
The recommended starting point is bulky (Category 5) yarn paired with a 6.5 mm hook. This combination produces a swatch you can actually assess in your hands: thick enough to feel the fabric's density, open enough to count the diagonal lines clearly. If you're swatching for drape on a lighter-weight scarf or a sweater panel, moving down a yarn weight and adjusting your hook will preserve the herringbone texture while producing a more supple fabric.
Yarn choice matters more here than in many basic stitches. Smooth yarns make the diagonal pattern visible and make it easier to count stitches accurately, which is especially important when you're first internalizing the rhythm. Textured, fuzzy, or bouclé yarns will obscure the herringbone lines and make tension harder to read. Save the fancy fibers for when the stitch is second nature. The pattern includes common abbreviations and row-by-row instructions, so you're not decoding shorthand mid-row when your hook is already moving.
Learning Curve: An Honest Assessment
The herringbone stitch is positioned as suitable for confident beginners and intermediate crocheters, and that framing is accurate with one caveat. "Confident beginner" here means comfortable maintaining consistent tension and working multiple loops off the hook, not just someone who has finished a first dishcloth. The stitch isn't technically difficult, but it's different enough from basic row-by-row work that the first few rows will feel slightly awkward before the rhythm clicks. That discomfort is normal and brief.
The two-row repeat is a genuine advantage on the learning curve. Once you've worked through several repeats, the hand memory takes over and the stitch becomes nearly automatic. The pattern's suggestions for adjusting stitch count to fit desired width mean you're not locked into a single gauge or project size while you're getting comfortable.
Mini Swatch Challenge
Before casting on a full accessory, make a 4-inch square swatch. Use bulky yarn and a 6.5 mm hook (or whatever weight and hook size your project calls for), work through the two-row repeat until you have roughly 4 inches of fabric, and then set it down and assess it. Note:
- Does the diagonal texture read clearly? If not, switch to a smoother yarn.
- Does the fabric feel dense without being stiff?
- How does it compare in weight and drape to the same yarn worked in half-double crochet?
That third question is the one worth investigating with actual swatches in hand, not just imagining. The difference is bigger than most makers expect until they feel both pieces together.
The Side-by-Side Share
Make two 4-inch swatches in identical yarn and hook size: one in herringbone, one in half-double crochet. Lay them side by side and photograph them at a low angle so the diagonal texture of the herringbone is visible against the flatter surface of the HDC. Note your hook size and yarn weight in the caption. The contrast is stark enough that the image explains the stitch's value instantly, and for any maker in your feed who's been hesitant to try herringbone, it answers the obvious question before they even ask it.
The herringbone stitch has been producing boutique-quality fabric for decades. Accessible, well-explained free patterns are what finally move it from intermediate curiosity to standard toolkit entry, and a pattern that costs nothing to try removes the last reason to put it off.
This article was produced by Prism’s automated news system from verified source data, official records, and press releases, then run through automated quality and moderation checks before publishing. The system is built and supervised by the people who set the standards it runs under. Read our full AI policy.
Did this article answer your question?