Dotwork Sacred Geometry Tutorial Breaks Down Layering Passes Step by Step
Tattoo Pathway's dotwork breakdown reveals why your layering sequence determines whether a sacred geometry piece ages with clarity or dissolves into gray noise within a few years.
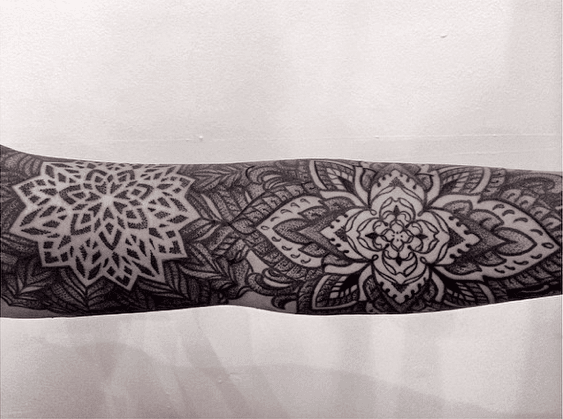
A wobble in a floral tattoo might read as organic. A wobble in a Metatron's Cube does not. Sacred geometry is defined by its structural rules, and dotwork is its most demanding execution method, where every gradient lives or dies on the density and evenness of thousands of individually placed dots. When a piece fails, it rarely fails in the chair. It fails two years later, when the middle gray zones start merging, the contrast collapses, and the geometry that was supposed to look mathematical starts reading as blurry. Tattoo Pathway, an independent tattoo-education YouTube channel focused tightly on technique, recently published a step-by-step process video titled "My Sacred Geometry Tattoo Process (Dotwork Explained)" that addresses exactly that failure point, not with general advice but with a specific, sequenced workflow built around healed readability from the first pass.
Why Dotwork and Sacred Geometry Are Built for Each Other
Solid fill and smooth machine shading are fast, but they are also unforgiving in a different way: they leave no room to modulate value with surgical control. Dotwork's core mechanic, building gradients entirely through dot density and spacing rather than ink drag, maps directly onto the logic of sacred geometry. Concentric rings in a mandala, the overlapping circles of a Flower of Life, the triangular facets of a Metatron's Cube — all of them require gradient transitions that follow precise geometric paths. Adjusting how tightly dots cluster along those paths is how an artist defines depth without disturbing the underlying structure. As Tattoo Pathway frames it plainly in the video, "sacred geometry tattoos aren't just about aesthetics — they're built on structure, precision, and technique." That sentence is less a philosophy statement than a technical warning: the method you choose has architectural consequences.
The Three-Pass Layering Strategy
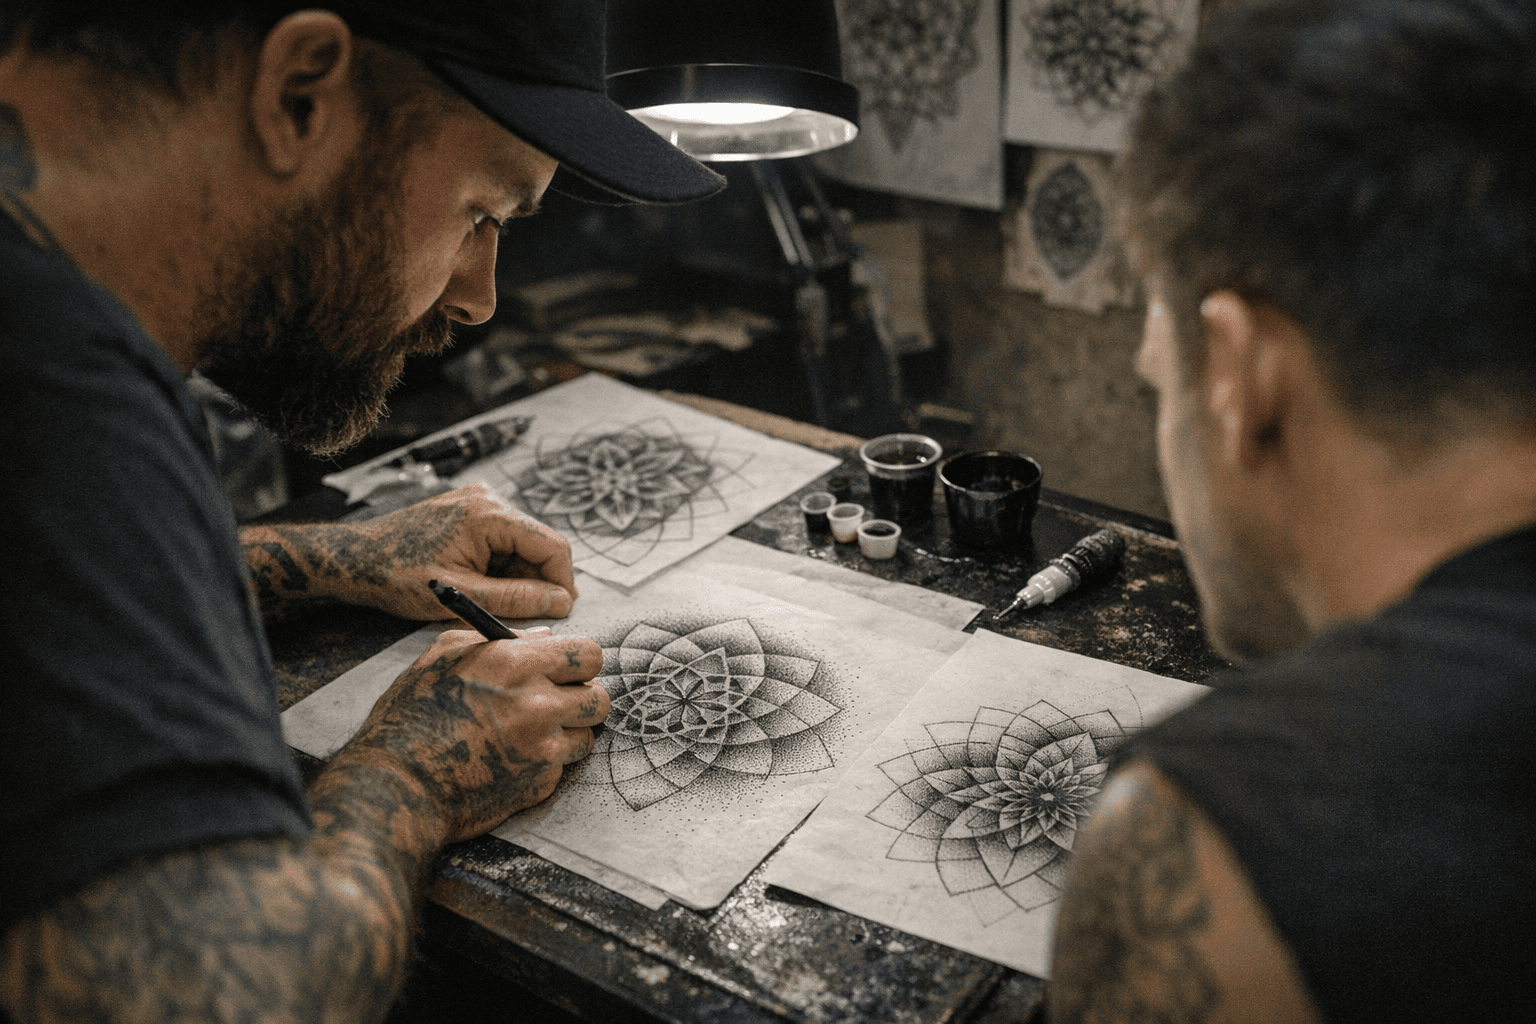
The core of the tutorial is a sequenced, three-pass approach that treats each layer as both a visual step and a structural preparation for the next. The on-screen step titles organize the workflow clearly.
Step 1: Dark Gray Base
The first pass lays down a diluted, dark gray foundation across the regions that will carry the deepest value in the finished piece. This is not merely an aesthetic starting point. Working lighter ink into the skin first stabilizes the tissue: the micro-trauma from the initial pass creates a firmer surface tension for subsequent layers, which means the black that follows sits more consistently and the dots land at more uniform depth. Skipping this step or substituting it with an immediate black pass is a common shortcut in shop environments, but it sacrifices that depth consistency. The dark gray base also provides an immediate reference layer, letting the artist verify that spacing and density are tracking correctly before committing to irreversible black saturation.
Step 2: Packing the Black
The second pass builds the piece's primary contrast. With the skin already worked and the gray base set as a guide, the artist packs black into the designated dark zones. Tattoo Pathway's video demonstrates machine angle and hand speed calibration during this pass on camera, showing how reducing hand speed over already-saturated zones prevents blowout while maintaining clean dot edges. The relationship between voltage and hand speed here matters enormously: at the lower voltage settings standard for dotwork fine needle work, slower hand movement produces larger, heavier dot impressions, while slightly faster movement at the same voltage yields smaller, crisper ones. That hand-speed pairing, not voltage alone, is what keeps dot size consistent across the minutes and hours of a single session.
Step 3: Light Gray Separation
The third pass is the most counterintuitive. After establishing the dark base and the packed black, Tattoo Pathway introduces a light gray separation layer into the transitional zones between the two darker values. This layer performs two functions: it creates the smooth gradient bands that give sacred geometry its dimensional quality, and it acts as a healed-state safeguard. Dark and black zones tend to spread and saturate slightly as a tattoo ages; without a deliberate buffer of lighter dots between them, those zones migrate toward each other and compress the contrast range. The light gray separation layer builds that buffer in intentionally, accounting for years of skin change rather than only the freshly-healed result. This is precisely where Tattoo Pathway's method diverges most sharply from standard shop practice, where many artists complete gradients in a single blending pass rather than treating the separation value as its own dedicated step.
Needle Grouping and the Spacing Logic Behind Smooth Gradients
The video covers needle selection as part of the session setup section, and the choices map directly onto each pass. Fine round liners in the 3RL range deliver the smallest, most precisely controllable dots and are standard for light gray work and outer gradient bands, where spacing needs to open up gradually without the visual jump that a wider needle produces. The 5RL grouping, with slightly more ink flow per tap, suits the tighter dot clusters in darker zones. Separating these needle groupings by pass, rather than using a single needle throughout the session, is part of what allows the artist to modulate dot size as a design variable rather than a side effect of machine inconsistency. Tattoo Pathway's on-camera demonstration of dot-spacing stencils extends this control further: the stencil reference helps maintain consistent dot intervals across large radially symmetric patterns, where freehand spacing tends to compress toward the center and expand at the outer rings, creating uneven density that shows plainly in the healed piece.
What the Healed Result Actually Requires
The video's section titled "Aging Tattoos and Layering Goals" makes the stakes explicit. A palm-sized mandala or Metatron's Cube piece contains thousands of individually placed dots across its full gradient range. Over time, each of those dots expands microscopically as the ink disperses through the dermis. In pieces with tight dark zones adjacent to light separation bands, that expansion is what erases the contrast and turns crisp geometric boundaries into soft blurs. Tattoo Pathway's three-pass sequence is designed so that each layer heals with enough physical separation to absorb years of dot spread without the values merging. It is a workflow that requires roughly three times the session discipline of a single-pass approach, but the legibility it preserves in a five-year-old piece is the return on that investment.
Session Setup and Safety
The tutorial opens with a session overview that includes equipment preparation and workflow sequencing before the first needle touches skin. Standard clinical hygiene, proper sterilization of equipment, correct aftercare protocols, and studio hygiene baselines are noted as prerequisites throughout. These are not afterthoughts in the context of a multi-pass dotwork project: working skin that returns for additional sessions requires clean healing between passes, and any infection or compromised healing between the gray base and the black pass will compromise the final gradient's evenness. The sequenced approach Tattoo Pathway demonstrates only works if each layer heals correctly before the next begins.
For artists currently working through geometric sleeves or planning large mandala commissions ahead of convention season, the video compresses a highly practical methodology into under eight minutes of structured, timestamped instruction. The method it describes treats every dotwork decision, from needle grouping to pass sequence to light gray buffer placement, as part of a single long-term strategy, not a series of independent technical choices. That frame is what separates a piece that still reads as sacred geometry a decade from now from one that simply used to.
Know something we missed? Have a correction or additional information?
Submit a Tip