Build Your Own Ice Bath at Home for Less Than Premium Prices
Skip the $7,000 price tag: a chest freezer conversion runs $200-500 and a chiller-equipped tub lands under $1,500, but only if you nail the three non-negotiables first.
The commercial cold-plunge market wants $5,000 to $10,000 for what is, at its core, a cold box with moving water and clean plumbing. A well-executed DIY build delivers almost identical functional performance for $200 to $1,500 depending on which of the three proven approaches you choose. That price gap is real, but so is the gap between a build done right and one that lands you in an emergency room or breeds a bacterial colony in your backyard. This guide covers both sides of that equation.
The Three Non-Negotiables Before You Buy a Single Part
Before you settle on a vessel or a chiller, three controls have to be locked in. Miss any one of them and the project isn't a budget build; it's a liability.
First: electrical isolation. Every outlet, controller, and pump in your setup must be protected by a ground-fault circuit interrupter (GFCI). Water and electricity share the same physical space in any cold-plunge build, and a standard breaker will not trip fast enough to prevent electrocution if a fault occurs. A GFCI will. For chest-freezer conversions especially, use a qualified electrician to verify the wiring, because a compressor pulling significant amperage on a modified circuit is not a place to cut corners.
Second: a documented sanitation plan. Cold water does not kill bacteria the way heat does; it just slows growth. Without active sanitation, a shared tub can become a health hazard within days. Your plan needs at least two layers: mechanical filtration (a sediment filter to pull particulates) paired with either a chemical sanitizer (chlorine or salt-based) or a non-chemical system (UV sterilization or an ozone generator). Ozone generators inject ozone into the water, destroying bacteria and neutralizing contaminants, and are considered the most effective non-chemical sanitation method available. Connecting an ozone unit to a timer and running it for two hours twice daily while the tub isn't in use can dramatically extend the time between water changes. Never share a tub without this plan written down and followed.
Third: temperature verification. A reliable inline thermometer or digital controller is not optional. The functional range for cold immersion is 2-15°C (roughly 35-59°F) depending on your tolerance and goals. Colder is not automatically better for regular use, and a malfunctioning chiller or a freezer compressor left unchecked can push water toward freezing. A thermostat with a low-temperature lockout prevents that.
Choosing Your Build: Three Paths, Three Trade-offs
Path A: Insulated Tub + Chiller Retrofit
This is the highest-performing DIY option and the best long-term choice for daily users. Start with a 100-200 gallon hard-shell vessel in stainless steel, cedar, or high-density polyethylene. Stainless is the most durable; cedar retains cold naturally; HDPE is the most affordable. Pair it with a dedicated cold-plunge chiller whose BTU or horsepower rating matches or slightly exceeds your tub volume. Undersizing the chiller is the most common mistake: a unit rated for 100 gallons struggling against a 180-gallon tub will run constantly, wear out faster, and never hit target temperature.
Home users running a chiller-equipped setup typically spend $10-20 per month on electricity, even for daily plunges. That number drops significantly with good insulation. Wrap all exterior faces of the tub and fit a tight-sealing lid; using a lid prevents heat exchange and keeps water cold longer, reducing how often the chiller cycles on. One builder's documented setup, running the chiller and pump on a nightly two-hour cycle, reduced total electrical cost to less than $10 per month even in summer.
DIY build kits and chillers typically cost $1,000-$1,500 upfront, compared to $5,000-$10,000 for factory cold-plunge units. The savings are front-loaded; ongoing costs are low when the system is properly insulated and maintained.
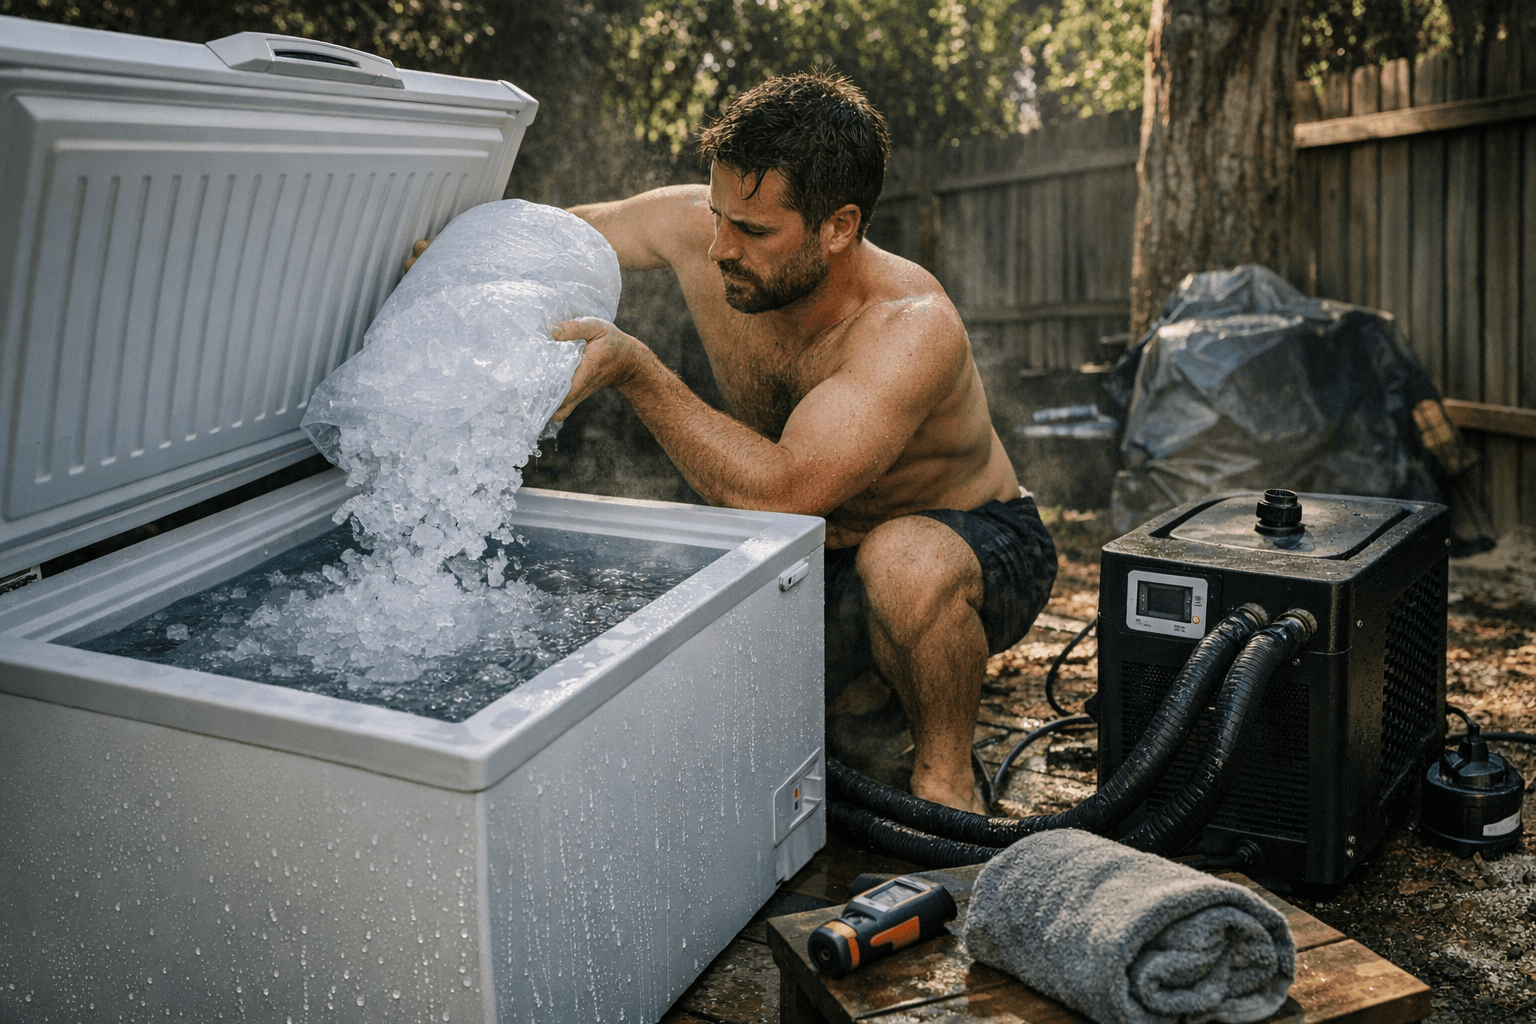
Path B: Chest Freezer Conversion
A chest freezer conversion runs $200-500 for the freezer plus sealant and controllers. Chest freezers can maintain consistent temperatures between 39°F-55°F, and by adding a digital temperature controller like an Inkbird, you get precise regulation nearly identical to a commercial plunge. Add a heavy-duty submersible circulation pump to keep temperatures uniform throughout the water column; without circulation, the coldest water sinks and you end up with thermal stratification that makes temperature readings unreliable.
The critical safety caveat: do not allow the compressor to short-cycle or run with the lid closed and no airflow. The compressor needs ventilation, and the thermostat override must be set to prevent the water from freezing solid, which will damage both the unit and any plumbing attached to it. This is the build that most needs a qualified electrician's sign-off.
Path C: Ice Barrel or Stock Tank (Ice-Only)
A cheap DIY cold plunge can start under $200 with a stock tank and bags of ice. This is the right entry point for occasional plungers testing whether cold immersion fits their routine before committing to a larger build. The trade-off is logistics: you need a reliable ice supply and a robust water treatment plan, because ice-only setups get refreshed infrequently and warm up quickly. Shock dosing between uses is the minimum standard; portable UV or ozone treatment extends water life significantly. Budget for ice costs as a recurring line item; they add up faster than chiller electricity over time.
The Build Log: Decision Points in Order
Work through these in sequence rather than buying equipment first and engineering second.
1. Calculate your vessel volume. This single number determines chiller size, chemical dosing, and pump flow rate. Get it right before anything else.
2. Select your sanitation stack. For small systems, combine sediment filtration, activated carbon for organics, and either chlorine/salt or UV/ozone. Running circulation and filtration for at least four hours daily is the baseline recommendation.
3. Add a circulation pump. A low-head pump keeps water moving, eliminating thermal dead zones and bacterial hotspots. Size it to turn over the full volume every 1-2 hours.
4. Insulate aggressively. Exterior wrap plus a fitted lid are the two highest-return investments in any build. They reduce both chiller runtime and monthly electricity cost.
5. Install controls and safety cutoffs. A thermostat or inline controller with a low-temperature lockout, an emergency shutoff, and GFCI protection on every circuit.
6. Set a maintenance calendar: weekly filter checks, sanitation shock as needed, and a full water chemistry test monthly.
Performance Test: Know If Your Build Is Working
Before declaring your build complete, run this three-part check.
- Cool-down time: Fill the tub with tap water and time how long the chiller takes to reach your target temperature (10°C is a useful benchmark). A properly sized chiller on a 150-gallon tub should reach that target within 12-24 hours of first fill.
- Temperature stability: Once at temperature, check the reading every 10 minutes for 60 minutes without adding ice or running the chiller. A well-insulated build should drift no more than 1-2°C over that window.
- Monthly running cost: Log your electricity meter reading on day one and day 30. Divide by your local rate per kWh. If your number is significantly above the $10-20 monthly benchmark for a chiller setup, check insulation gaps, lid seal, and whether your chiller is appropriately sized.
Maintenance and the Long Game
The DIY path saves money on initial hardware but recaptures that savings slowly over time only if maintenance is consistent. A poorly maintained tub with degraded filtration media, inadequate sanitation, and worn pump seals will cost more in repairs and water changes than the original build justified. Schedule weekly filter inspections, replace sediment cartridges on the manufacturer's cycle (typically every 30-60 days depending on use), and do a full drain-and-refill when water chemistry falls outside range rather than chasing it with chemicals.
The gasp reflex, the involuntary sharp inhale triggered by sudden cold-water immersion, is a real physiological event. Always have a spotter present for anyone new to cold immersion. Never enter the water after alcohol. And keep sessions within sensible time limits, particularly when starting out.
Done with discipline, a DIY cold plunge is not a compromise. It is the same cold water, the same circulatory response, and the same recovery window, just packaged in hardware you built and understand completely.
This article was produced by Prism’s automated news system from verified source data, official records, and press releases, then run through automated quality and moderation checks before publishing. The system is built and supervised by the people who set the standards it runs under. Read our full AI policy.
Did this article answer your question?