How to install sailboat deck hardware without leaks or crush damage
A deck fitting only stays dry and tight when the load is spread, the core is sealed, and the bedding is treated as a gasket, not structure. Ignore that, and a simple cleat install becomes a soft, leaking repair.
A cleat, winch, stanchion base, or traveler track usually does not fail at the bolt head first. It fails when it concentrates sail loads into a small patch of fiberglass, crushes the laminate underneath, and gives water a path into the core. Once that starts, the leak and the soft spot feed each other.
Start with the load path, not the hole
A smart install begins with the question every owner should ask before drilling: where does the load go? Small washers can work for light-duty fittings, but serious deck gear needs a backing plate that spreads force over a much larger area so the laminate is not taking the compression by itself. That plate might be stainless steel, aluminum, G10 fiberglass, or marine plywood, depending on the location, the expected load, and how much moisture the area sees.
For high-load fittings, machine bolts with locknuts belong in the system, not wood screws or casual hardware-store substitutions. West System’s bonding-fasteners guidance says epoxy can dramatically improve load-carrying capacity by spreading a fastener’s load into a greater area of the substrate.
Treat cored decks like structure, not just fiberglass
Most boats have some sort of core in the deck, and balsa, plywood, and foam all can absorb water once a penetration starts leaking. The same failure mode appeared in Marine How To's 2015 deck-penetration guide: water gets into the core, the core softens, and the fitting loses support. A cored deck is not a solid slab, so you cannot treat a fastener hole like a simple through-bolt in plate stock.

The fix is straightforward, but it has to be done completely. Overdrill the hole, dig out any crushed or wet core, fill the cavity with epoxy, and then redrill the final fastener hole after the epoxy cures. That leaves a sealed sleeve around the fastener, protects the core from future intrusion, and preserves the load path instead of letting the hardware chew straight into the laminate.
Steve D’Antonio's July 2013 cored-composite material and his 2021 task sheet return to the same principle: the core either gets excluded during construction, or it gets removed and back-filled with thickened epoxy before hardware goes back in, for cleats, ports, windows, hatches, stanchions, antennas, through-hull fittings, and transducers.
Seal every penetration, but do not confuse sealant with strength
Rigging Doctor’s bedding guidance says that whenever you make a hole in your deck, you need to seal it to avoid water intrusion. A fat bead of sealant cannot do the job of backing structure. Sealant is there to keep water out, not to hold a stanchion base together against shock load.
The other mistake is thinking oversized washers are always enough. Sometimes they are fine for a light-duty fitting, but a cleat, winch, or jib track often deserves a full backing plate because the load is too concentrated for washers alone. Backing plates and screw-hole repair are recurring maintenance problems on real boats; Practical Sailor has covered both repeatedly.
The install sequence that saves you from rebedding later
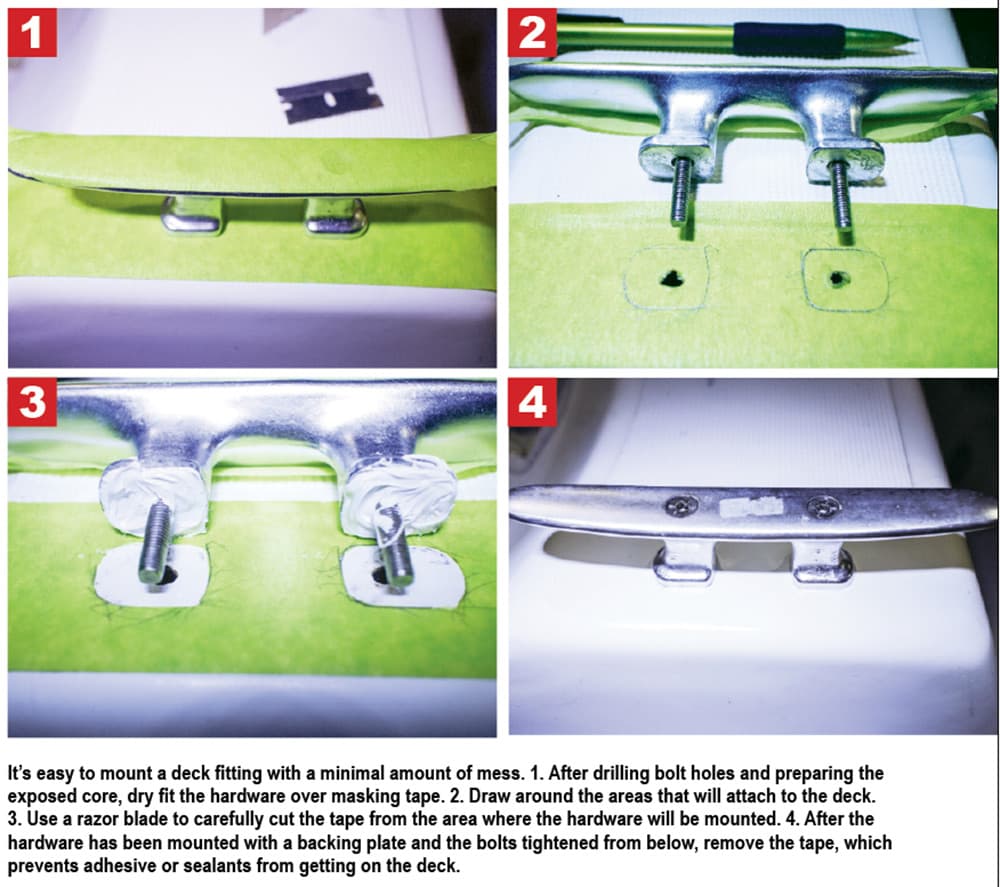
1. Dry-fit the hardware first so the bolt pattern, bedding footprint, and backing plate all line up before any sealant gets involved.
2. Mark the holes carefully, then overdrill for the epoxy sleeve if the deck is cored.
3. Remove any damaged core, fill the cavity with thickened epoxy, and let it cure fully before redrilling the final hole.
4. Bed the fitting, torque the fasteners evenly, and come back after the bedding has cured to recheck the hardware.
If the old hardware already leaked, the replacement has to restore the seal and the structure, not just cover the old damage with fresh sealant.
The fittings that deserve extra respect
Cleats, handrails, stanchion bases, line clutches, jib tracks, hatches, and winches are the usual leak-prone suspects because they see repeated loading and are often mounted where the deck is already working hard. D’Antonio’s cored-composite list adds ports, windows, antennas, through-hulls, and transducers to the same caution zone.
The same rebedding questions keep coming back on Sailboat Owners Forums and Cruisers Forum.
This article was produced by Prism’s automated news system from verified source data, official records, and press releases, then run through automated quality and moderation checks before publishing. The system is built and supervised by the people who set the standards it runs under. Read our full AI policy.
Did this article answer your question?