Balance, Proportion and Two to Three Pieces Define Successful Necklace Layering
Two to three necklaces, at least 2 inches of breathing room, and varied textures are the stylist’s recipe for layered necklaces that read curated, not crowded.
1. Balance: the guiding principle
Balance is the bedrock of effective layering, “Balance, proportion, and thoughtful contrast” are the three words BlueStone’s stylist-driven how‑to returns to again and again. Balance means choosing pieces that relate to one another so no single chain or pendant fights for attention; it also guides decisions about metal dominance, thickness, and whether to go minimalist or maximalist in a single look.
2. Proportion: how size, weight, and length work together
Proportion is the practical sibling to balance: vary thickness, weight, and length so each layer has its own visual territory. David Yurman’s guidance, “For balance, vary the thickness, weight, and length of each chain”, captures the idea: a chunky curb or paperclip link reads differently next to a delicate cable or fine snake chain, and that difference is what creates depth rather than clutter.
3. Two to three pieces: the single most reliable rule
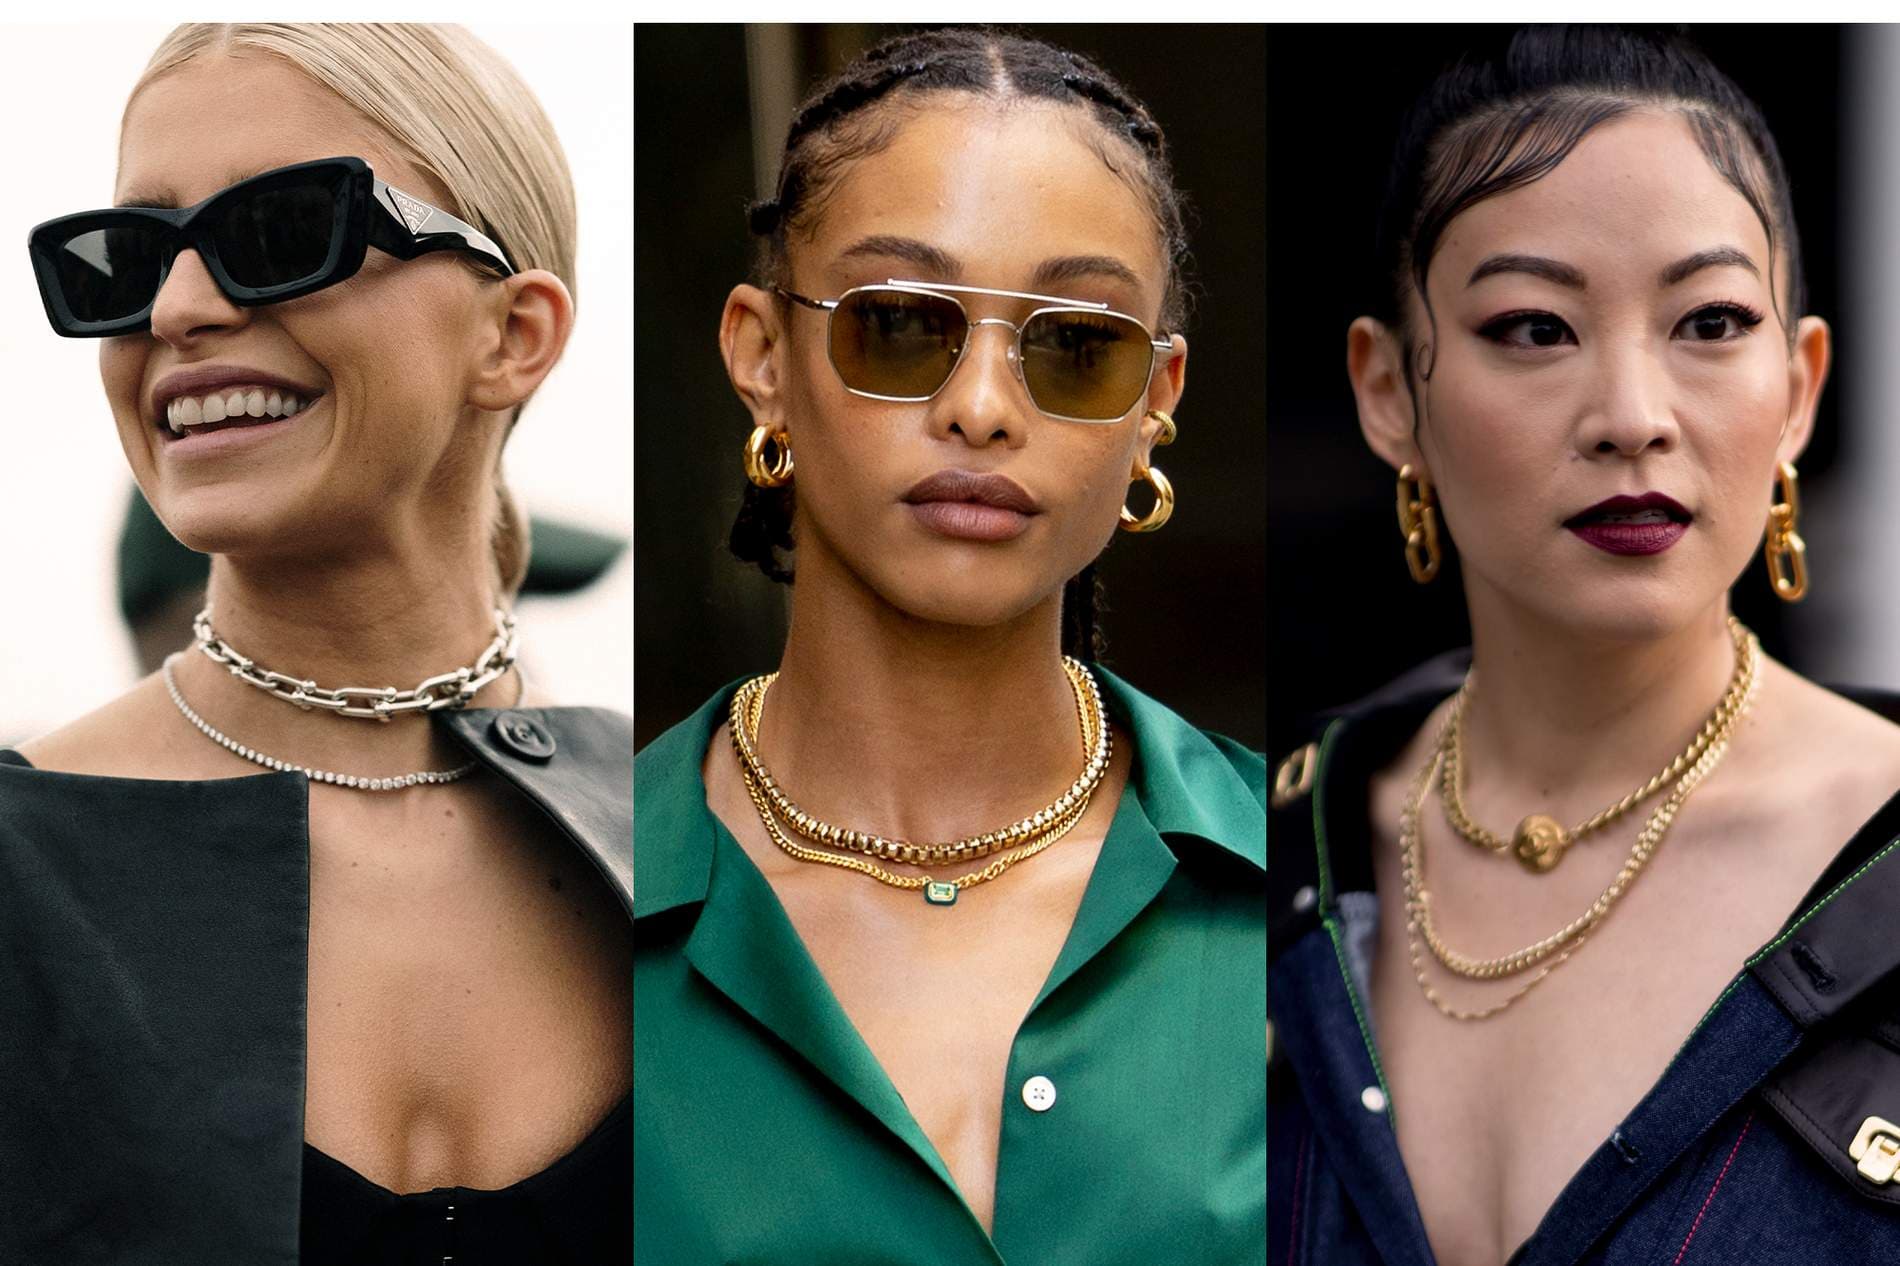
Start with two to three necklaces; the sources converge on this as the sweet spot. Blog Bluestone and the Original Report both state that “Two to three necklaces are usually enough for a balanced look,” which limits visual noise while still allowing a tiered, intentional effect that lifts a simple tee or refines an evening neckline.
4. Negative space and the 2‑inch rule
Leave at least 2 inches between necklaces, or between focal pendants, so pieces don’t collide. BlueStone’s how‑to and Blog Bluestone reiterate the rule to “leave 2" between focal pendants” and “leave at least 2 inches between each piece,” while Sylviejewelry advises choosing pieces that differ by at least 2 inches in length to prevent tangling and ensure each piece is visible.
5. Classic length foundation and practical variations
Build layering from a reliable length ladder: a choker or 14–16 inch chain as the shortest layer, an 18‑inch mid layer, and a 20–24 inch longer piece to finish the tier. Blog Bluestone provides 14–16, 18, and 20–24 inches as the classic foundation, while Monishamelwani notes a slightly wider mid range of 16–18 inches, both are viable, and you can reconcile them by selecting mid lengths that suit your neck and neckline.
6. Spacing tools: extenders, clasp tricks and pendant placement
Use extenders to fine‑tune spacing and prevent overlap; Monishamelwani explicitly recommends “Adjust the spacing with extenders for a balanced look.” When stacking pendants, make sure they do not sit directly on top of one another, Blog Bluestone cautions that layered pendants should have distinct vertical space so each focal point reads clearly.
7. Mix textures and chain types deliberately
Vary textures to add contrast and keep the eye moving: rope, snake, cable and paperclip chains are named examples from Monishamelwani, while David Yurman suggests mixing Curb Chain with DY Madison® paperclip links. Use these elements to create contrast, “Thick and thin chains – A chunky chain next to a delicate one creates contrast”, and consider how matte versus high polish or smooth versus faceted links reflect light differently.
8. Metals: mix with purpose, or don’t
Mix metals intentionally: let one metal dominate and use the other as contrast, or repeat a metal across multiple layers for cohesion. Blog Bluestone’s guidance, “one metal dominates and the other adds contrast”, and its “Mix Metals With Purpose” headline are practical rules: alternate metals for statement effects, or keep to gold, silver, or platinum for a streamlined, unified look.

9. Style contexts: everyday, workday, and evening approaches
Tailor layering to the occasion. For everyday wear, Blog Bluestone recommends starting with a simple collarbone pendant and adding a shorter chain with subtle detail, think a petite bezel‑set diamond or paperclip links, to create dimension without excess. At work, keep to two layers and avoid oversized pendants or long chains that might tangle with buttons and lapels; for evening, choose either a maximalist pile with varied weights and chain types or a minimalist trio of delicate chains and pavé bars, per David Yurman’s split between maximalist and minimalist approaches.
10. Two valid “start” techniques: base first or statement first
You can build from the shortest chain as a base, Jennifer Fisher’s “start with the shortest necklace as your base, adding longer pieces progressively to maintain proportion and interest”, or begin with a standout focal piece: “Start with a Statement Piece: Begin your layering with a standout piece that serves as the focal point of your ensemble.” Both approaches are stylist‑level tactics; choose the workflow that suits the piece you want to showcase.
11. Common mistakes and fixes
Avoid these frequent missteps: selecting similar lengths (which creates clutter), overloading on heavy pieces, ignoring proportion, and letting pendants sit at the same level. Fixes are concrete: use distinct lengths (14–16, 16–18/18, 20+ inches), employ extenders to create at least 2 inches of visual breathing room, repeat a metal to tie pieces together, and swap an oversized pendant for a sleeker alternative in work settings.
- Two to three necklaces only, no more by default.
- Use a choker (14–16"), a mid length (16–18 or 18"), and a long piece (20–24") as your starting ladder.
- Leave at least 2 inches between focal pendants and adjust with extenders.
- Mix chain types, rope, snake, cable, paperclip, Curb Chain, DY Madison® paperclip links, for texture.
- Mix metals with purpose: let one dominate, repeat a metal for cohesion, or stick to one metal for minimalism.
12. Tactical checklist for building a layered look
13. Brand and product notes that illustrate the rules
David Yurman’s examples, DY Madison® paperclip links and Curb Chain, demonstrate how mixing identifiable chain families creates a layered signature; their models are shown pairing charms and necklaces to “shop the look,” which is a practical playbook for replicating proportions. Sylviejewelry and Monishamelwani provide the tactical spacing and texture rules that prevent overlap; Jennifer Fisher supplies the stepwise "start with base or statement" methods that stylists use when dressing live subjects.
14. Visual cues and the final edit
Think “visual breathing room,” “tiered effect,” and “curated not crowded” as your editing checklist when you stand back and view the finished stack. If anything looks busy, remove the heaviest or most ornate piece first; layering should “feel effortless, not forced,” and the ultimate test is whether the stack serves the outfit rather than competes with it.
15. Conclusion: wear intention, not excess
Layering succeeds when you design with restraint: two to three thoughtfully spaced pieces, varied textures and a clear metal strategy create a look that elevates a tee or sharpens eveningwear without appearing overdone. Keep the 2‑inch rule, choose distinct lengths (14–16, 16–18/18, 20+), and mix chains and metals with purpose, those are the practical, stylist‑approved rules that turn a pile of necklaces into a considered, wearable composition.
This article was produced by Prism’s automated news system from verified source data, official records, and press releases, then run through automated quality and moderation checks before publishing. The system is built and supervised by the people who set the standards it runs under. Read our full AI policy.
Did this article answer your question?