Style Experts Reveal How to Layer Necklaces Like a Pro
Tangled chains and stacks that fight your neckline are the two reasons most layered looks fall apart — here's how to fix both in minutes.
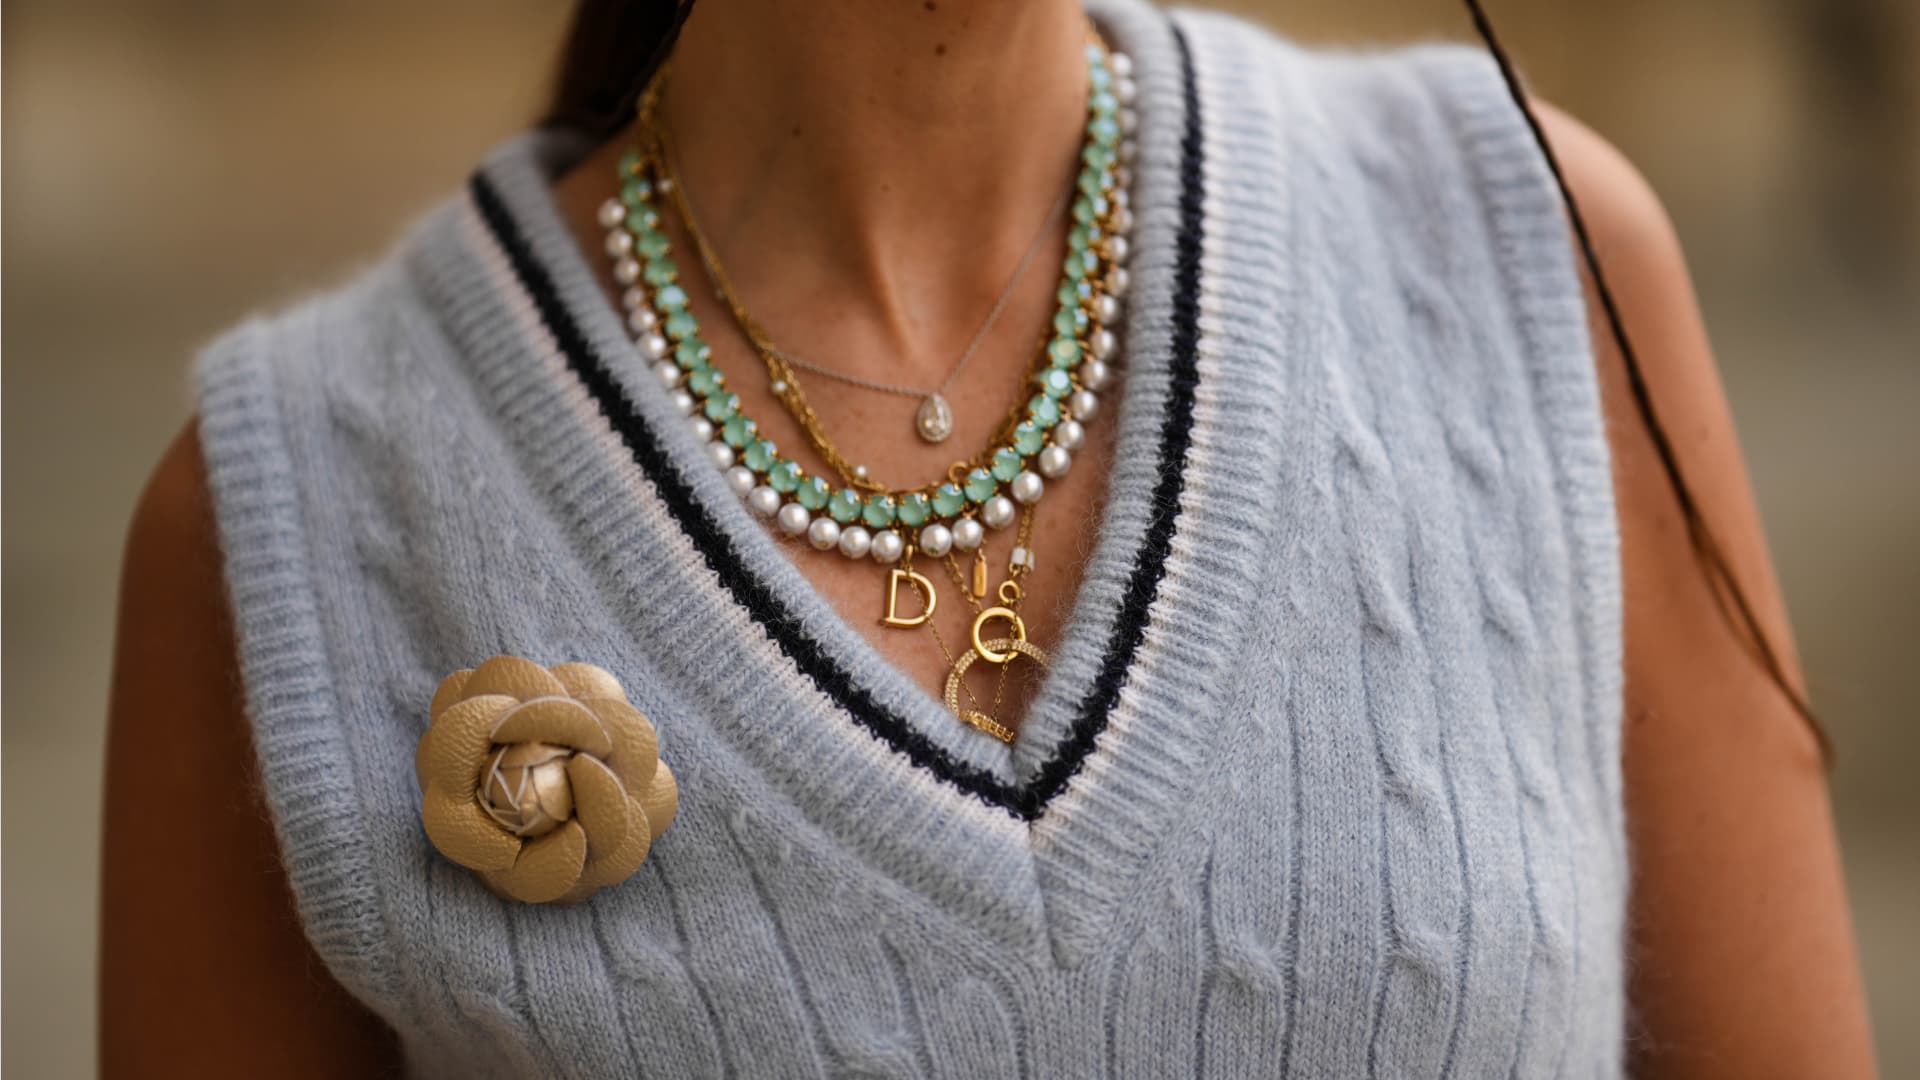
There is a particular confidence that comes from wearing jewelry well — not just wearing it, but composing it. A layered necklace stack done right signals something effortless about the wearer; done wrong, it costs you twenty minutes of frustrated untangling before you've had your morning coffee. The frustrating truth is that most layering mistakes trace back to just two fixable problems: chains that tangle and stacks that ignore the neckline they're resting against. Fix both, and everything else follows.
Start with the Right Foundation
Every well-layered stack is built from the base up. The first piece you put on sets the register for everything above it, and stylists consistently recommend a choker or a short 14-to-16-inch chain as the anchor. This shortest layer does two things: it frames the collarbone and establishes a visual starting point that separates your jewelry from the neckline of your top. From there, the rule is simple arithmetic — space each subsequent piece at least two inches longer than the one before it. A 16-inch base, an 18-to-20-inch mid layer, and a 22-to-24-inch statement piece creates the cascading effect that reads as intentional rather than accidental. Resist the urge to pile on more than three or four chains; two or three necklaces at genuinely distinct lengths stay tangle-free and readable throughout the day.
The Tangling Troubleshoot
Tangling is the number one reason people abandon layered stacks altogether, and it's almost entirely preventable. Fashion stylist Alison Bruhn put it plainly: "The first thing I always suggest is to purchase a layering clasp (necklace detangler)." A layering clasp, sometimes called a separator or multi-clasp connector, is a small tool that anchors each necklace to its own designated hook at the back of your neck. The chains are physically separated at the source, so no matter how much you move throughout the day, they can't migrate into each other. It is, genuinely, the single most useful tool in a jewelry wardrobe that most people don't own.
If you don't have a layering clasp yet, a jump ring at the back achieves a similar effect: attach multiple clasps to the same small ring and the chains share a fixed point rather than drifting independently. Extenders are the other essential fix. When two pieces sit at the same length, an extender on one chain costs almost nothing and creates the critical spacing that keeps chains from colliding.
For chains that are already tangled, the fix requires patience rather than force. Lay the necklaces flat on a soft surface and use a pin or thin needle to tease the knot open gradually — pulling with your fingers tightens the knot further. Fine chains respond particularly well to this method.
Texture and Weight: The Variables Most People Ignore
Length spacing is necessary but not sufficient. Two chains sitting two inches apart will still migrate toward each other if they share the same texture and weight, because smooth links on smooth links find each other naturally. The solution is deliberate contrast. Pair a fine cable chain with a beaded or twisted rope chain; pair a flat herringbone with a round belcher. The different surface geometries resist each other and hold their positions far more reliably.
Weight matters just as much. Placing the heaviest piece as the longest layer creates a natural anchor at the bottom of the stack. The weight pulls that chain down and away from the shorter pieces above it, reducing friction and keeping the whole arrangement in place. A heavy pendant on a short chain, by contrast, tends to pull its layer sideways into neighboring chains — which is why pendant weight and placement deserve their own consideration.
The Focal Pendant Question
One of the clearest style decisions in layering is choosing between a single focal pendant and a collection of small charms. A single strong pendant, a meaningful medallion, a stone drop, a locket, reads refined and draws the eye to one deliberate point. Several smaller charms read more personal and collected, like jewelry that has accumulated meaning over time. Neither approach is wrong, but mixing the two — a statement pendant and competing charms — tends to create visual noise rather than intention. Pick a register and commit to it.
When using a layering clasp, pendant weight on the front of the stack helps counterbalance the clasp's weight at the back. Heavier pendants are the tool's natural partners; very delicate chains with no pendant can feel unbalanced in the clasp and shift forward.
The Neckline Cheat Sheet
This is where most layering advice stops short. It's not enough to know your lengths if your stack is fighting the neckline it sits against. Here's how to match them:
- V-neck: Let the longest piece follow the line of the V. A Y-shaped pendant or a pointed stack that mirrors the neckline's geometry is the most flattering approach. Start with a chain that kisses the collarbone and let the deepest piece fall into the V's point.
- Crew neck and round neck: The collar sits high, so start with a choker or a 16-to-18-inch princess-length chain that clears the fabric. Longer chains from a crew neck create elongating vertical lines. Keep at least one inch of visible skin between the neckline and your first pendant.
- Scoop neck: The rounded neckline calls for rounded shapes — chokers, bib-style pieces, or curved pendants that mirror the scoop. A single mid-length pendant centered in the space works well.
- Turtleneck: The high collar changes everything. Short necklaces disappear into the fabric; the turtleneck is the one neckline that actively rewards drama. Opera lengths (28 to 36 inches) and rope chains layered over the knit create strong vertical lines and balance the collar's weight.
- Strapless and sweetheart: Your collarbones are the focal point, so keep the stack short and frame them. A bold choker or a 16-to-18-inch chain with a curved pendant echoes the sweetheart's arc. Avoid pieces that extend below the neckline's lowest point.
- Off-shoulder: Bold and short. A choker or a close-fitting 16-inch chain draws attention to the exposed shoulders and collarbone without competing with the fabric's horizontal line.
- Open button-down: Treat it as a V-neck with real estate to work with. A choker paired with a mid-length chain sits neatly in the open collar gap and plays off the shirt's unbuttoned depth.
The Order of Operations
How you put the stack on matters as much as what you put on. Fasten dainty chains first, then add chunkier or heavier pieces on top. Putting on the shortest layer first and the longest last means each tier drops cleanly beneath the previous one; reversing the order almost guarantees tangling. When you take the stack off, reverse the sequence.
Store each necklace separately, ideally flat, with tissue or a soft cloth between pieces if traveling. Tangles in storage undo all the care you take in wearing.
When Less Is Genuinely More
High necklines, turtlenecks with heavy knits, and busy printed fabrics often call for restraint rather than abundance. A single intentional piece on a complex print will almost always outperform three competing chains. The skill in layering is knowing when to stop — and that judgment, more than any clasp or extender, is what separates a styled stack from a tangled one.
This article was produced by Prism’s automated news system from verified source data, official records, and press releases, then run through automated quality and moderation checks before publishing. The system is built and supervised by the people who set the standards it runs under. Read our full AI policy.
Did this article answer your question?