Mastering Mash Schedules, Water Profiles, Hops and Yeast for Repeatable Beers
Dial mash temps, water ions, hop timing and pitch rates precisely—these four knobs are what turn a tasty homebrew into a reliably repeatable one.
You want beers that taste the same batch after batch. I built repeatability into my process by treating mash schedule, water profile, hop utilization and yeast management as interlocking systems rather than isolated “tweaks.” Below are the exact, practice-tested recipes, targets and pitfalls I use when I need reproducible results on a 19–23 L (5–6 US gal) homebrew system.
1. Mash schedules
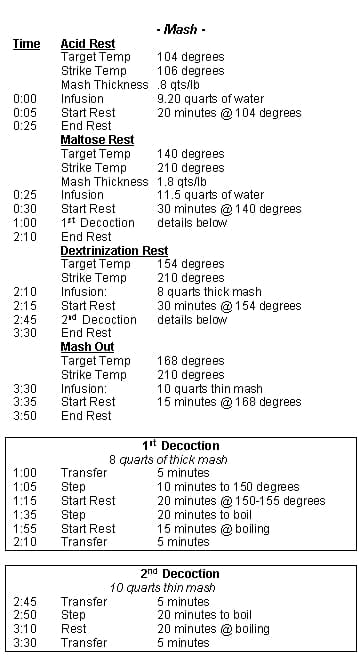
A mash is a conversion factory; control its temperature and time and you control fermentability and body. For clean, highly fermentable pale ales I use a single infusion at 64°C (147°F) for 60 minutes—this reliably produces wort with a calculated attenuation in the mid-70s and a balanced malt backbone. When I want more dextrins and mouthfeel (NEIPA, amber) I raise the main saccharification to 68–70°C (154–158°F) for 60–75 minutes; that shifts the sugar distribution toward less-fermentable compounds and gives a fuller midpalate. If I need starch conversion for high-gravity or complex grain bills, I run a three-step mash: acid/protein rest at 45°C (113°F) for 15–20 minutes to reduce mash pH and improve lautering with big flaked adjuncts, main saccharification at 63–66°C (145–151°F) for 30–45 minutes, then a mash-out at 76°C (169°F) for 10 minutes to stabilize conversion and ease sparge viscosity. For decoction work (Doppelbock or authentic lagers) I do a single-decoction: pull 20–30% of the mash, boil it for 10–12 minutes and return it—expect an extra 3–5 °C jump and markedly more caramelization and body. Always measure mash pH after 10–15 minutes of mash rest; target 5.2–5.4 at room temperature (that’s about 5.1–5.3 hot). If your pH is high, add lactic acid in small 0.1 mL increments or use 1–2 g gypsum to supply Ca2+ and firm up enzymes. Consistent temp control is non-negotiable—±0.5°C drift across batches will change attenuation and hop perception.
2. Water profiles
Water is an ingredient and a tuning tool; match mineral balance to the style and your malt bill. My baseline targets for a 20 L all-grain pale IPA: Ca2+ 100–150 ppm, sulfate 150–250 ppm, chloride 50–100 ppm, magnesium 10–20 ppm. That sulfate-heavy profile (Burton-esque) sharpens hop bitterness and helps separation; for malt-forward beers I swing to a chloride-forward profile: sulfate 50–80 ppm, chloride 120–180 ppm, Ca2+ 80–120 ppm to boost perceived fullness. I dose with the usual salts: gypsum (CaSO4) to raise Ca and sulfate, calcium chloride for Ca and chloride, magnesium sulfate (Epsom) sparingly only if magnesium is below 10 ppm. Use small additions—think grams per 20 L batch, not handfuls. For example, starting from very soft (distilled) water to hit the IPA target above I typically add 4–6 g gypsum and 3–4 g CaCl2 to 20 L—measure and adjust with a TDS meter or a water calculator rather than guessing. Keep mash pH in the correct window by adjusting water alkalinity: if your profile needs a lot of bicarbonate correction (dark beers), add acid (lactic or phosphoric) in small measured doses to prevent a pH jump late in the mash. Track your municipal tap numbers—Ca, Mg, Na, SO4, Cl and alkalinity in ppm—and save the exact dosing per style in a brewing log so you can replicate it.
3. Hops and extended utilization strategies
Hops are time-temperature chemistry; control when and how you add them to control IBUs vs aroma. For bittering, boil 60 minutes (or 90 for very high gravity) remains the most repeatable IBU source—calibrate your utilization by keeping boil vigor consistent. For flavor and top-end bitterness, rely on a late whirlpool/steep: 20–30 g L−1·hr−1 equivalent extraction at 80–85°C for 20–30 minutes gives intense late-hop flavor without excessive isomerized bitterness. I use hop-bursting for IPAs: a modest 60-minute addition for base IBU (10–20% of total IBU), with 70–80% of the hops split between a 15–10-minute addition and a 0–5-minute/flameout addition, then a 20–30 minute 80°C whirlpool. For dry-hopping, dose by weight per volume: 4–8 g/L for a session IPA feel, 10–15 g/L for aggressive late-biotransformation beers, and split additions across days to control grassy or vegetal extraction. Beware hop creep: when dry-hopping sugars and enzymes can trigger renewed fermentation and carbonation spikes—if your beer is at or near terminal gravity, sterilize hops (brief heat or peroxide rinse) or wait until gravity is stable for 3 days before heavy dry-hop. Practical lab habits: always weigh hops on the same scale, record alpha acids and batch alpha for pellets, and keep your kettle temperature profile consistent (boil vigor, whirlpool temp and time). Small changes move aroma more than bitterness; that’s where repeatability either shines or falls apart.
4. Yeast management
Yeast is the biological repeatability gate. Pitch rate, health, oxygen and temperature control are the four levers I obsess over. For ales I target 0.75–1.0 million viable cells per mL per degree Plato (roughly 0.75–1.0 M cells/mL/°P); for lagers 1.2–1.5 M cells/mL/°P. For a 19 L batch at 12 °P (~1.048 OG) that translates to roughly 150–200 billion viable cells for a clean, healthy fermentation start. I verify with a hemocytometer or a digital cell counter when precision matters. Oxygenation: aim for 8–10 ppm dissolved O2 for ales using pure O2, or maximum vigorous aeration by shaking (target ~8 ppm equivalent). Over-oxygenation is less common, but under-pitching plus low oxygen guarantees stuck or stressed ferments. Temperature matters more than people admit—control it to ±1°C with a PID and immersion heater/chiller; for a clean American ale I ferment at 18–20°C, for fruity Belgian/English ales I ferment 22–26°C, and for kveik use the strain’s recommended 30–38°C window to get consistent ester profiles. Manage yeast life: make starters for >1.065 beers (I use a 1–2 L starter for mid-high gravity), re-pitch up to three times max from healthy crops, and store slurries cold with fresh wort feed if holding longer. Track viability with simple staining or professional kits; a 70% viable pitch will underperform even at the correct cell count. For consistent attenuation, measure real-time gravity and temperature and build a fermentation profile log—after a few batches you’ll be able to predict final gravity within 0.002.
- Confirm mash water, salts and expected pH on the calculator and record the exact grams for the batch.
- Preheat mash liquor to hit target mash temps within ±0.5°C.
- Weigh hops to the nearest 0.1 g and set whirlpool/stand temp timers.
- Rehydrate or make yeast starter 24–48 hours ahead; measure viability if re-pitching.
- Record every variable in an electronic brew log so the next batch copies the same numbers.
Practical checklist I use before every brew
Conclusion Repeatability is less about a single “secret” and more about treating mash schedule, water chemistry, hop timing and yeast management as a single control system. Dialing each of the four knobs to specific, measurable targets—mash temps and time, ion ppm and pH, hop timing and temperatures, and pitch rate plus oxygen—gave me the confidence to hit the same beer profile across multiple systems and seasons. Get those numbers stable and the recipes stop being guesses and start being reliable.
Know something we missed? Have a correction or additional information?
Submit a Tip