Bonsai Garden Reveals Seven Approach-Grafting Secrets to Add or Relocate Branches
Bonsai Garden’s seven approach‑grafting secrets compress a years‑long shortcut into repeatable steps so intermediate‑beginner growers can add or relocate branches reliably.
If you want to add a convincing branch or relocate a limb without waiting for slow air‑layering, Bonsai Garden’s Feb 26, 2026 tutorial, aimed squarely at intermediate‑beginner growers, lays out seven concrete, repeatable secrets to make approach grafting work on living bonsai. I’ve used these same principles in the nursery and on my own ficus and elm projects; the difference between a failed graft and one that looks natural five years later is almost always the prep and timing.
1. Choose compatible parent and scion
Bonsai Garden’s Feb 26, 2026 piece emphasizes species compatibility and vigor; pick a scion and recipient that are closely related in growth rate and cambium thickness. In practice that means matching deciduous to deciduous, conifer to conifer, or staying within the same genus when possible, a vigorous young branch on the recipient and a healthy donor scion with similar bark texture will give you the best cambium contact. If you’re unsure, test by holding the two cambium surfaces together for a few minutes: they should sit flush without large gaps or offset bark.
2. Time the graft for active growth
The tutorial for intermediate‑beginner growers points to doing approach grafts during the tree’s active growing season, typically spring to early summer for most temperate bonsai, when sap flow is up and cambium is lively. Do not attempt major approach grafting during dormancy or peak summer heat; the tissues need to be producing callus and healing. In my experience following Bonsai Garden’s guidance, unions form visibly faster when nights are cool and daytime temperatures average in the 15–25°C range.
3. Prepare both stems with careful cuts and clean tools
Bonsai Garden stresses clean, matched cambium exposures: strip a narrow window of bark on both stems so fresh cambium meets fresh cambium, and use a razor‑sharp grafting knife to avoid crushing cells. On the scion side lighten leaves to reduce transpiration, but leave enough foliage to feed the graft, for intermediate‑beginners the rule of thumb from the tutorial is to reduce but not eliminate active foliage on the donor branch. Sterilize blades between cuts to minimize infection and always remove loose bark and callus until you see bright green cambium.
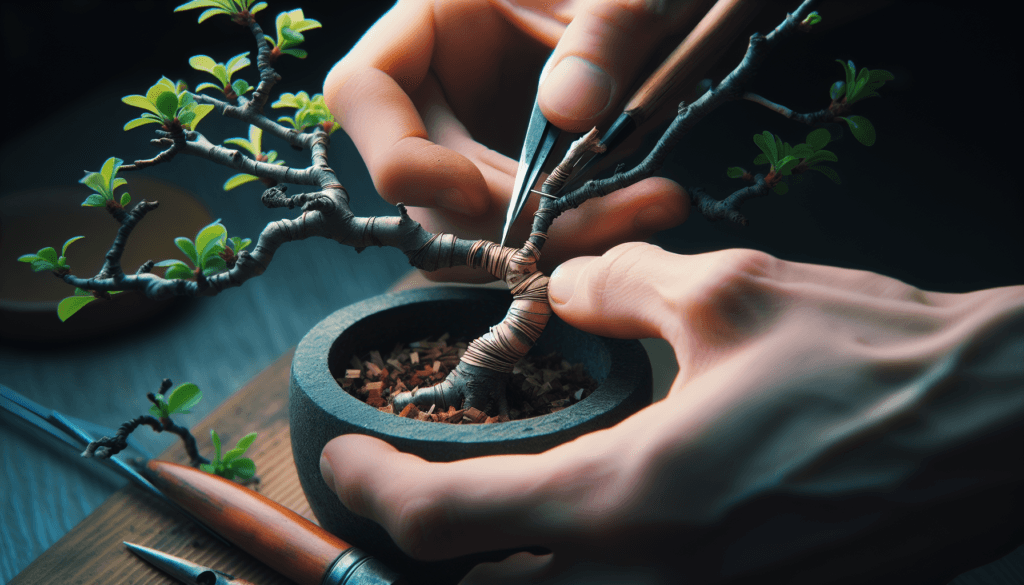
4. Make intimate contact and align the cambium precisely
The core secret in the Feb 26, 2026 guide: alignment is everything. Once bark is removed on both stems, clasp them together so the cambium layers touch in several places along the joint, more contact points mean a higher chance of vascular bridging. Bonsai Garden shows how a slight notch or matching splice can stabilize contact; I prefer a shallow matching notch on both stems so they lock without slipping. Use a snug temporary brace to hold alignment while you bind.
5. Secure the graft with the right materials and tension
Bonsai Garden recommends using soft, breathable ties (raffia, grafting tape, or parafilm) to hold the two stems without crushing them, and then seal exposed seams with grafting wax or wound paste if the climate is dry. Wrap evenly from the base of the joint outward to preserve cambial contact, and avoid sharp turns or knots that concentrate pressure. • Tip from my trials: tie a loose figure‑eight of raffia first, then finish with parafilm, the raffia prevents slippage while the parafilm keeps humidity in the micro‑environment.
6. Aftercare: monitor, reduce stress, and know when to sever
The Bonsai Garden tutorial for intermediate‑beginners is explicit about the waiting game: keep the graft shaded but ventilated, maintain steady moisture (not waterlogged), and return to a light feeding schedule once new callus appears. Check every 1–2 weeks for signs of union (callus growth crossing the seam and lack of movement under gentle tension); most unions first show callus in a matter of weeks, but plan on months before fully relying on the new connection. Only sever the scion from its original source when the union is solid, cut the donor side in two stages so the new connection carries the load, then clean and seal the remaining stub.
7. Recognize and fix common failures early
Bonsai Garden’s Feb 26, 2026 article walks beginners through troubleshooting: poor cambium contact, infection, girdling from ties, and incompatibility are the usual culprits. If the graft slips, re‑align and rebind within the first couple of weeks; if infection shows (soft, discolored tissue), remove diseased areas and treat with a clean cut and wound paste, and if incompatibility appears (no callus after several months) plan a different approach or try a new donor. Preventative points the guide stresses, sterile tools, correct tension, proper timing, are where most grafts are won or lost.
- Tools: sharp grafting knife, sterilant, raffia/parafilm, grafting wax.
- Timing: active growth period (spring/early summer for most species).
- Positioning: site with good light but not blast heat; clear access for future wiring or styling.
- Aftercare: shade, steady moisture, check every 7–14 days.
Practical checklist (one‑page from Bonsai Garden’s approach)
Bonsai Garden’s tutorial is written for intermediate‑beginner growers who want a clear path beyond trial and error; the Feb 26, 2026 piece folds together the technical bits I always train people on in the nursery, clean cuts, precise cambium contact, correct tension, and patient aftercare. Approach grafting isn’t magic; it’s method. Follow these seven secrets, keep detailed notes on species and timing the first few times, and you’ll convert what used to be a risky gamble into a repeatable tool in your bonsai toolbox.
This article was produced by Prism’s automated news system from verified source data, official records, and press releases, then run through automated quality and moderation checks before publishing. The system is built and supervised by the people who set the standards it runs under. Read our full AI policy.
Did this article answer your question?