Breville's Step-by-Step Guide Helps Home Baristas Dial In Espresso
Breville's official espresso dial-in guide cuts through the guesswork with a practical framework built on dose, yield, grind, and taste — the same variables professional baristas control every single pull.
Breville has earned its place as one of the most-referenced names in the home espresso world, and its official guide on dialing in espresso reflects exactly why. Semi-automatic machines like the Barista Express, Barista Pro, and Bambino Plus are popular among home baristas for their ease of use and professional-level results. But as Breville's own guide makes clear, owning the right machine is only half the equation. Achieving the perfect espresso shot requires more than just pressing a button: it starts with dialing in your espresso beans.
What "Dialing In" Actually Means
The term gets thrown around constantly in home coffee circles, but it has a specific, actionable definition. Dialing in refers to the process of adjusting grind size, dose, and extraction time to achieve a balanced espresso shot. When you dial in espresso, you follow a process that aims to harmonize the complex flavor elements packed into the roasted coffee beans, such as caramelized sugars, citric acids, and caffeine. Get the balance right and those elements sing together. Get it wrong and you're drinking something sour, bitter, or flat.
The three main parameters are dose, yield, and brew time, all of which have a massive impact on flavor. When dialing in, you should only adjust one parameter at a time, otherwise you can easily lose track of which has affected the espresso's flavor in a certain way. This is the cardinal rule, and it's the one most beginners break first.
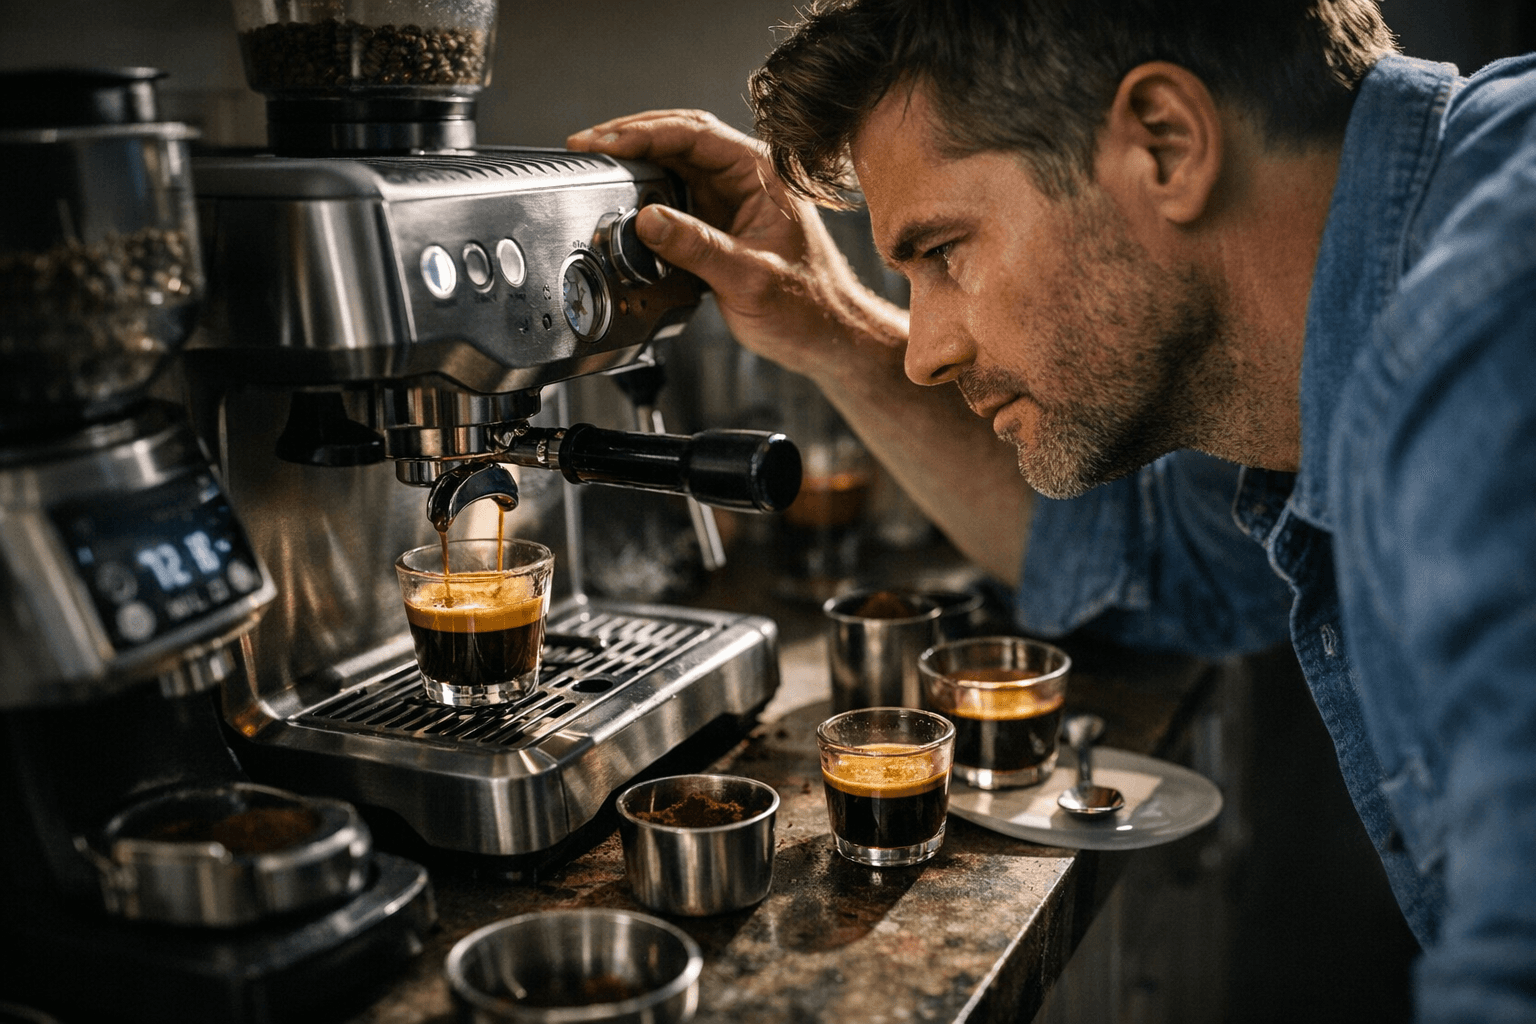
Step 1: Lock In Your Dose
Before anything else, you need to know how much coffee is going into the portafilter. The dose is the amount of dry grounds that you place into your portafilter, typically measured in grams. Many baristas consider this the first step of how to dial in espresso.
Begin by weighing the dry coffee grounds, known as the dose. The ideal amount depends on several factors, such as your portafilter size and even the roast date of the coffee beans. In general, 18 to 22 grams is a safe start, and you can always adjust from there. For most Breville machines with a 54mm portafilter, the practical ceiling is a little lower. All Brevilles other than the dual boiler and Oracle machines use a slightly smaller 54mm portafilter, meaning that if you want to play around with dose, caution against going much higher than 18 grams.
One critical note: don't trust the grinder's timed dose setting as your source of truth. The built-in grinder runs based on time, not weight, and the factory settings are never ideal for most beans. Using a scale and individually measuring each grind results in a much more precise and consistent amount of coffee in every shot.
Step 2: Set a Target Yield and Brew Ratio
Once dose is fixed, determine your yield — the weight of liquid espresso in the cup. A 1:2 ratio means that for every gram of dry coffee, you'll extract two grams of liquid espresso. So if you're dosing 18 grams, you're targeting 36 grams in the cup.
Different espresso recipes may employ alternate ratios, such as a delicate but highly-concentrated Lungo clocking in at 1:3, or the rich, intense Ristretto at 1:1. For most medium-roast espresso blends and milk drinks, 1:2 is the right starting point. This ratio balances strength and flavor, tasting great as a straight shot or in milk drinks.
Step 3: Adjust Grind Size
With dose and yield set, grind size becomes your primary lever. When you're dialing in an espresso, grind size is always the first thing you adjust.
When you grind finer, you want to increase the brew time; if not, you may end up with a short and under-extracted espresso, since finer grinds will have more resistance to the flow of water. When you grind coarser, you want to shorten the brew time; coarser grinds will allow for a faster flow of water, so the espresso extraction will take a shorter amount of time.
Make changes in small increments. Your grinder's micro-adjustments are your best friend for dialing in espresso. Move in tiny increments, sometimes just one click, to fine-tune your flow rate. Patience and small steps lead to perfect shots.
Step 4: Time the Shot and Taste
The total duration of water contact with the coffee grounds is critical to achieving a balanced and flavorful espresso. An ideal extraction time typically falls between 25 to 30 seconds, starting as soon as you activate your brewing cycle, noting that a great-tasting espresso can take anywhere between 20 and 40 seconds.
But don't let the clock override your palate. Focus on taste rather than time alone — the clock is a guide, but your palate determines balance.
If it tastes sour or sharp, it's under-extracted. Either grind finer or extend your espresso yield slightly, say from 36g to 40g. This gives the water more time to extract soluble flavors. If it tastes bitter or ashy, it's over-extracted. Go a little coarser, or reduce your yield.
Puck Prep: The Variable Nobody Talks About Enough
Even a perfectly calibrated grind setting can produce a terrible shot if puck prep is sloppy. Level the coffee in the portafilter before tamping. Use firm and even pressure when tamping. Ensure the coffee bed is level to prevent channeling, which is when water finds uneven paths through the coffee.
After grinding into your portafilter, ensure that the coffee bed is as evenly distributed as possible. You can do this with your index finger or use distribution tools like a WDT tool. Use your finger to gently sweep the coffee up, down, left, and right. Ensure your tamper is level and apply medium pressure. Consistency is more important than the exact force.
A bottomless portafilter is a powerful diagnostic tool here. It renders channeling or unevenness visually obvious, giving immediate useful feedback for modifying your grind, distribution, and tamp. It's a great learning aid when dialing in espresso.
Roast Level Changes Everything
One thing Breville's guide emphasizes that too many home baristas ignore: every new coffee requires its own dial-in session. The type, size, and roast of bean can all dramatically impact the way it grinds, which can lead to an under-extracted or over-extracted espresso.
In general, darker roasts will be easier to extract, requiring a more coarse grind and less water. Lighter roasts, on the other hand, will require you to grind finer and have a higher yield to fully extract. Temperature also matters for the extremes: lighter roasts often require higher temperatures to extract without sourness, compared to the often darker blends and roasts sold for espresso.
Troubleshooting Fast and Slow Shots
When something is off, the fix is usually straightforward:
- If your espresso runs fast, delivering your yield too quickly and leaving you with a sour, thin-bodied cup, try choosing a finer grind or upping the dose by a gram or two.
- If your espresso flows too quickly, under 24 seconds, adjust to a finer grind. If it flows too slowly, over 35 seconds, adjust to a coarser grind.
- If your shot is tasting both bitter and sour at the same time, you're probably extracting unevenly due to channeling: work on your puck prep.
Keep a Log
Don't attempt to memorize. Note your grind setting, dose, yield, time, and flavor notes. The journal is your own espresso dialing-in bible where you record what is working and troubleshoot what is not. If you enjoy experimenting with various beans, roasts, and producers, keeping a small recipe booklet with notes on the grind settings lets you make easy adjustments in the future without having to go through the entire dialing-in process.
The 4 Keys Formula
Breville's machines are built around what the brand calls its 4 Keys Formula. Built on the foundation of the 4 Keys Formula, which includes the perfect coffee dose, 9 bar pressure, precise extraction temperature, and steam optimized for velvety crema, home baristas are empowered to master the dialing-in process right from the comfort of their own kitchen.
Those machine-side parameters handle a lot of the heavy lifting, but they can't compensate for a dose that's off by four grams or a grind that's three settings too coarse. It's important to use the same coffee blend throughout the dialing-in process, as different blends will require different settings. Be prepared to pull several shots to get it right. Learning this process is a rite of passage for every barista, and over time, it will become second nature. The machine sets the ceiling; your technique determines whether you reach it.
This article was produced by Prism’s automated news system from verified source data, official records, and press releases, then run through automated quality and moderation checks before publishing. The system is built and supervised by the people who set the standards it runs under. Read our full AI policy.
Did this article answer your question?