DIY Crafts Releases Beginner-Friendly Axolotl Amigurumi Crochet Tutorial
DIY Crafts just dropped a photo-rich axolotl amigurumi tutorial built for beginners, covering frilly gills, tail shaping, and limb placement one stitch at a time.
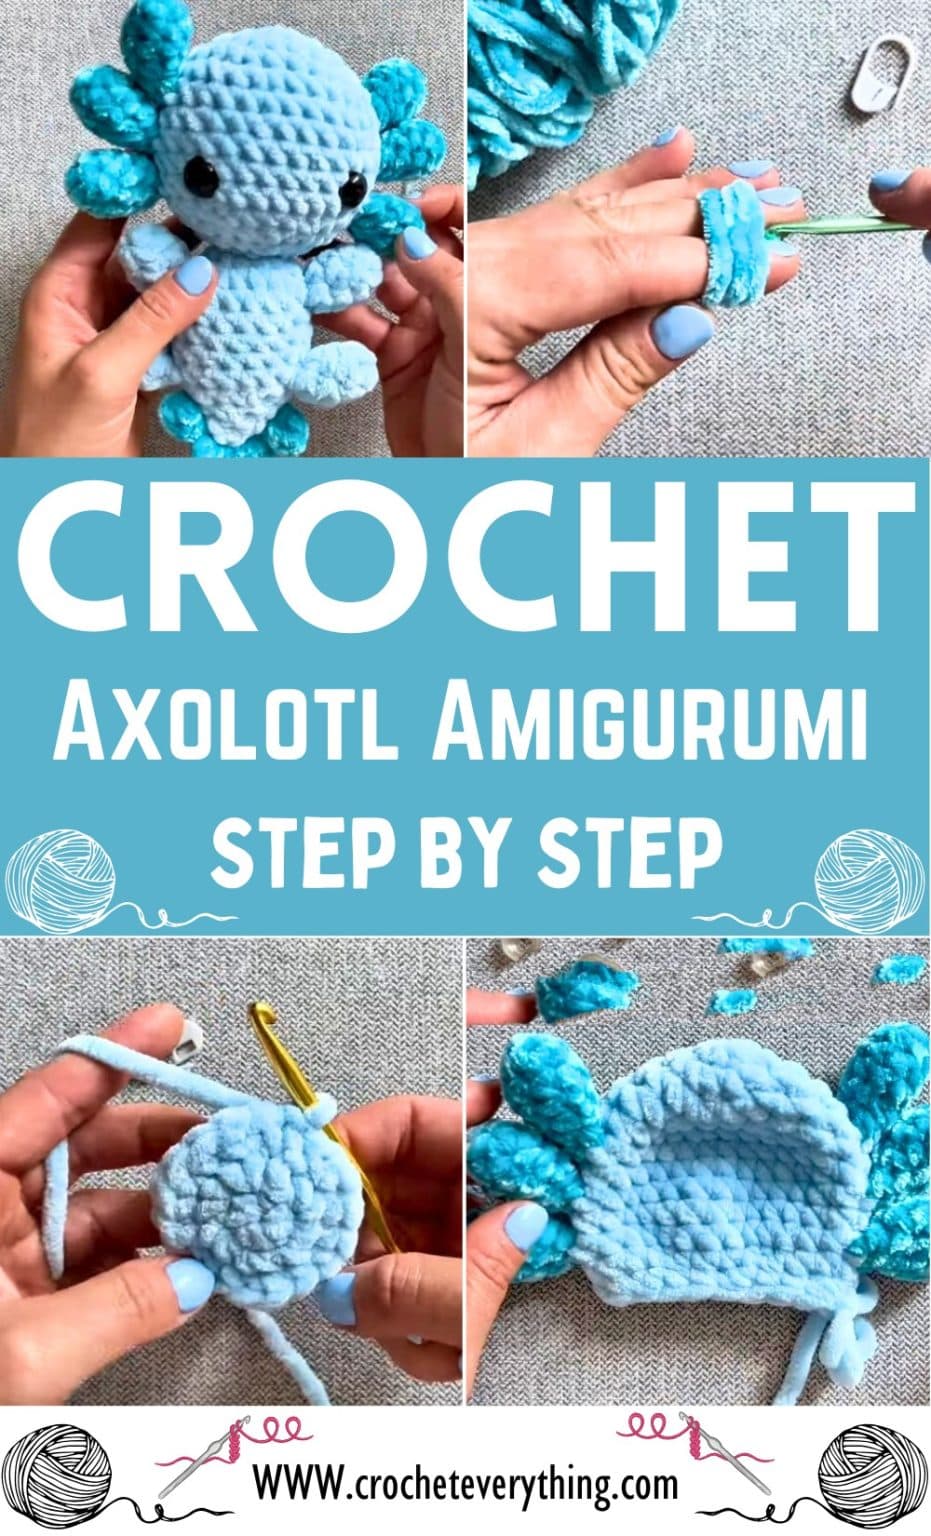
If there's one amigurumi project that's been winning over new crocheters lately, it's the axolotl. With its feathery gill stalks, stubby little legs, and permanently cheerful expression, the axolotl translates beautifully into plush form, and DIY Crafts has released a step-by-step, photo-rich tutorial designed to walk complete beginners through every part of the build.
What the Tutorial Covers
The DIY Crafts guide is structured as a true beginner resource, not a pattern that assumes you already know the hard parts. It walks you through basic shaping first, which is the foundation of any amigurumi piece, before moving into the details that make an axolotl unmistakably itself: the distinctive frilly gills, tail shaping, and the placement of the small limbs. Those four elements, basic shaping, gills, tail, and limbs, are exactly where beginners tend to either fall in love with amigurumi or get frustrated enough to set the project down. Having each addressed in sequence, with photos at each stage, removes most of the guesswork.
The photo-rich format matters more than it might sound. Written stitch counts alone can be genuinely confusing when you're new to working in the round, and seeing what a correctly shaped gill ruff looks like before you've attached it is the difference between a confident join and a ripped-out seam.
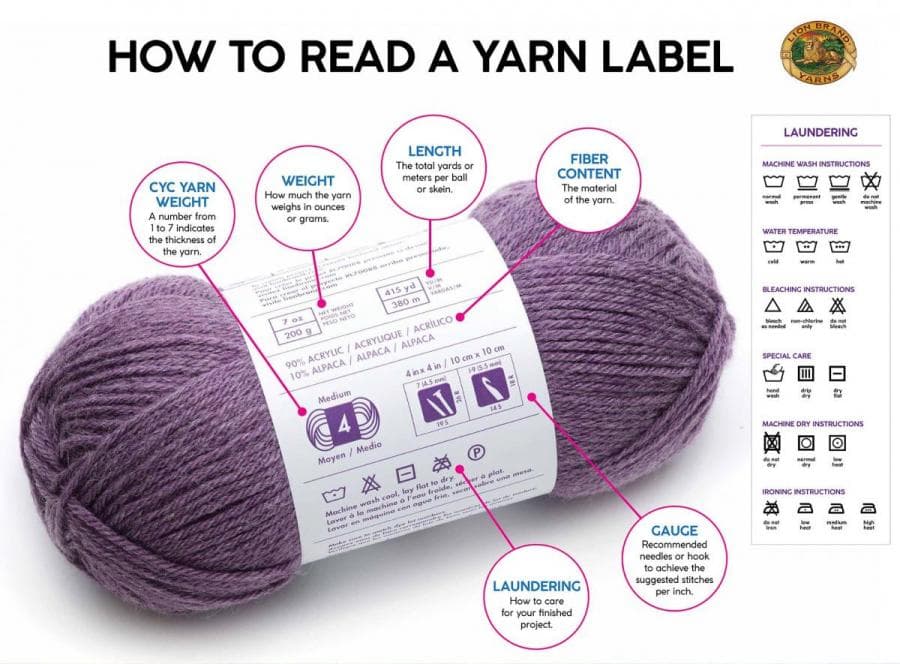
The Stitches You Need Before You Start
Don't pick up this pattern on day one of crocheting. The consensus from experienced crafters is clear: "focusing on mastering basic stitches such as single crochet, increases, and decreases is essential before tackling the axolotl." Those three skills, single crochet, working into the front or back loop to increase, and the invisible decrease, are the entire technical vocabulary of this project. If you can work a tight magic ring, single crochet evenly around, and execute a clean decrease without leaving a gap, you are ready.
The good news is that none of those skills require paid instruction. Plenty of free tutorials are available online, and a few practice rounds of a basic sphere, the classic beginner ball, will give you enough muscle memory to approach the axolotl's gill fronds without panic.
The Two Technique Tips That Actually Change the Result
Two pieces of practical advice stand out as genuinely impactful for this specific pattern.
The first is tension. Keep your stitches tight, particularly on the smaller components like the limbs and gill stalks. Amigurumi stuffing is unforgiving: if your tension is even slightly loose, the polyfill will push through the fabric and give your axolotl a fuzzy, pockmarked surface instead of a smooth one. This is especially true on the gill fronds, which are narrow and tubular, and on the four small legs. Working with a hook one size down from what your yarn label recommends is a common fix if you naturally crochet loosely.
The second tip is blocking. Before you assemble the individual pieces, block them. Blocking each component before seaming improves both the shape and the overall finish of the finished plush. It sounds like an extra step that impatient crafters skip, but on a project with as many distinct pieces as an axolotl, it makes the final assembly dramatically cleaner.
Choosing Your Yarn and Colors
This is where the project becomes genuinely personal. The axolotl's real-world coloration gives you a natural starting point: classic wild type colors like pink and white produce an immediately recognizable, undeniably cute plush. But the amigurumi format is also a canvas, and pastel shades or even bright neons can add a fun twist that gives each axolotl its own character.
Yarn texture is as important as color here. Soft yarns make the finished plush genuinely cuddly, which matters if you're making it as a gift or as decor. Avoid anything scratchy or loosely spun. A smooth, tightly plied DK or worsted weight yarn in a soft acrylic or cotton blend will give you clean stitch definition and a surface that photographs well, which is relevant if you're planning to share the finished piece.
- Classic pink and white: the wild type axolotl look, immediately recognizable
- Pastels: lavender, mint, and peach all work well for a softer, fantasy-creature feel
- Bright neons: bold and playful, great for making a statement piece
- Soft acrylic blends: easy to care for, widely available, and ideal for gift-giving
Why This Project Works for Beginners
The axolotl is a smart entry point into character amigurumi precisely because its anatomy forgives small imperfections. The gill fronds are textured by nature, so slight tension variation reads as character rather than mistake. The body is worked in a single oval or elongated sphere depending on the pattern approach, which keeps the main piece manageable. The limbs are small and worked quickly.
What the project does demand is patience with assembly. Getting the gill placement symmetrical and the limbs positioned naturally takes a careful eye, and this is where the step-by-step photo guidance in the DIY Crafts tutorial becomes most valuable. Following a sequential approach keeps the process smooth, and having a reference image at each assembly stage is worth more than any written instruction.
Beyond the technical, there's a real case for this kind of project as a regular crochet practice. Crocheting encourages mindfulness, reduces stress, and provides a sense of accomplishment with each completed project, and a piece with as much personality as an axolotl delivers that payoff in a way that a dishcloth practice square simply does not. The finished object is something you'll actually want to display, gift, or post, which makes completing it feel meaningful rather than purely mechanical.
Getting Started
Gather a soft worsted weight yarn in your chosen colorway, a crochet hook sized appropriately for that yarn, polyfill stuffing, a yarn needle for seaming, and safety eyes if the pattern calls for them. If you crochet loosely by habit, size down half a hook size on the smaller pieces.
Work through the DIY Crafts tutorial in order, block each piece before you start assembling, and resist the urge to rush the gill attachment. The frilly gills are the feature that makes an axolotl an axolotl, and taking the time to get their placement right is what separates a finished plush that looks intentional from one that looks improvised.
The axolotl amigurumi trend has real staying power in the crochet community, and a well-made one in soft pink and white or an unexpected neon will turn heads at any craft fair or on any shelf. It's a project worth doing properly.
This article was produced by Prism’s automated news system from verified source data, official records, and press releases, then run through automated quality and moderation checks before publishing. The system is built and supervised by the people who set the standards it runs under. Read our full AI policy.
Did this article answer your question?