Leathercraft edge finishing techniques for smoother, more durable goods
Edge finishing is the quickest way to make a leather piece look intentional, and the right mix of beveling, burnishing, paint, or wax decides whether it reads polished or homemade.

On belts, wallets, and bags, raw cut edges can look rough, fray sooner, and make even good stitching feel unfinished. The fix is not one single trick, but a sequence: shape the edge, compress the fibers, then seal and polish it so the finish matches the rest of the work.
Why edge finishing matters
Once the fibers on a cut edge are left exposed, they can start to fuzz and wear faster. The basic goal of edge finishing is simple: close those fibers down, reduce abrasion, and leave a smoother surface.
Start with beveling, not burnishing
The first move is often beveling. An edge beveler shaves the sharp corners off a cut edge at a consistent angle, which rounds the profile and makes the edge easier to finish cleanly. If you skip this step on a project that needs a refined look, the edge can keep its hard, blocky shape even after you slick it.
Beveling is especially useful before dyeing or burnishing because it gives the finish somewhere to go. Instead of fighting a square corner, you are working on a softened edge that will accept compression more evenly.
Burnishing is where the edge comes alive
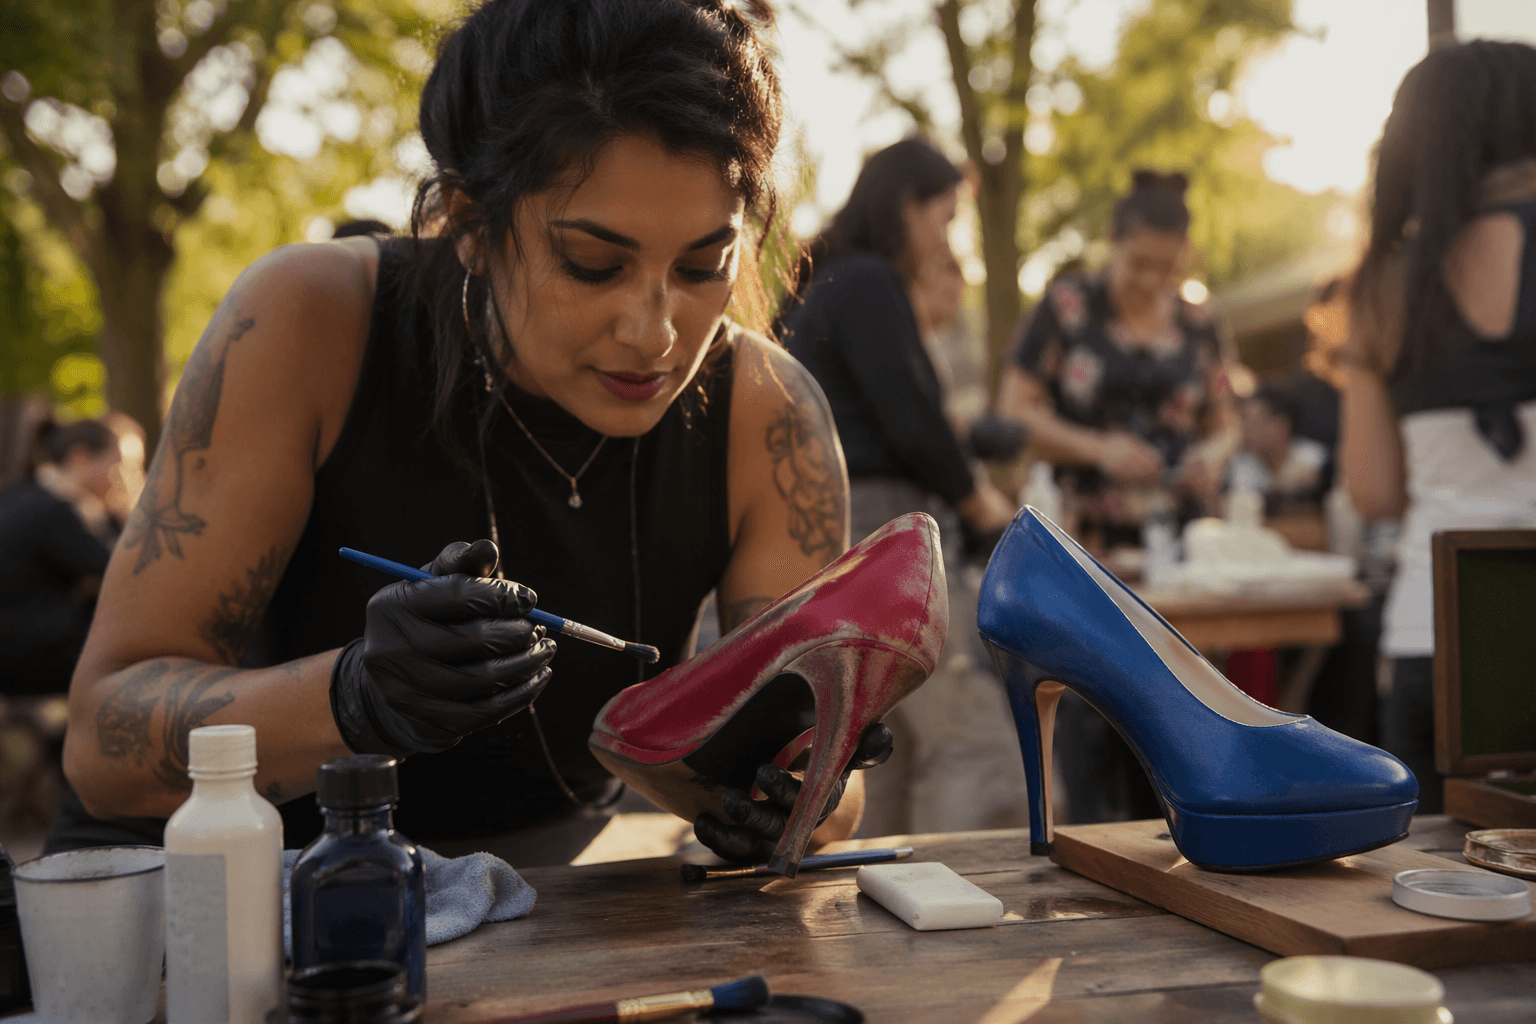
Burnishing is the heart of the process. It is a friction-based technique that compresses the leather fibers into a smoother, more sealed edge, and it is the step that turns a cut edge into something that can gleam. The practical payoff is immediate: the edge stops looking fuzzy and starts looking like part of the design.
You can do it with water, gum tragacanth, or Tokonole, then work the edge with canvas cloth or a hand slicker until the fibers tighten up. For larger projects, powered burnishing wheels save time and help keep the finish more even across long runs like bag panels or belt edges. The same workflow shows up on holsters, knife sheaths, and high-end handbags. It is the standard way many finished leather goods get their clean edge.
Tandy lists Tokonole as water-based and non-toxic. It can be applied to the edge or the flesh side before rubbing with a slicker or canvas. It is useful when you want a smooth glossy finish without leaning on harsher products.
Choosing between burnish, paint, or wax
There is no single correct edge finish. Leather edges are typically finished by burnishing, dyeing, or painting, the same three-way split Sailrite uses. Burnishing gives you a more natural, compressed edge. Dyeing and edge paint create a more uniform colored line that can sharpen the visual outline of the piece.

If you want a uniform colored finish, edge paint or edge dressing does the job. If you want a more traditional sealed edge, beeswax can be buffed into the leather and then polished with a soft cloth or canvas until it shines. Paint produces a crisp, deliberate outline. Wax keeps the edge closer to the material’s natural look.
For a lot of belts and smaller accessories, the choice comes down to what the rest of the project is already doing. A dyed, polished edge can look perfectly at home on a dress belt or wallet, while a natural beeswax finish often suits a more classic, less glossy build. A carefully burnished edge on one side and a muddy, overworked edge on the other will make the whole piece look like it was rushed.
The tools that make the difference
Edge tools are not optional if you want repeatable results. Weaver Leather Supply puts bevelers, trimmers, slickers, and burnishers in the core set for professional leather finishes. A dull tool or the wrong profile leaves uneven cuts, and uneven cuts are much harder to finish well.
The hand tools are still the foundation because they let you control pressure and angle. Canvas cloth is useful because it grips the edge just enough to generate friction without tearing it up. A hand slicker gives you more focused pressure for smaller work. When the project gets larger, powered burnishing wheels take over the repetitive part and keep you from wearing yourself out before the edge is done.
Where beginners usually go wrong
Most bad edges fail for the same few reasons. Skipping beveling leaves a square, stubborn corner that never quite looks finished. Over-wetting the edge can make the leather go mushy instead of smooth. Using dull tools produces a ragged surface that takes more effort to correct than it saves.
There is another common mistake: flooding the face of the leather with too much finish. Edge paint, dressing, wax, or burnishing compound should stay on the edge, not spread across the panel and stain the clean surface. A neat edge job depends on restraint as much as pressure. The goal is a controlled, even build-up, not a shiny mess that spills onto the rest of the work.
A craft with deep roots
Leather itself has been used for more than 7,000 years to make clothing, footwear, handbags, furniture, and tools. Burnishing as a surface-finishing idea also reaches deep into history, with early pottery showing burnishing and polishing practices dating back to 6500 BCE and 2000 BCE.
A hand-carved bone tool found in Italy was used for smoothing leather and dates to about 400,000 years ago. On the tooling side, C.S. Osborne & Company was founded in 1826 as a maker of saddle and harness tools.
This article was produced by Prism’s automated news system from verified source data, official records, and press releases, then run through automated quality and moderation checks before publishing. The system is built and supervised by the people who set the standards it runs under. Read our full AI policy.
Did this article answer your question?