Common Fiberglass Repair Mistakes and How to Avoid Them Safely
Learn the top fiberglass repair mistakes and step-by-step fixes, surface prep, resin choice, layering, safety, curing, and when to call a pro.

Lead: Fiberglass repairs fail more often from simple, avoidable mistakes than from bad luck. Below I break down the common errors you’ll see in boat, RV, and tub repairs and give clear, practical fixes you can use today.
1. Poor surface preparation
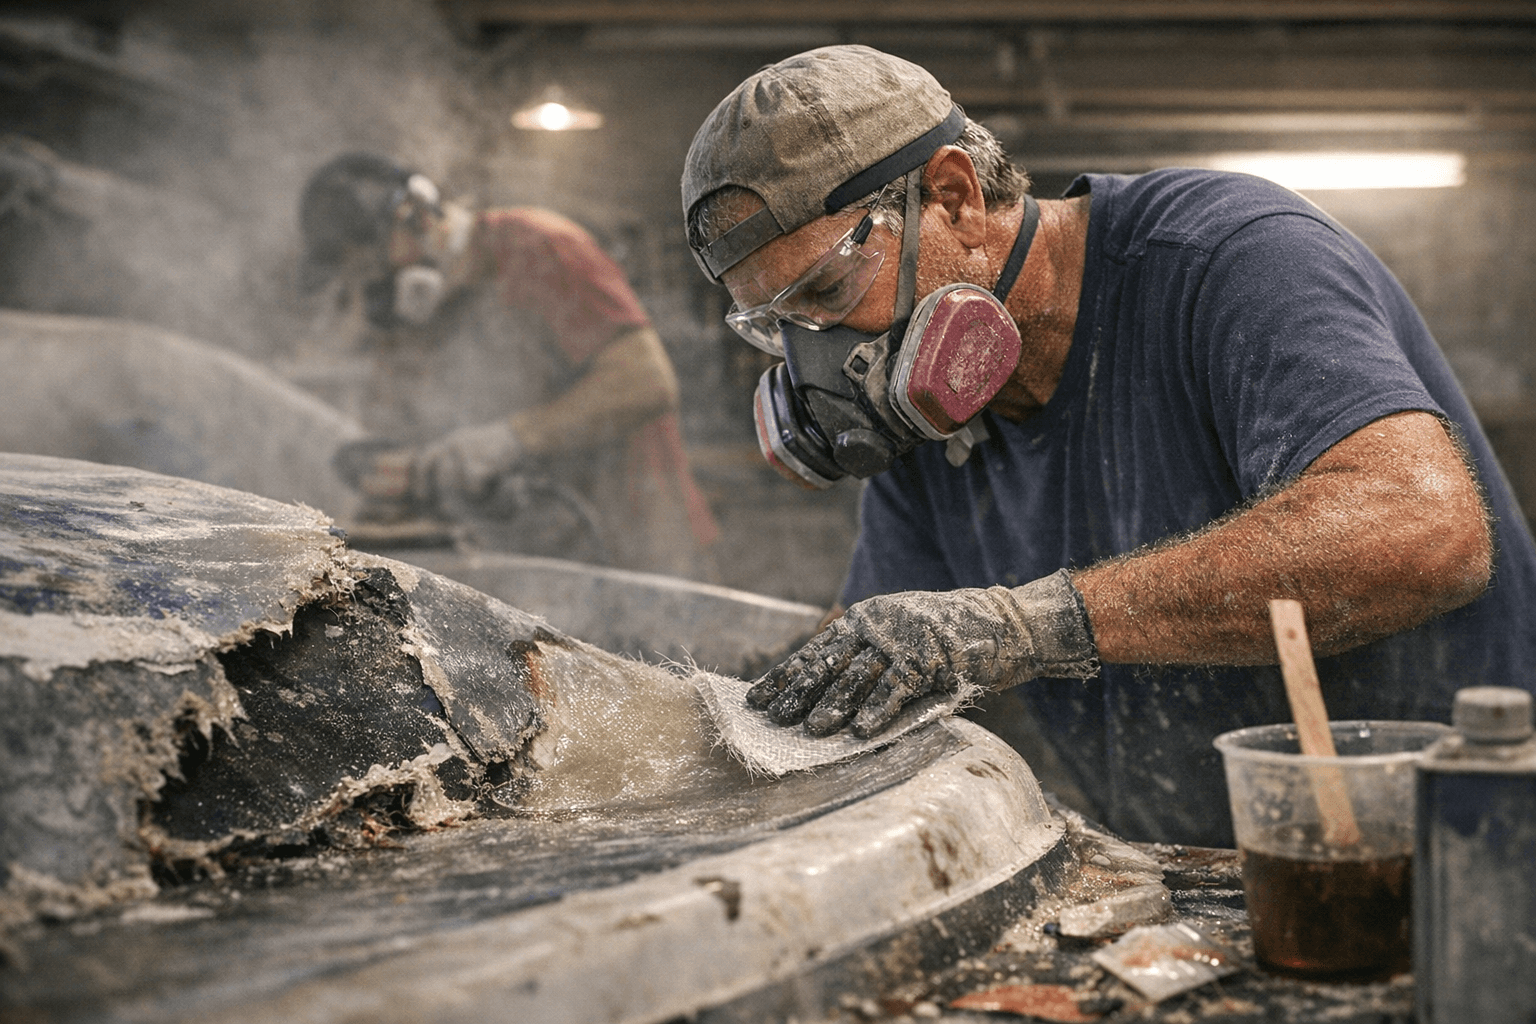
Clean, sand and remove weak fibers before you do anything else. Truecomposites instructs you to “Clean the area thoroughly using acetone or a similar solvent to remove grease, oils, and dirt.” They also say to “Sand the damaged area well… Use 80‑grit sandpaper to roughen the area and create a good bonding surface.” Removing flaky or deteriorated glass, “trim, dremel and/or sand them away before proceeding”, ensures mechanical bonding instead of a delaminating patch.
2. Using the wrong resin or ignoring compatibility
Resin choice can make a repair fail outright if you mismatch systems. Fiberglass Warehouse states: “If the part was made with polyester resin, you can use epoxy resin over top. Epoxy resin will adhere to polyester resin surfaces. The opposite is not true.” Plan repairs around that rule and, when gelcoat is involved, remember their advice to prefer polyester for parts you’ll gelcoat.
3. Leaving gelcoat under new fiberglass
Gelcoat can be a weak layer under a new laminate if left in place. As a practical tip the Fiberglass Warehouse comment says: “Typically you want to remove all the old gelcoat if you will be adding more fiberglass. Reason being is the gel coat will be a weak spot in the laminate.” When you add new glass, strip back to solid laminate except where a cosmetic gelcoat match is required.
4. Not layering fiberglass correctly
Layer sequencing and sizes matter, don’t wing it with mismatched patches. Truecomposites tells you to “Cut fiberglass cloth into progressively larger layers. Start with a small patch… and use larger patches with each additional layer to create a tapered, seamless repair.” They warn: “Don’t skimp on layers… additional layers may add much‑needed strength.” Tapered, overlapping layers reduce stress risers and spread load into sound laminate.
5. Poor resin application and trapped air
Dry spots and air bubbles weaken the laminate. Truecomposites urges you to “Apply resin evenly between layers… Each layer of fiberglass cloth needs to be fully saturated with resin; avoid dry spots! Use a roller or brush to smooth each layer.” Jaxfiberglassrepairllc reinforces that correct application “prevents air bubbles, ensuring a solid and lasting repair.” Work methodically and wet out each ply fully before adding the next.
6. Mixing too much resin or ignoring pot life
Batch management matters for workable resin and cure control. Fiberglass Warehouse flags “Mixing too Much Resin at one Time” as a common mistake; large batches can heat up and cure before you finish, causing waste and poor laminate consolidation. Mix only what you can apply within the resin’s pot life and follow manufacturer instructions for temperature and working time.
7. Creating sharp corners and inadequate scarfing
Sharp transitions focus stress and invite cracks. WEST SYSTEM (Epoxyworks) explains that “Corners can be described as stress concentrations… Before grinding the scarf onto the surface, take the time to create a nice rounded shape to the repair area.” Taper or scarf smoothly, fillet edges, and avoid abrupt geometry, these small shapes are where failures start.
8. Incorrect scarf ratio or inadequate taper
Not tapering enough means you didn’t give the repair area a gradual load path. Epoxyworks warns about “Inadequate scarf ratio” and the problems that creates. Follow recommended scarfing practice (consult system manuals for exact ratios) so your new laminate blends strength into the old skin instead of stopping at a thin edge.
9. Mishandling core repairs and skin rebonding
Core replacement is a common, nuanced task. Epoxyworks describes a useful technique: if the skins are in good condition you can peel them away, replace the core, and re‑bond the original skins, using fiberglass only around the perimeter. That method saves time and preserves molded textures like non‑skid, when done carefully it’s a strong, efficient fix.
10. Delaying repairs until small damage grows
Patch early to avoid big jobs later. Elite RV Roof & Collision says “A common mistake RV owners make is delaying fiberglass repairs. If left unattended, minor damage can quickly build up, leading to larger and more expensive repairs down the road.” Deal with chips and cracks quickly to prevent water ingress and core rot.
11. Choosing cheap or inconsistent materials
Cheap kits can be false economy. Jaxfiberglassrepairllc urges you to “Opt for high‑quality resin and fiberglass cloth for durability and strength,” and Elitervpros cautions that “Use of inadequate or inconsistent materials can lead to weak and inefficient repairs.” Spend a little more on reputable products or ask a shop for brand recommendations.
12. Overlooking small details and water seepage paths
Small oversights create long‑term leaks. Jaxfiberglassrepairllc warns: “Make sure to cover all edges properly to prevent water seepage. Inspect the surrounding area for hidden damage that may need attention too.” Check adjacent surfaces, penetrations, and bonded fittings, water travels and the patch must block its path, not just look neat.
13. Ignoring cure times and environmental conditions
Cure depends on temperature and humidity, don’t rush it. The original guidance stresses “allowing proper cure times and temperature control,” and Jaxfiberglassrepairllc reminds you to “Pay close attention to curing times and environmental conditions like temperature and humidity.” If you cure in too-cold or too-humid conditions the laminate may never reach full strength; follow product instructions and be patient.
14. Neglecting the final finish and safety practices
Surface finish and safety go hand-in-hand with a durable repair. Truecomposites stresses: “Wear protective gear. Use gloves, safety goggles, and a respirator… Work in a ventilated area. Fiberglass resin emits strong fumes… Ensure adequate airflow in your workspace.” They add: “Manage dust carefully. Sanding fiberglass creates fine, sharp particles that can irritate the skin or cause respiratory issues.” Finish with a proper feather, primer or gelcoat match and clean dust control to leave a safe, seaworthy job.
15. Failing to consult professionals when structural issues are present
When in doubt, get help. Elite RV Roof & Collision recommends consulting pros for tricky or systemic problems: “Staff should always conduct thorough assessments to identify and address systemic problems.” If a repair touches load‑carrying structure, major core rot, or repeated failures, a professional evaluation will save time and prevent unsafe outcomes.
- Use acetone, 80‑grit sandpaper, and clean tack rags for prep (Truecomposites).
- Wet out cloth fully with a roller or brush to avoid dry spots (Truecomposites).
- Remember the resin compatibility rule: epoxy can be applied over polyester, but polyester won’t stick well to epoxy (Fiberglass Warehouse).
- If you need help, reach out: Fiberglass Warehouse offers support at sales@fiberglasswarehouse.com or 1-833-669-7899.
Practical tips from the shop floor
Closing wisdom: Fix it right, not fast. Take the time to prep the surface, choose compatible materials, build tapered layers, respect cure conditions and PPE, and you’ll save time and money in the long run. When repairs touch structure or you’re unsure about scarf ratios and core work, call a pro, your hull, hullmates and future weekends afloat will thank you.
This article was produced by Prism’s automated news system from verified source data, official records, and press releases, then run through automated quality and moderation checks before publishing. The system is built and supervised by the people who set the standards it runs under. Read our full AI policy.
Did this article answer your question?


