How to Diagnose and Repair Common Aluminum Boat Damage Yourself
Aluminum boats are tough, but pinholes, dents, and structural cracks will find you eventually. Here's how to diagnose and fix them yourself.

Aluminum has a reputation for being nearly indestructible, and in most conditions, it earns that reputation. But spend enough seasons on the water and you'll meet the damage that aluminum is actually vulnerable to: slow-weeping pinholes hidden under old paint, dents that compromise hull geometry, and the occasional structural crack that makes your stomach drop the moment you spot it. The good news is that all three of these problems are repairable at home, with the right diagnosis and the right technique for each.
Understanding what you're actually dealing with
Before you touch a grinder or pick up a welder, the most important step is figuring out exactly what kind of damage you have. Aluminum fails differently depending on where it lives on the hull, how old the boat is, and what kind of stress it's been under. A pinhole near a rivet line is almost always a corrosion issue, often galvanic, working from the inside out. A dent in the hull side might be purely cosmetic or might have work-hardened the surrounding metal in ways that affect structural integrity. A crack, especially one that radiates from a stress concentration point like a cleat base or a weld seam, is a different animal entirely and needs to be treated as such.
Take your time in the diagnostic phase. Clean the affected area thoroughly, strip paint if necessary, and look at the damage in good light. Run your fingers across the surface; aluminum cracks that aren't yet fully through-hull will sometimes telegraph as a ridge or a slight flex point before your eyes can catch them. A soapy water solution brushed on while the boat is under light pressure, or even just floating, will reveal active leaks as a chain of fine bubbles.
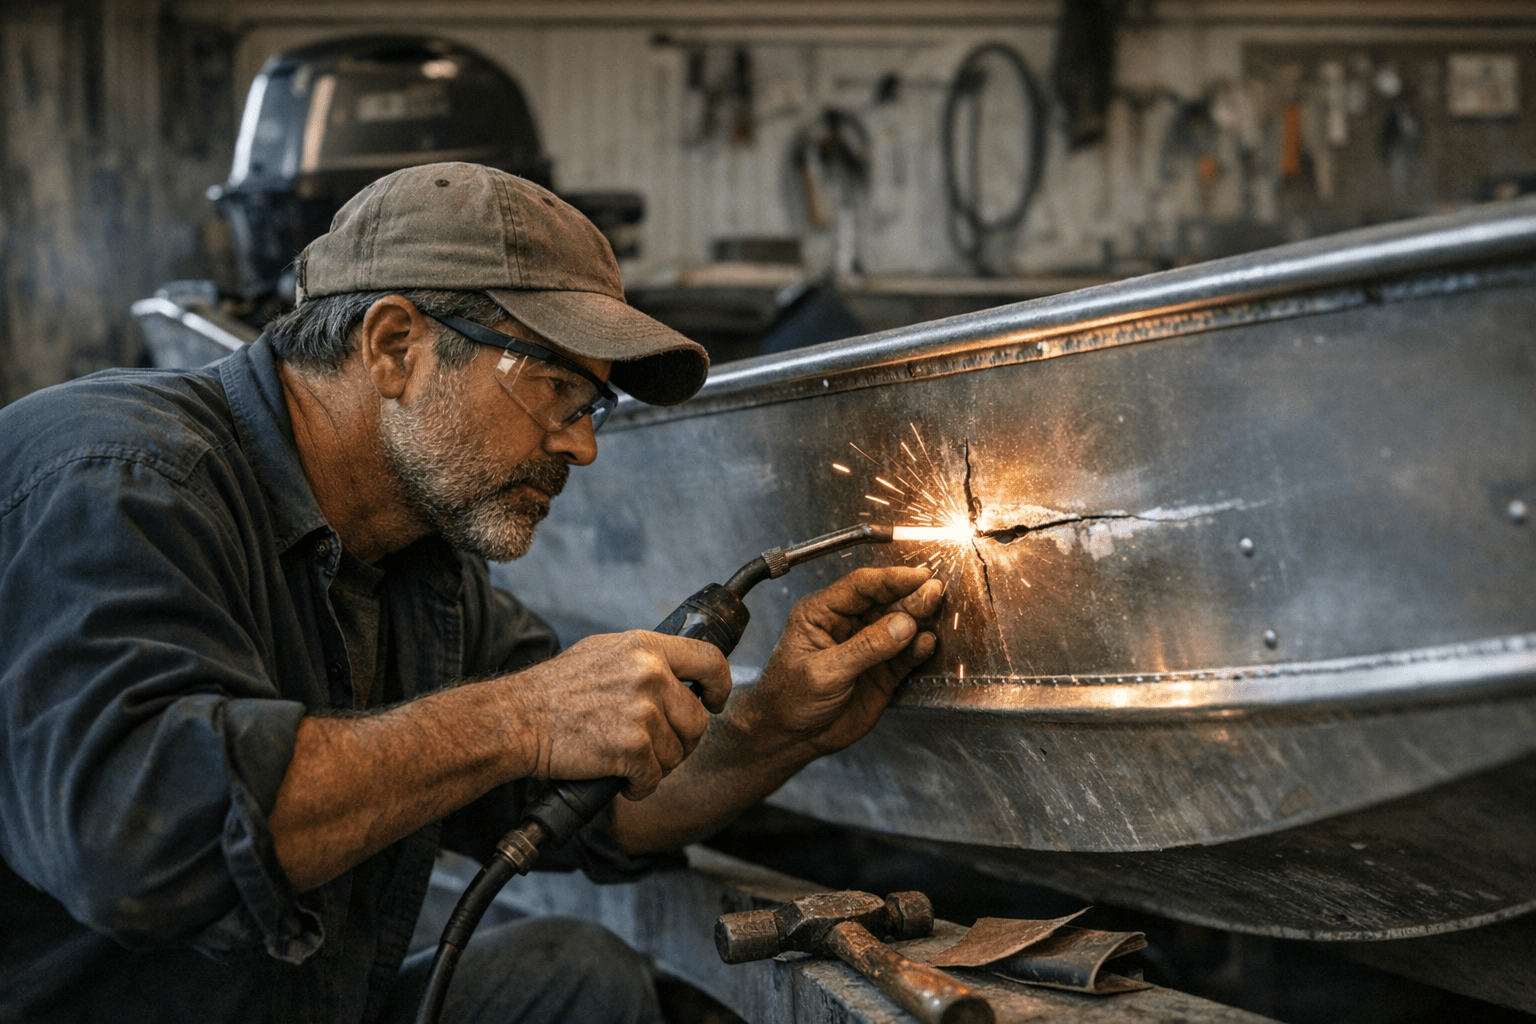
Fixing small pinholes and leaks
Pinholes are the sneakiest problem in aluminum boat ownership because they're often invisible until the bilge pump starts running too often. Once you've confirmed a pinhole through the soapy-water bubble test or by getting into a dark bilge with a flashlight while a partner shines a light on the outside of the hull, you have a couple of paths forward depending on severity.
For very small pinholes in non-structural areas, a two-part marine epoxy or aluminum-specific underwater repair compound can serve as a temporary or semi-permanent fix. Clean the area to bare metal, roughen the surface with 80-grit, and apply the compound per the manufacturer's specs. This is not a forever repair on a working boat, but it buys time.
The correct long-term fix for pinholes, and really for any through-hull breach in aluminum, is welding. TIG welding is the gold standard for aluminum because of the control it gives you over heat input; too much heat and you'll warp thin plate or burn through entirely. If you're not a confident TIG welder, this is one case where farming the job out to a professional is the right call. A small pinhole repair weld done correctly takes a skilled welder maybe fifteen minutes. Done badly, it creates a larger problem.
Working out dents
Dents in aluminum hulls are more common than most people expect, especially on boats that spend time trailering or operating in rocky shallows. The approach to a dent depends almost entirely on its location and depth. A shallow dent in a flat panel, with no cracking in the surrounding metal, is a candidate for working out from behind with a body hammer and a backing dolly, exactly the same approach used in aluminum automotive repair.
Heat can help. Aluminum work-hardens when deformed, which is why a dent that looks simple to push out will sometimes resist surprisingly hard. Applying gentle heat with a heat gun, not a torch, to bring the metal up to around 200 to 300 degrees Fahrenheit softens the work-hardened zone and makes the material more cooperative. Work slowly, from the edges of the dent toward the center, and check your progress frequently.
Dents in curved sections of the hull, or dents adjacent to frames and stringers, are harder to address because you have less access and more risk of distorting surrounding geometry. In these cases, it's worth assessing whether the dent actually affects performance or structural integrity before deciding to address it at all. Many experienced aluminum boat owners make peace with cosmetic dents that don't leak and don't stress the frame.
Addressing structural cracks
A crack in an aluminum hull is serious and deserves to be treated that way, even a small one. Cracks propagate. A hairline crack that looks stable today will be significantly longer after another season of flex loading from wave action. The only correct repair for a structural crack in aluminum is to stop-drill the ends, which means drilling a small hole, typically 1/8 inch, at each terminus of the crack to prevent it from continuing to run, and then weld the crack closed.
The stop-drilling step is not optional and is not something to skip in the interest of getting to the welding faster. A crack that is welded without stop-drilling the ends will often re-crack from those same endpoints, because the stress that caused the original crack is still concentrating there. The hole interrupts the stress concentration and gives the repair a fighting chance.
After welding, the repair area should be ground flush, inspected carefully for porosity or cold welds, and if it's in a high-stress location, considered for a backing plate. A backing plate is a piece of aluminum plate, typically the same alloy as the hull, welded or riveted over the repair on the inside of the hull to distribute load away from the repaired zone. It adds weight, but in a structural repair context, it's insurance worth having.
A note on alloy compatibility
One detail that trips up first-time aluminum boat repairers is alloy matching. Marine-grade aluminum hulls are almost universally built from 5052 or 5086 alloy, chosen for their corrosion resistance in saltwater. When you're welding repairs or sourcing patch material, the filler rod and any backing plate material need to be compatible. Using the wrong alloy or the wrong filler rod can create a repair that looks solid but fails prematurely, or worse, creates a galvanic couple that accelerates corrosion right at the repair site. When in doubt, check the boat's build documentation or contact the original manufacturer for alloy specifications before you start.
Aluminum repair rewards patience and preparation far more than speed. The boats that come out of a DIY repair season looking right and staying dry are the ones whose owners took the time to understand exactly what was wrong before picking up a tool.
This article was produced by Prism’s automated news system from verified source data, official records, and press releases, then run through automated quality and moderation checks before publishing. The system is built and supervised by the people who set the standards it runs under. Read our full AI policy.
Did this article answer your question?


