Pool Noodles Offer a Cheap Fix for Annoying Hull Wave Slap
Wave slap ignored long enough becomes a structural question, not just a noise problem. A slit pool noodle strapped to the waterline junction could be all it takes to test a fix for under $5.
Hull wave slap is one of those problems that sounds trivial until it isn't. A persistent drumming every time a wake rolls through isn't just annoying at anchor; over time it signals repeated impact loading on the hull skin, fittings, and interior joinery. The temptation is to either live with it or commit immediately to expensive remediation: custom fendering, hull fairing, or worse, a haul-out to address trim. Tony Raven, writing for Practical Boat Owner's Practical Projects hub, offers a third path that costs almost nothing and takes an afternoon to test.
The Problem With Wave Slap
On small powerboats and planing hulls, wave slap concentrates at predictable locations: the hull/waterline junction and the transom. Short chop and crossing wakes create a repetitive impact cycle that transmits shock and noise directly into the hull and cabin. For cruisers prioritizing live-aboard comfort, or anyone maneuvering in confined, choppy anchorages, that constant percussion degrades the experience fast. The problem isn't always structural, but it feels structural, and that's often enough to send owners toward repairs that may not be necessary yet.
The smarter diagnostic move is to deaden the impact first and see what you're actually dealing with. If the noise and vibration drop significantly with a surface buffer in place, you've confirmed the slap is superficial rather than symptomatic of a deeper trim or hull form issue. If the buffer barely helps, you've saved yourself the assumption and can investigate further.
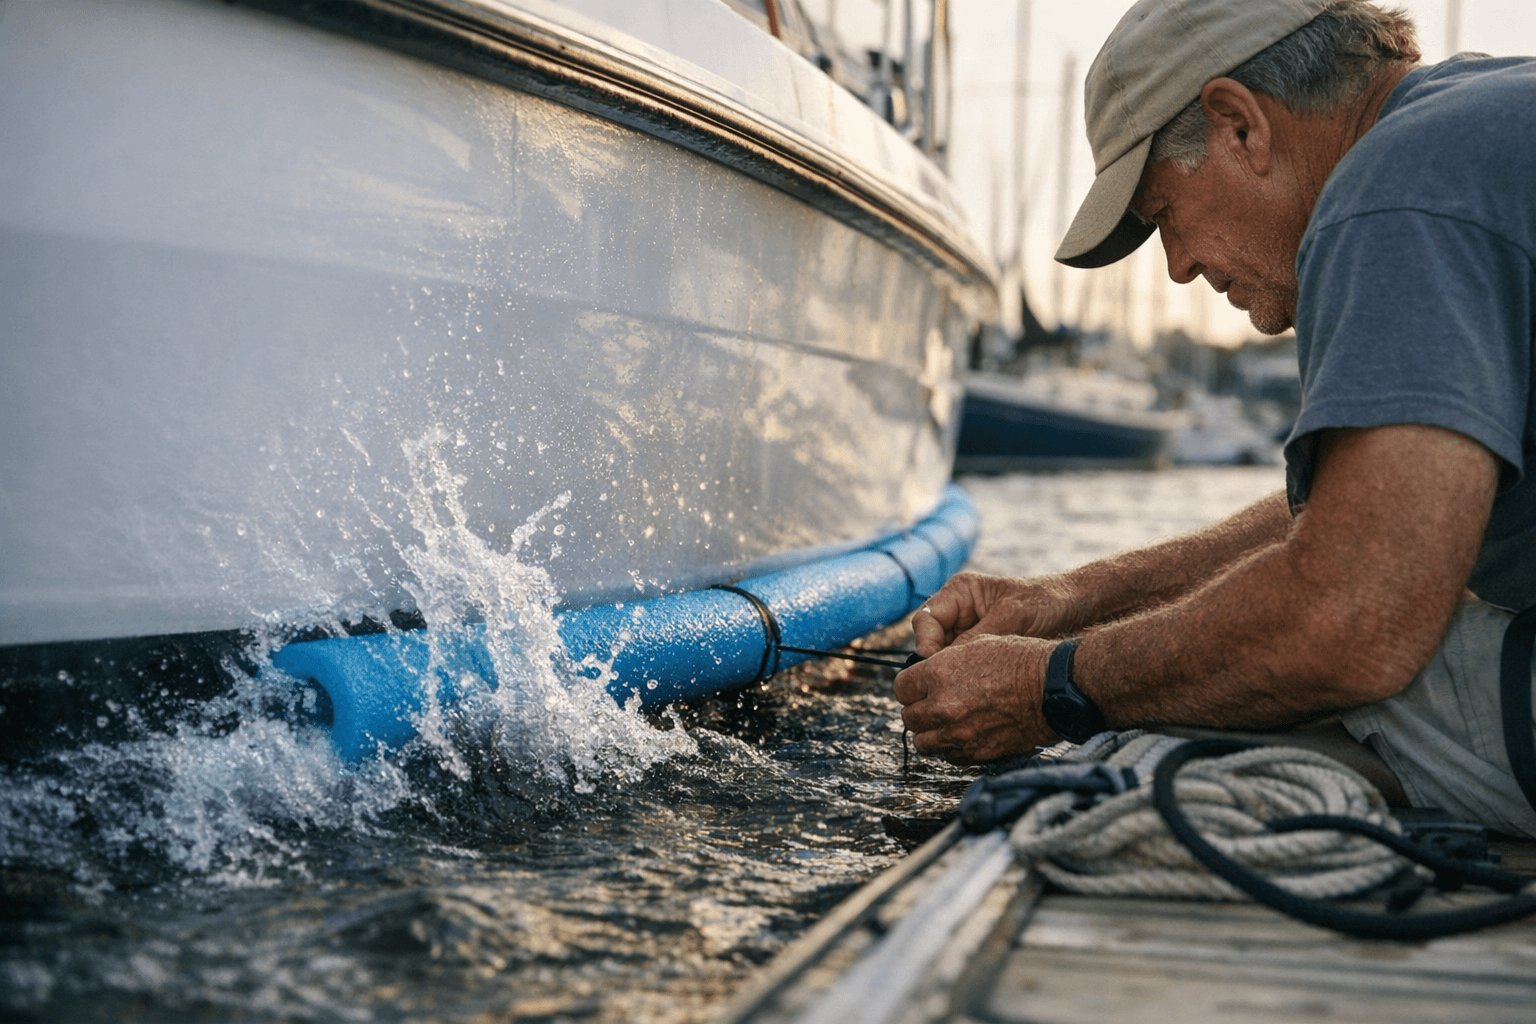
Raven's Pool Noodle Fix
Raven's contribution, published on the PBO Practical Projects page on March 24, 2026, is refreshingly direct. The material is a standard closed-cell foam pool noodle, the kind available at any dollar store or supermarket in summer. Closed-cell foam is the key characteristic here: it doesn't absorb water the way open-cell foam does, which matters whenever you're putting foam against a hull that spends time at the waterline.
The installation process is straightforward:
1. Measure and cut the pool noodle to the length of the zone you want to protect, whether that's along the waterline junction, the transom corner, or both.
2. Slit the noodle lengthwise so it can be seated over or against the hull surface like a sleeve or gasket.
3. Fasten it using UV-stable straps for any external, exposed run; adhesive-backed marine hook-and-loop in sheltered or semi-protected spots; or simple temporary clamping if you're doing an initial trial and want to remove it easily.
The goal is to create a sacrificial, compressible buffer that absorbs the peak impact energy before it transfers into the hull skin. The noodle deforms slightly on each wave contact and springs back, breaking the sharp shock cycle that produces both the noise and the transmitted vibration.
Why "Temporary First" Is the Right Approach
What makes Raven's tip genuinely useful beyond the material choice is the philosophy behind it. He frames this explicitly as a non-permanent trial fix, appropriate for testing effectiveness before committing to more engineered solutions. That framing matters. Too many DIY hull projects escalate immediately to irreversible work, whether gluing on foam blocks, adding spray rails, or altering trim tabs, before the owner has confirmed what's actually causing the problem or whether a simple intervention would suffice.
Temporary clamping for initial trials is the right starting point. Run the boat in the conditions that produce the slap, note whether the buffer makes a meaningful difference, and then decide whether it's worth a more permanent installation. If it works well enough, marine hook-and-loop in a protected spot or UV-stable strapping can make it semi-permanent. If you need something that will last a full season and beyond, the pool noodle trial at least confirms the location and dimensions before you spend money on marine-grade fendering or commission a fairing job.
What Pool Noodles Can't Do
PBO's posting is careful about the limits here, and those limits are worth taking seriously. Pool noodles are consumer products, not marine-grade components. Left exposed to constant UV radiation and mechanical abrasion from wave contact, they degrade. The foam surface becomes brittle, crumbles, and eventually sheds material. That's manageable if you're inspecting and replacing them regularly, but it becomes a problem if you install them and forget them.
The more insidious risk is moisture. A foam buffer that sits tight against hull fittings or hardware without adequate drainage channels can trap water against metal or gelcoat, setting up conditions for corrosion or osmotic issues underneath. Installation needs to account for this: position the noodle so water can drain away from the hull surface rather than pool behind the foam.
The recommendation from Raven's note is to inspect for chafe regularly and to treat the pool noodle fix as a temporary measure with a defined end point: either you replace it with a marine-grade fendering solution, or you use what you've learned to inform a hull fairing or structural modification. It's a starting point, not a finish line.
Knowing When to Escalate
The DIY threshold here is reasonably clear. Pool noodles are appropriate for:
- Diagnosing whether surface buffering addresses your wave slap problem
- Providing short-term comfort improvement at anchor or in choppy conditions
- Low-cost seasonal protection on trailerable boats between uses
They are not appropriate as a substitute for:
- Marine-grade fendering on a boat that's in constant use or exposed to significant mechanical stress
- Hull fairing where the slap is being caused by a structural or form issue
- Any installation where moisture management can't be reliably controlled
If the foam trial confirms that buffering works but the degradation rate of consumer foam is too fast for your use case, that's the signal to move to closed-cell marine foam, custom fendering, or a semi-permanent fairing solution. The information you get from a $5 pool noodle test is worth exactly that upgrade decision.
The Broader DIY Lesson
Raven's submission fits squarely in the tradition of what makes the PBO Practical Projects series valuable: it's user-tested, low-cost, and honest about its scope. The pool noodle fix won't suit every boat or every kind of wave slap, but it provides a fast, reversible first step that costs almost nothing and risks nothing. For owners who've been putting up with hull drumming and assuming the fix will be expensive, that first step is often the one that doesn't get taken. A pool noodle sitting in a garage bin might already be the trial material you need.
This article was produced by Prism’s automated news system from verified source data, official records, and press releases, then run through automated quality and moderation checks before publishing. The system is built and supervised by the people who set the standards it runs under. Read our full AI policy.
Did this article answer your question?


