SpinSheet's April 2026 Issue Guides Chesapeake Sailors Through Spring Refit Season
Fiberglass forgives a lot, but a skipped seacock check or missed swage crack before Chesapeake launch day won't. Three weekend projects from SpinSheet's April 2026 issue that matter most right now.
Fiberglass is a forgiving material until you treat a structural crack like a cosmetic scratch, or a stiff seacock like a minor inconvenience. Every spring, the Chesapeake Bay delivers a hard deadline: the water warms, the racing calendar fills, and whatever you didn't fix on the hard becomes something you manage underway. SpinSheet's April 2026 issue, anchored by its "Making YOUR BOaT New Again!" feature package and a full Spring Commissioning Checklist, lays out exactly what owners need to tackle in the next two to six weeks before the season takes over.
The timing is pointed. "It's Time To Pull Out the Spring Commissioning Checklist" is how the issue frames the moment, and that isn't editorial softness. It's a recognition that the window between winter layup and first splash is short, and that deferred maintenance compounds. The issue runs that checklist alongside a "Safety Series Part 1: Equipping Your Boat for Ocean Racing," a "Back to Sailing School" section for instructors and new sailors, and a full Annapolis Spring Sailboat Show program. Taken together, these pieces make the April issue function less like a magazine and more like a pre-departure briefing. Below are the three projects worth prioritizing this weekend, drawn directly from that editorial framework.
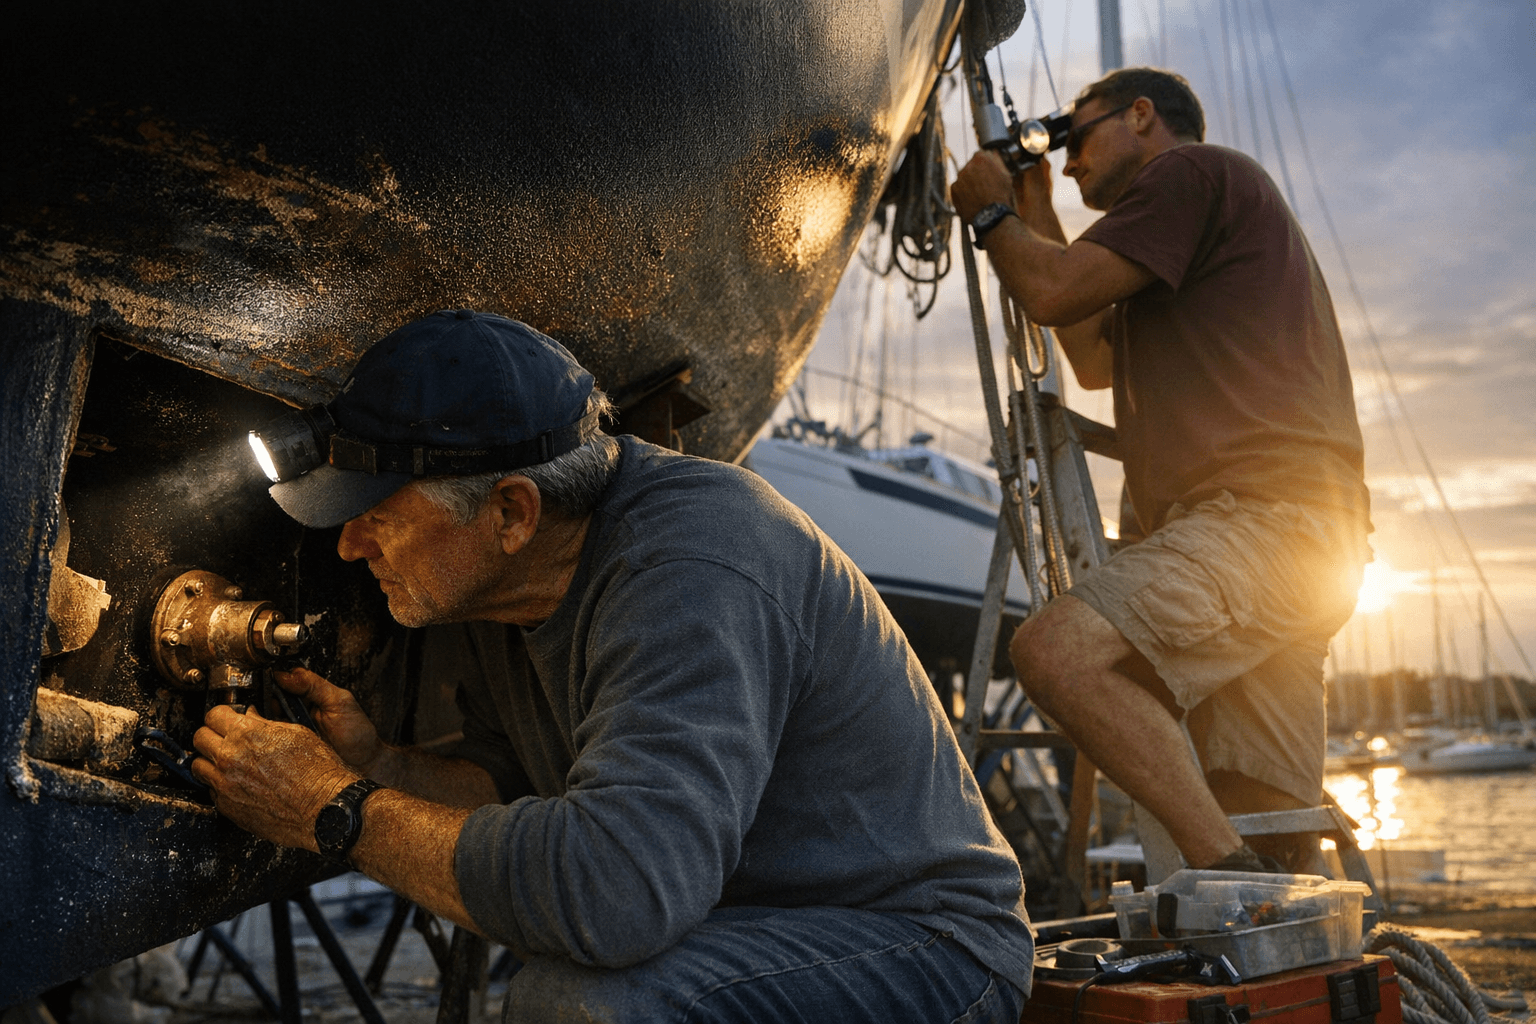
Project 1: Hull and Gelcoat Inspection and Spot Repair
A blister you ignore in April is a delamination job you pay for in September. Before any other work begins, pull out a good flashlight and walk the entire hull. SpinSheet's commissioning guidance is explicit: inspect for cracks, blisters, gelcoat wear, anchor chain damage, and delamination, with particular attention to the rudder, where stress concentrations are highest and failures are least forgiving.
Run your hand along the topsides and the waterline boundary. Any soft spots, bubbles, or star-pattern crazing warrant immediate grinding and repair rather than a coat of bottom paint on top. The standard Chesapeake repair sequence for isolated blisters is: grind back to dry laminate, let the exposed area dry completely (ideally 48-72 hours on a dry day), fill with a two-part epoxy fairing compound, sand fair when cured, and apply matching gelcoat or a barrier coat before bottom paint goes on.
- Tools needed: Angle grinder with 36-grit disc, orbital sander, mixing cups and sticks, fairing knife or plastic spreader, wet-or-dry sandpaper in 80/120/220 grits, masking tape
- Time: 4-6 hours of active work, spread across one weekend with cure time overnight
- Cost range: $60-$150 for epoxy fairing compound, gelcoat repair kit, and sandpaper
The share hook here is straightforward: catching a 2-inch blister cluster on the hard and spending a Saturday morning on it costs roughly $80 in materials. Leaving it through a Chesapeake summer of thermal cycling and salt exposure routinely turns into a full barrier coat project the following spring, averaging $800-$1,500 at a boatyard. That math is the argument for doing it now.
Project 2: Seacock and Through-Hull Service
A seacock that hasn't been exercised since last fall is not a minor nuisance; it is a flooding risk. Ball valves and tapered-plug seacocks both seize with inactivity, and the one moment you need a through-hull closed in a hurry is not the moment to discover the handle won't budge.
SpinSheet's commissioning checklist puts seacock operation and the condition of all connected hoses and hose clamps on the same line item. That pairing is deliberate. A seacock that moves freely doesn't guarantee the hose downstream is sound. Double-stainless hose clamps at every below-waterline connection, hose that isn't hardened or cracking at the bends, and fittings that haven't corroded past their working life are the three things to verify together.
The Chesapeake-specific scenario for why this matters before first launch: if you're motoring out of a Whitehall Creek or Spa Creek slip in April and your stuffing box hose develops a slow leak at a soft clamp, you're pumping the bilge before you clear the bridge. That's a recoverable problem on a calm spring morning; it's a serious one at the mouth of the Patuxent at dusk.
The full through-hull service on a 35-footer typically takes an afternoon on the hard:
1. Locate and label every seacock. Work each one through its full travel several times. If resistance is high, disassemble, clean, and re-grease with a dedicated waterproof marine grease.
2. Inspect every hose run from hull fitting to the connected system. Squeeze and flex for cracks. Check both hose clamp bands for rust and snug fit.
3. Replace any clamp showing surface rust, any hose that's gone rigid or shows surface crazing, and any fitting with dezincification (a chalky, pinkish surface on bronze).
4. Re-torque all clamps and log the date.
- Tools needed: Socket wrench and screwdriver set, wire brush, bucket, waterproof marine grease (Lanocote or equivalent), spare stainless hose clamps in common sizes
- Time: 2-4 hours
- Cost range: $30-$80, assuming no hose replacements; budget $150-$250 if hoses need replacement
Project 3: Standing Rigging Walk-Down
SpinSheet's commissioning guidance recommends a professional rigging inspection every couple of years for larger boats, including a mast climb. For the annual at-dock check every owner should be doing before first race day, the critical focus points are swage fittings at terminal ends, wire halyards and running backstays for "fishhooks" (broken individual strands that protrude and snag), chainplates for signs of working or corrosion staining at deck level, and toggles and clevis pins for wear and cotter pin integrity.
A cracked swage fitting at a lower shroud doesn't always look alarming. A small surface fracture visible at the base of the swage, caught with a hand lens at the dock before the first Wednesday night race, is a $60-$120 terminal replacement at a local rigger. The same fitting failing on the water dismasts the boat and can seriously injure crew. That is the only ratio that matters.
Walk from the chainplate at deck level up each shroud visually with binoculars. Then run your bare hand (carefully) down each wire to feel for fishhooks or corrosion roughness. Check that every turnbuckle barrel is lock-wired or taped. Confirm that your forestay toggle and clevis pin are cotter-pinned correctly, not just bent over with fingers.
- Tools needed: Binoculars, strong flashlight, hand lens or magnifying glass, small inspection mirror for chainplate areas, rigging knife
- Time: 2-3 hours for the walk-down; add a full day if going up the mast for an aloft inspection
- Cost range: $0 for a clean inspection; $60-$300+ if terminals or clevis pins need replacing, depending on wire size and fitting count
The Bigger Picture: Safety, Community, and the First Race
The three projects above sit within a broader editorial context in SpinSheet's April issue. The "Safety Series Part 1: Equipping Your Boat for Ocean Racing" extends the same logic to sailors preparing for offshore passages, covering the systems, deck hardware, and safety equipment that distinguish a coastal daysailer from a boat ready for bluewater. Even for owners who never leave the Bay, the series is worth reading: the offshore checklist surfaces items such as jackline attachment points, tether compatibility with harnesses, and liferaft servicing dates that inshore sailors often treat as optional until they aren't.
For sailors coming back after a winter away from the water, the "Back to Sailing School" section addresses the competence side of commissioning, offering guidance for both instructors managing returning students and individuals refreshing fundamental skills. Spring sailing on the Chesapeake has its own specific hazards, including cold water temperatures well into May, powerful afternoon thermal winds in the upper Bay, and heavy commercial traffic in shipping lanes. Getting the hull right and the rigging right matters less if crew handling is rusty.
The Annapolis Spring Sailboat Show rounds out the issue as a planning resource. It functions as both a gear-sourcing opportunity (new safety equipment, line and hardware replacements, and bottom paint on display) and a community gathering point for the regional fleet before the season begins in earnest.
The window to do this work on the hard is measured in weeks. Three weekends of focused project work on hull, through-hulls, and rigging transforms a boat sitting in the yard into one you can sail with confidence; that transformation is exactly the promise behind "Making YOUR BOaT New Again!" and it's one the Chesapeake season has a way of testing early and often.
This article was produced by Prism’s automated news system from verified source data, official records, and press releases, then run through automated quality and moderation checks before publishing. The system is built and supervised by the people who set the standards it runs under. Read our full AI policy.
Did this article answer your question?


