Step-by-Step Safety Guide to Jump-Starting a Dead Marine Battery
Learn how to safely jump-start a dead marine battery with step-by-step cable sequence, system checks, and maintenance tips to avoid sparks, damage, and tows.

Jump-starting a dead marine battery is a common stop-gap that can keep you afloat, but the boat environment adds hazards cars don’t have. This guide walks you through identification, safety checks, the cable sequence, alternatives, and when to stop and call for help.
1. Identify the battery type and bank
Confirm whether the battery is a starting battery, a deep-cycle, or a dual-purpose unit and which bank you’re connecting to (starting bank vs house bank). Starting batteries supply high cranking amps and are usually the target when the engine won’t spin; connecting to the wrong bank can leave you stranded or damage electronics. Label or map your banks now so in an emergency you don’t guess under load or in a wet engine room.
- Kill all electronics, radios, and breakers on both boats
- Keep open flames and sparks away from the battery area
- Position both boats so cables reach without stretching or passing over sharp edges
2. Prepare the boat and take marine-specific safety precautions
The marine environment increases risk: moisture, confined battery compartments, and hydrogen gas from charging can create explosive or corrosive conditions. Before you touch cables, secure the boat, open ventilation in the engine compartment if possible, remove jewelry, wear eye protection and gloves, and make sure bilges are dry. Use this short checklist to reduce hazard:
3. Verify system voltage and compatibility
Check whether the system is 12V or 24V and confirm the donor source matches the dead system; mismatched voltages can cause catastrophic damage. Use a handheld voltmeter to verify resting voltage, roughly 12.6V for a healthy 12V battery, lower if discharged, and check the donor battery’s voltage before connecting. If you’re uncertain about parallel banks or complex charging setups, pause and get help; it's not worth frying electronics or a house bank.
4. Turn off all electronics and prepare jumper cables or a jump starter
Shut down radios, bilge pumps (if safe), navigation gear, and any loads on both boats to prevent surges when you make the connection. Select heavy-duty marine-rated jumper cables or a self-contained portable jump starter with built-in protections; ordinary automotive cables can work, but exposure to salt and spray increases corrosion and short risk. Place cables where they won’t fall into the bilge or tangle, and keep the clamps separated until you’re ready.
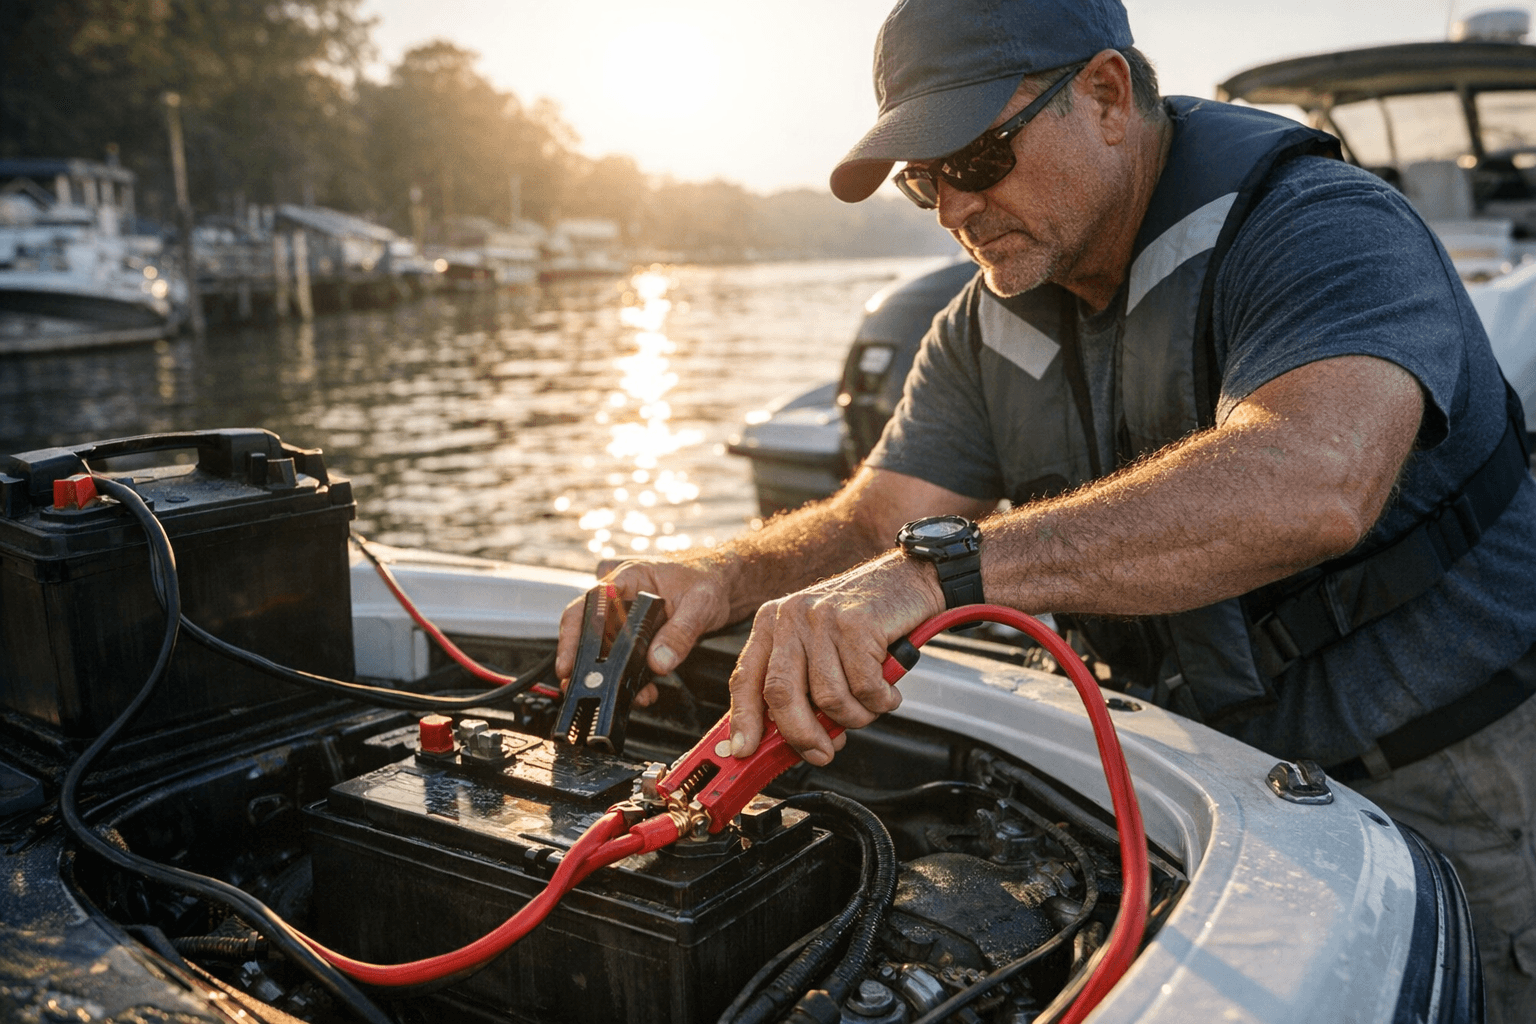
5. Connect positive to positive
Attach the positive (+, red) clamp to the donor battery positive terminal first, then to the positive terminal of the dead battery or its positive lug on the bank you identified. Firm, clean connections lower resistance, remove corrosion or tighten terminal nuts if needed before clamping. Keep the clamps from touching anything conductive while you work.
6. Ground the negative properly to minimize sparking
Connect the negative (−, black) clamp to the donor battery negative terminal next, but do NOT attach the final negative clamp to the dead battery’s negative terminal. Instead, clamp it to a clean, unpainted metal ground on the dead boat, an engine block bolt, alternator bracket, or chassis point, away from the battery and fuel lines. This reduces the chance of igniting hydrogen gas at the battery and gives you a safer ground path.
7. Start the donor, let it run, then start the dead engine
Start the donor engine and let it idle for a few minutes to deliver charging current and stabilize voltage; modern alternators recover a drained starting battery faster with the engine running. After a short charge period (typically 2–5 minutes), attempt to start the dead engine. If it turns over sluggishly, wait another minute of charging; repeated cranking can overheat the starter.
8. Remove cables in reverse order and secure systems
Once the dead engine is running, remove the clamps in reverse: negative clamp from the grounded metal on the dead boat, negative from the donor, then positive from the dead bank, and finally positive from the donor. Reverse removal minimizes spark risk near the battery. Run the revived engine under load or charge the battery with a proper onboard charger, idling briefly isn’t a substitute for a full charge.
9. Consider portable jump starters as a safer alternative
Portable lithium jump starters are a self-contained option that removes the need for a donor boat and avoids awkward cable runs between hulls. They’re compact, reduce galvanic transfer risk, and often include reverse-polarity and short-circuit protections; keep one on board charged and accessible in your safety kit. Note capacity limits: ensure the unit is rated for marine cranking amps appropriate to your engine.
10. Follow post-start checks and battery maintenance
After a jump, inspect terminals for corrosion, measure resting voltage, and consider a controlled recharge with a proper marine battery charger or maintainer to prevent sulfation. Regular maintenance, cleaning terminals, checking state-of-charge, and using trickle/float chargers during layups, prevents many emergency jump-starts. Treat a battery that repeatedly needs a jump as a candidate for replacement or professional testing.
11. Know when to stop and call for professional help
Stop attempting to jump-start if the battery won’t accept a charge, shows physical damage, swells, or repeats no-starts, sulfation and internal failure are likely, and further attempts risk damage or injury. Call a mobile marine technician or tow/assistance service if you suspect 24V issues, bank configuration problems, or if the engine won’t respond after proper charging attempts. Towing ashore and replacing a failing battery is better than risking an onboard electrical fire or fried electronics.
Practical wisdom to take aboard: make prevention part of your pre-season checklist, label banks, carry a rated portable jump starter, and keep terminals clean. A calm, methodical approach and the right gear usually get you motoring again without drama; when systems behave oddly or you’re unsure, free yourself from DIY pride and call a pro to avoid turning a simple fix into a costly mishap.
Know something we missed? Have a correction or additional information?
Submit a Tip