Science-backed methods rank safest, most effective ways to clean silver jewelry
A kitchen foil-and-baking-soda bath is the most effective, nonabrasive way to reverse silver tarnish, learn exact steps, timing variants, and when to call a pro.

Silver tarnish is not mysterious wear; it's chemistry. "Tarnish is a thin layer of corrosion that forms on sterling silver when it reacts with sulfur-containing substances in the air," and the easiest, science-backed countermeasure uses a simple electrochemical exchange to move sulfur off the silver and onto aluminum. Below I rank and explain the safest, most effective cleaning methods that appear in the experimental and consumer literature, with exact recipes, timing ranges, and precautions so you can choose the right treatment for every piece.
- Ensure direct contact with aluminum foil, the electrochemical transfer requires it.
- Popsci notes "The water temperature and the presence of salt and baking soda accelerate the cleaning process"; salt is optional in other recipes but may speed results.
- Expect sensory cues: bubbling (a sign the reaction is happening) and, per Popsci, "The faint, gross smell of rotten eggs? That’s sulfur. It means it’s working."
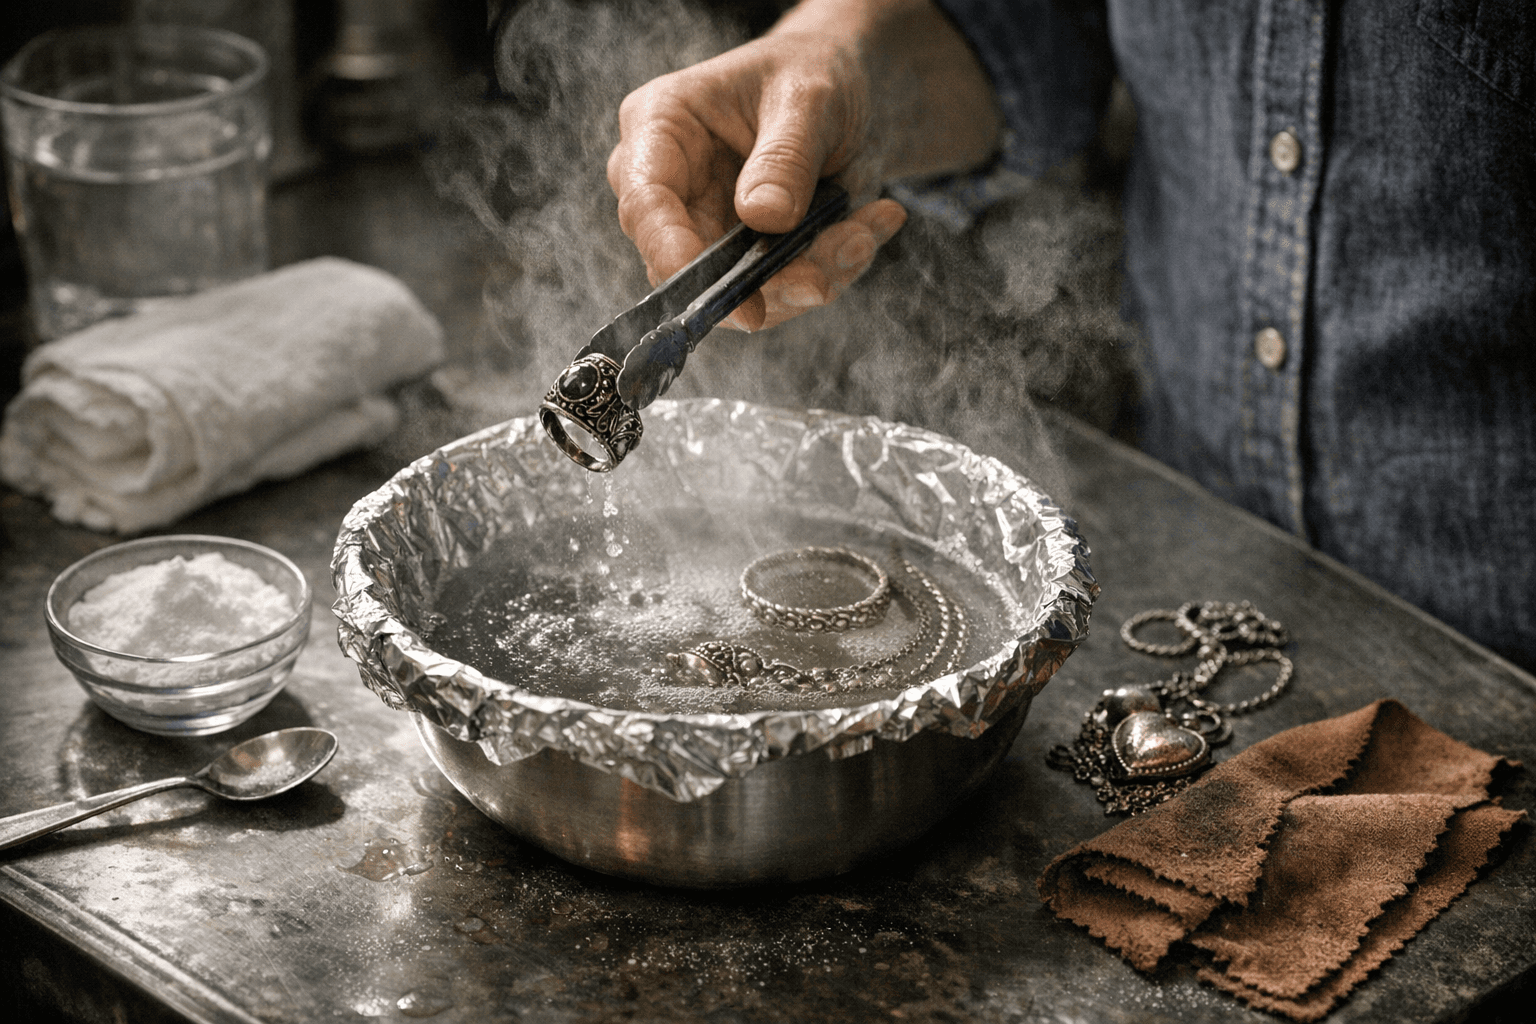
1. Aluminum foil + baking soda (hot-water electrochemical bath), the best first-line method
This is the method most consistently described as effective and nonabrasive: line a container with aluminum foil, add a hot baking-soda solution, submerge pieces so they touch the foil, and watch the reaction. Popsci’s step-by-step instructs: "Line the inside of your container with aluminum foil. Keep the shiny side of the foil up," then "Bring the water to a boil. Then take it off the heat," mix in baking soda (and salt, in Popsci’s variation), and "Make sure your jewelry is totally submerged and touching the aluminum foil." The science is clear: the reaction transfers sulfur atoms from silver sulfide to aluminum, freeing the silver; Wired reproduces the stoichiometry as "3 Ag2S + 2 Al → 6 Ag + Al2S3" and explains that "a small electric current is actually running between the silver and the aluminum" during the process. Practical timing varies by source and tarnish level, Wired observed shiny silver after about five minutes, Silver-collector and Finks report typical clean times measured in seconds to a few minutes, while Planetfriendlyliving suggests leaving items in boiling water and bicarbonate for up to an hour for stubborn tarnish. Tips:
2. Aluminum foil + baking soda (short soak vs. long soak variations), tailored timing for severity
Different practitioners offer different cook-times for essentially the same chemistry. Finks champions the method for intricate sterling pieces and claims it can "remove tarnish in as little as 30 seconds to 3 minutes." Silver-collector’s soak variant calls for "1 tablespoon of baking soda" on a clean aluminum plate and hot (but not boiling) water, leaving items "in the water for 2-3 minutes." Wired’s hands-on account turned pieces during the process and saw the bubbles stop and the silver shine after roughly five minutes. Conversely, Planetfriendlyliving prescribes "a tablespoon of bicarbonate of soda" and "leave it for about an hour" in boiling water for very heavy tarnish. Choose the timing that matches the level of corrosion: start short (30 seconds–5 minutes) for light tarnish and escalate to longer soaks only if needed; always inspect and repeat rather than extending a single treatment indefinitely.
3. Mechanical paste scrub with baking soda (for stubborn, localized tarnish)
When tarnish is patchy or deeply seated in crevices, a paste-and-scrub technique can be useful. Silver-collector describes a scrub method using an aluminum plate, "Add 1 tablespoon of baking soda into the aluminum plate," pour hot (not boiling) water to make a paste, dip a toothbrush, and "Start scrubbing the silver piece with the tooth brush until its clean." This is a more physical approach and works well on heavy deposits or pieces with machine marks where a soak alone might not reach. Take care: use a soft-bristled brush and light pressure on fragile settings, and rinse thoroughly afterward to remove residue.
4. White vinegar + baking soda soak, an alternate chemical route for hard-to-clean pieces
For pieces described as difficult to access, Finks cites the John Hardy Icon 50 Club Bracelet as an example, the white vinegar and baking soda method offers an acidic alternative. Finks notes the vinegar method "uses the natural acidity of white vinegar to remove tarnish" and that it tends to take longer than the foil method, but can be effective where the electrochemical bath or mechanical scrubbing struggle. Use this as a second-line technique for sturdy sterling items; avoid immersing porous stones, glued settings, or plated components without expert advice.
5. Mild soap and water, routine maintenance, safest daily practice
The gentlest, least risky habit is regular cleaning with mild soap and water to remove oils and residues that accelerate tarnish. Finks recommends the "Mild Soap and Water Method" for everyday care, wipe pieces after wear and dry completely with a soft cloth. This preventive step slows corrosion and reduces how often deeper interventions are necessary.
6. Professional jewelry cleaning, for high-value, plated, or gem-set pieces
When a piece is plated, heavily encrusted, or set with porous or sensitive gemstones, professional cleaning is the safest option. Finks and other guides list "Jewelry Store Cleaning Services" as a valid path; a jeweler can assess plating integrity, prong security, and gemstone compatibility with chemical or ultrasonic cleaning. If a piece has sentimental or monetary value you cannot risk, entrust it to a pro.
- Bubbles mean the reaction is occurring; Popsci and Wired both observed active bubbling.
- If you detect the "rotten eggs" sulfur smell, that’s an expected sign of sulfur release.
- If stubborn spots remain, try a gentle scrub with scrunched foil (Planetfriendlyliving) or repeat a short hot soak rather than an extended single exposure.
7. Aftercare, rinsing, drying, and troubleshooting cues
No matter which method you choose, finish by rinsing and drying to remove residues and prevent spotting. Popsci warns: "Baking soda will leave a white cast on your jewelry, so rinse it under the faucet once you take it out of the solution. Then dry and polish it with a microfiber cloth to keep your piece lint-free." Planetfriendlyliving recommends a damp cloth wipe to remove bicarbonate residue; Silver-collector suggests washing with water and letting the piece dry on clean paper. Troubleshooting cues:
8. What this method does, and what it doesn’t
The kitchen foil bath is praised because it reverses tarnish chemically rather than abrading metal. Wired summarizes the key benefit succinctly: "Silver polish removes the outer layer of metal. This method actually removes the tarnish while leaving the silver intact." That distinction matters for thin or intricately engraved pieces. However, the sources do not universally test plated silver or state long-term effects of repeated cycles; exercise caution with electroplated finishes and always test one small area first. Wired advises: "If you want to try this at home, I suggest doing one earring, or half of one item item like a silver spoon, at a time, so you can compare them before and after."
- Gemstone caution: Planetfriendlyliving warns, "Before you begin, if your jewellery contains any non-silver elements such as gemstones, check that it is suitable for cleaning in this fashion first." Some stones and adhesives are vulnerable to hot water, acids, or mechanical agitation.
- Heat and handling: Silver-collector notes the water will be hot; use tools to move pieces and avoid burns.
- Salt and speed: Popsci explicitly adds salt to the baking-soda mix and says the "presence of salt and baking soda accelerate the cleaning process," although several other recipes omit salt. Salt appears optional rather than required.
Practical safety notes and final judgment
In practice, the aluminum-plus-baking-soda approach, properly executed with attention to contact with foil and the correct water temperature, is the most effective, least abrasive way to restore sterling silver. For everyday care, mild soap and soft drying will postpone tarnish; for stubborn build-up, combine short electrochemical soaks with careful mechanical work; and for anything plated, gem-set, or priceless, hand it to a professional. Science gives us a kitchen chemistry fix and clear rules for when to use it; follow those steps and your silver will respond, returning to silver rather than simply being scoured away.
This article was produced by Prism’s automated news system from verified source data, official records, and press releases, then run through automated quality and moderation checks before publishing. The system is built and supervised by the people who set the standards it runs under. Read our full AI policy.
Did this article answer your question?