How to Tell if Something is Silver: Complete 2026 Hallmark & Identification Guide
Pick up a piece from an estate sale and you're holding a small archive; its hallmarks, read in the right order, will tell you exactly what it is.
Pick up an inherited ring or a brooch pulled from an estate sale, and you're holding a small archive. The stamps pressed into its surface, sometimes no larger than a sesame seed, carry compressed information: who made it, where it was tested, what year it was certified, and whether the metal is what it claims to be. Reading them correctly is the fastest, least invasive, and most reliable route to understanding what you actually have.
Start Here: The Hallmark Is Your First Move
Before any physical test, look. A loupe at 10x magnification and a strong directed light source are enough for most pieces. Search for a cluster of tiny stamped marks on the reverse of a brooch, inside a ring's shank, along a necklace clasp, on the back of a flatware handle, or inside the lid of a box or cigarette case. These are the locations where assay offices required makers to place their marks.
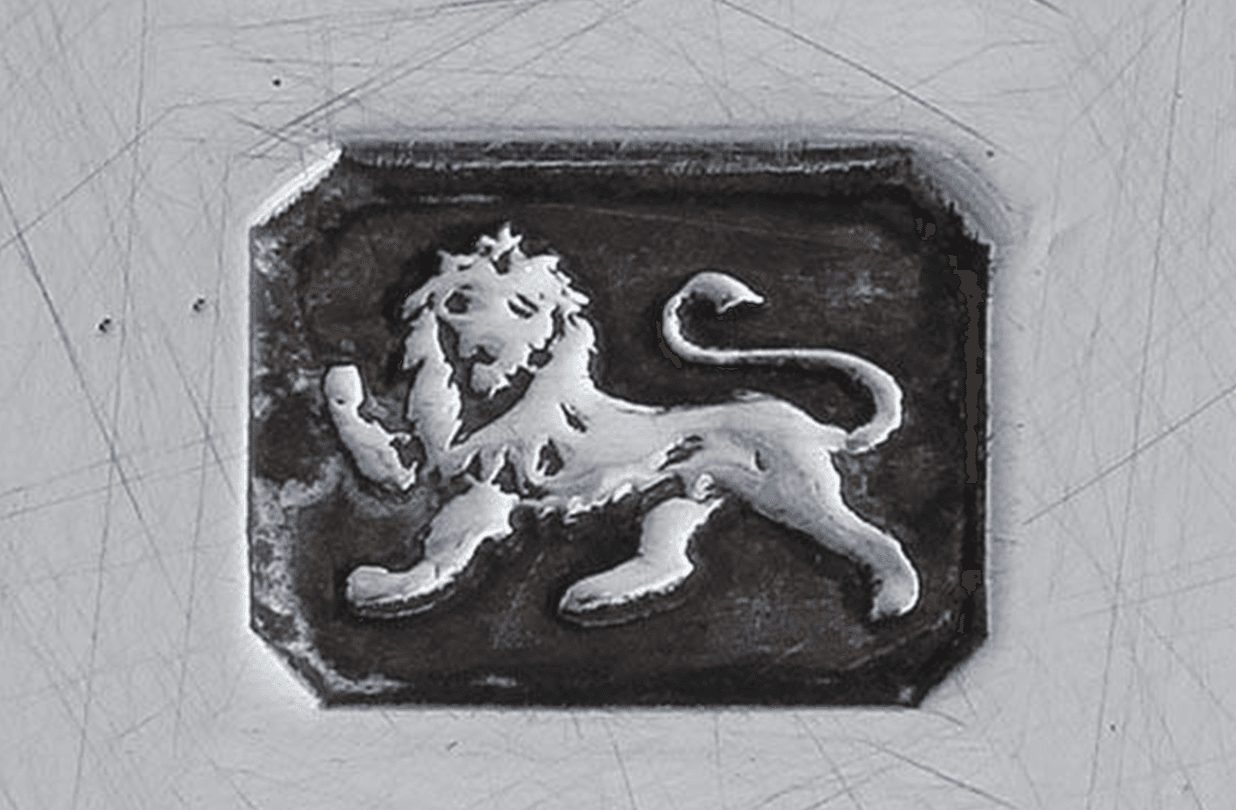
What you want to find: the number 925 (meaning 92.5% pure silver, the legal definition of sterling), the word "Sterling," or, on British pieces, a small walking lion facing left. That lion, the Lion Passant, has signified English sterling since the 16th century and remains the single most recognizable purity mark in the world of silver. Spotting it confirms sterling. Not finding it does not confirm the opposite, but it means you need to look further.
The British Hallmark System: Five Marks, One Story
British silver carries the most formalized hallmarking tradition of any country, which makes it both the most informative and the most misread system a collector will encounter. A fully marked British piece can carry up to five distinct stamps, each serving a separate function. Reading them in the correct sequence is essential.
The maker's mark appears first and identifies the silversmith or manufacturing house that submitted the piece for assay. These are typically initials in a shaped cartouche, with the outline of that cartouche carrying its own meaning: different assay offices used different border shapes. Sir Charles Jackson's *English Goldsmiths and Their Marks*, first published in 1905 and revised in 1989, remains the most authoritative guide to decoding British maker's stamps. Some collectors focus exclusively on pieces by specific makers, treating the stamp as a signature.
The standard mark confirms metal purity. For English sterling, this is the Lion Passant. Between 1697 and 1720, a higher standard of 95.8% purity was legally required, and pieces from that period carry a seated figure of Britannia alongside a lion's head "erased," meaning with a jagged, torn neckline. Both standards remain legal in Britain today. A Britannia mark on a piece dated before 1720 is historically significant; finding one after that date signals a maker who voluntarily chose the higher grade.
The assay office mark tells you where the piece was tested. Identify this one first, before you attempt to read the date letter. The major British offices and their symbols:
- London: a leopard's head (crowned until 1821, then uncrowned)
- Birmingham: a ship's anchor, one of the most common marks on Victorian and Edwardian silver
- Sheffield: a crown (replaced by a rosette after 1974)
- Edinburgh: a three-turreted castle
- Dublin: a crowned harp, with a seated figure of Hibernia added from 1731
- Glasgow: the city's coat of arms, featuring a tree, a fish, a bird, and a bell
- Chester: a sword between three wheatsheaves
The date letter cycles alphabetically through the offices, but each office used its own typeface, alphabet length, and shield shape. The Birmingham "a" of 1900 looks nothing like the London "a" of the same year. This is why the assay office must be confirmed first: using the wrong date table produces a wrong date. Published date letter tables from the British Hallmarking Council allow precise year attribution once the office is confirmed.
The duty mark, a King's or Queen's head in profile, was stamped on pieces between 1784 and 1890, confirming that the maker had paid a government levy on the silver. The sovereign's head faced left until 1786, then right. On pieces falling within that date window, its absence is worth questioning.
10 Hallmarks You'll Actually See in the Wild
Not every piece carries a complete sequence, and partial marks, worn marks, and import additions are common in vintage collections. These are the ten marks most frequently encountered in the field:
1. Lion Passant - English sterling purity; the mark every silver hunter learns to identify first
2. 925 or .925 - The international purity standard, universal on modern and imported sterling
3. Sterling (word stamp) - The American standard, used widely from the 19th century onward, with no accompanying town or date system
4. Anchor - Birmingham assay office; the city was one of Britain's most prolific silver-manufacturing centers
5. Crown - Sheffield assay office before 1974; appears on vast quantities of Victorian flatware and hollowware
6. Three-turreted castle - Edinburgh; look for it on Scottish silverwork and Celtic revival jewelry pieces
7. Leopard's head - London assay office; one of the oldest hallmarks in continuous use anywhere in the world
8. Britannia figure - Indicates the higher 958 standard; a meaningful find on pre-1720 pieces
9. EPNS or A1 - Electroplated nickel silver. This is not a silver mark. It is the collector's single most common trap
10. F in an oval, or post-1904 import town marks - Foreign silver submitted to a British assay office; introduced in 1867, with the specific town marks revised in 1906
The Common Vintage Traps
Four situations catch even experienced buyers. Know them before you reach for your wallet.

*Vermeil.* This is gold-plated sterling silver. The base metal is genuine 925, and you may find a legitimate sterling or 925 stamp, but the visible surface is a gold layer over silver. Under U.S. Federal Trade Commission rules, vermeil requires a gold coating of at least 2.5 microns in thickness, applied over a sterling silver base with gold purity of at least 10 karat. The silver stamp is real; the surface is not solid gold. Vermeil is a defined product category, not inherently a deception, but buyers expecting solid metal are misled every time. The original box or paperwork often carries the vermeil designation, which rarely survives decades of estate passing.
*800 silver.* Common on Continental European antiques, particularly German, French, and Dutch pieces from the 19th and early 20th centuries. The 800 stamp means 80% pure silver, genuinely precious but below the sterling threshold of 92.5%. Do not dismiss it as false; understand it as a different national standard. Much beautiful Continental silverwork carries 800 marks and deserves proper recognition for what it is.
*EPNS and Sheffield plate.* Electroplated nickel silver and the older Sheffield plate (sterling silver fused to a copper core, developed around 1743) carry no silver purity marks because they are not solid silver. Electroplating, perfected by Elkington & Co. in Birmingham around 1840, deposits a thin layer of silver onto base metal through an electric current. These pieces can look and feel entirely convincing. The giveaway is the absence of any purity mark and the presence of EPNS, "A1," or similar plating designations. At wear points, edges, and clasp hinges, the copper or brass base eventually shows through.
*Mixed-metal findings.* On vintage brooches, necklaces, and bracelets, the decorative body may be sterling while the clasp, pin stem, or connecting jump rings are base metal. This was standard cost-reduction practice. A magnet run slowly along the piece may react to the findings but not to the body, indicating composite construction. Never assume the whole piece is made from its most impressive component.
Field Tests: Non-Damaging, Fastest First
When marks are absent, worn to illegibility, or genuinely ambiguous, physical tests provide supporting evidence in escalating order of usefulness.
The magnet test is always first. Silver is not magnetic. A strong neodymium magnet held against a piece should produce no pull. A pronounced attraction strongly suggests significant base metal content. The caveat: some plated items on non-magnetic brass bases will also pass this test, so a passing result is a green flag, not a guarantee.
Weight and sound come next. Silver is dense, noticeably heavier than most base metals of equivalent size. When tapped gently against another piece of silver or a firm surface, genuine silver produces a clear, sustained, high-pitched ringing tone lasting a second or two. Base metals return a duller, shorter thud. The combination of unexpected density and a clean ring is a reliable preliminary indicator.
Tarnish behavior is the third physical read. Real silver tarnishes to dark grey or black (silver sulfide) relatively uniformly across the surface. Plated items tarnish unevenly, with wear points revealing the base metal below: copper orange on Sheffield plate, brassy yellow under gold plate, or grey-white on nickel. If the tarnish is concentrated at corners and edges rather than distributed across the whole piece, suspect plate.
When to Escalate
Physical tests build a case; they do not close it. Hallmarks themselves are not infallible. Re-stamps exist, where genuine marks are removed from a damaged piece and applied to an unmarked one. Outright forgeries appear in the higher-value antique market. Import marks can complicate attribution. For any piece of significant potential value, the correct next step is a professional assay or an assessment by an auction house specialist who handles silver regularly. Before sending anything anywhere, photograph every visible mark under raking light, the kind of angled illumination that makes stamped detail pop. Those images are your documentation if questions arise later.
The One-Minute Field Checklist
Keep this in your bag.
1. Locate the marks: shank, reverse, clasp, hinge edge, handle back
2. Loupe at 10x: look for Lion Passant, 925, "Sterling," or "800"
3. Identify the assay office town mark first before reading anything else
4. Match the date letter only to that specific office's published table
5. Check for EPNS, A1, or a complete absence of purity marks
6. Magnet test: no attraction expected on genuine silver
7. Tap test: clear sustained ring, not a dull thud
8. Inspect wear points at edges and hinges for base metal exposure
9. Note any import marks, especially F in an oval or post-1904 variants
10. Value uncertain? Photograph every mark and consult a specialist before selling
The stamp pressed into the metal is the piece's own testimony, filed at the moment of its creation. Read it correctly, and you stop guessing and start knowing.
This article was produced by Prism’s automated news system from verified source data, official records, and press releases, then run through automated quality and moderation checks before publishing. The system is built and supervised by the people who set the standards it runs under. Read our full AI policy.
Did this article answer your question?