Designing, Planning, and Caring for Geometric and Sacred Geometry Tattoos
Plan geometric and sacred‑geometry tattoos like a builder: match motif to body topology, lock symmetry with precise stencils, and treat dotwork and linework with staged sessions and disciplined aftercare.
1. Designing
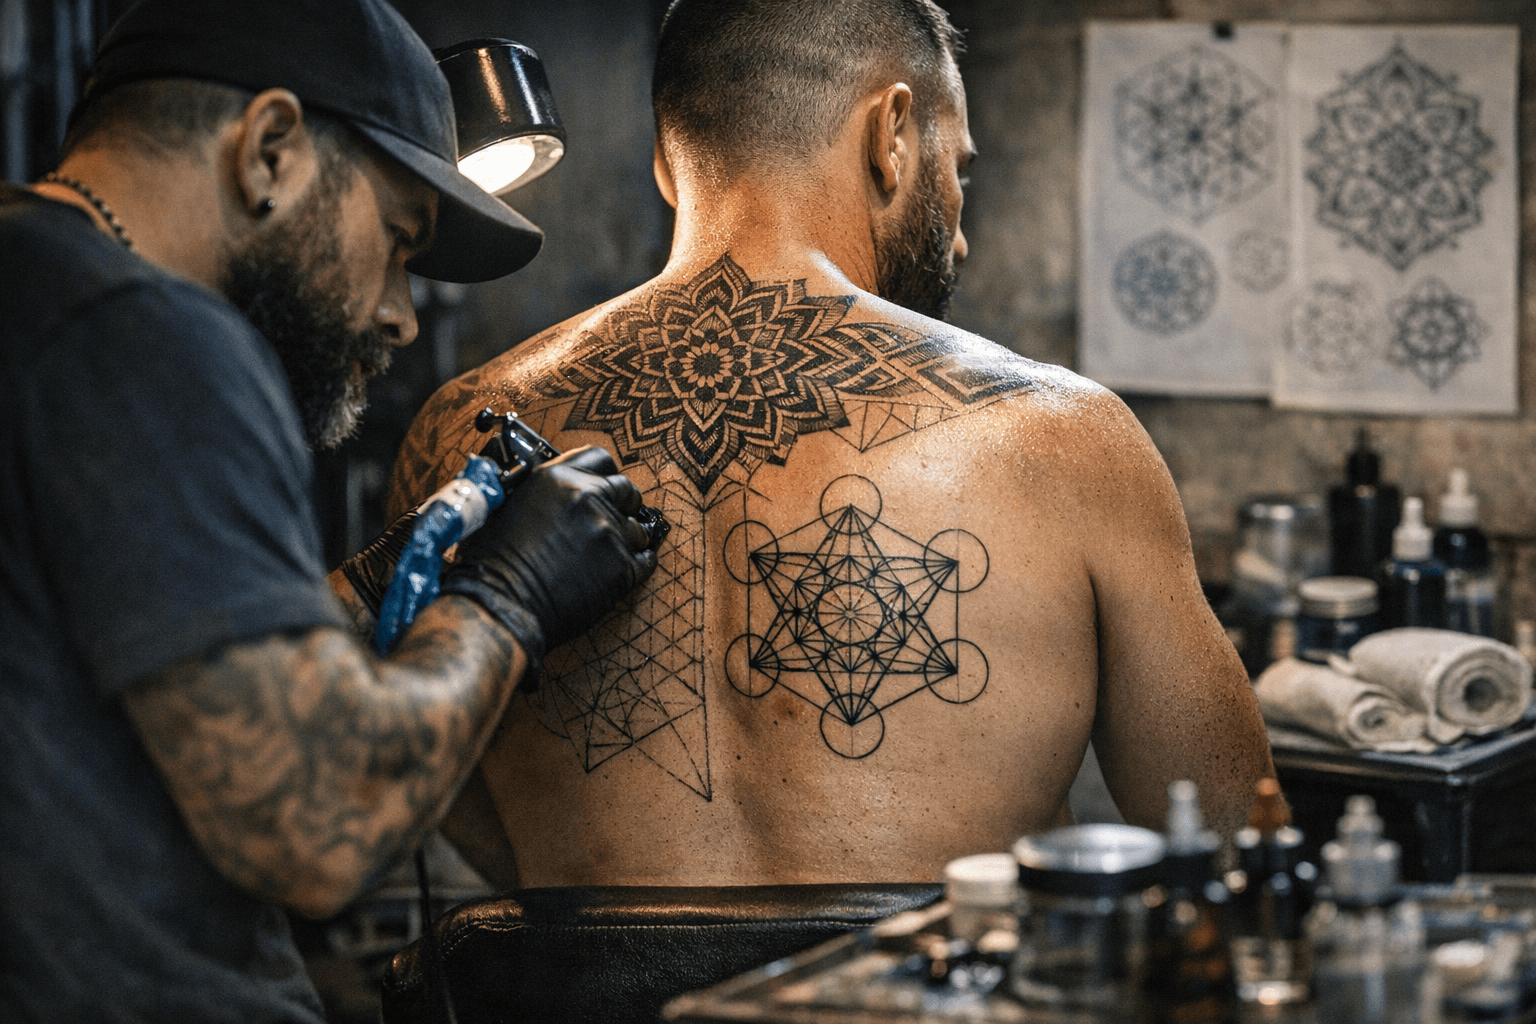
Design starts with scale, not style—pick the motif to fit the canvas. Sacred geometry motifs commonly used by artists are the Flower of Life, Seed of Life, Metatron’s Cube, Sri Yantra, and Vesica Piscis; each has predictable proportions that break when you squeeze or stretch them to fit an arm or rib. I build designs as vector files so circles and radial axes remain mathematically exact when blown up or reduced; that preserves intersection points and keeps the optics crisp during healing.
Start your draft with a grid: a central axis and concentric circles or a triangular lattice depending on the motif. For radial pieces (Flower of Life, Metatron’s Cube) mark the center clearly and plan repeats in 30° or 45° increments; for linear/lattice work (seed patterns, tessellations) use a square or hex grid and test wrap on a 3D print or laminate sheet before committing to skin. If you’re working with a client ask for precise placement photos at rest and in motion—biceps at flex and relaxed, ribcages mid‑breath—so you can predict distortion.
- Use vector software (Illustrator, Affinity Designer) and export a stencil at 100% scale.
- Create at least two scale options: the “ideal” geometry and a “body‑fit” version adjusted for curvature.
- Decide line weight early: single‑needle fine lines for delicate sacred motifs, 3–5RL or cartridge equivalents for crisp medium lines, and 7RL+ or magnums for bold outlines and blackwork anchors.
2. Planning
Treat a geometric tattoo like an engineering print: registration points, session timing, and machine/needle choices matter. For clean dotwork and micro‑lines schedule longer, focused sessions rather than trying to finish a complex lattice in one run—dotwork and stippling are slow; I commonly break a full sleeve into 3–5 sessions of 2–4 hours each so swelling and skin fatigue don’t blow out lines. Plan for stencil registration marks at three non‑collinear points so you can re‑align mid‑session if a stencil smudges.
Match tools to technique: use rotary machines (Cheyenne or similar) for steady single‑needle dotwork and reliable cartridge systems for consistent line depth during long straight runs. Needle choices I default to: single needles (1–3) or 3RL for filigree and microline, 5RL for standard geometric lines, and curved magnums for shading or black fills. Keep line spacing in mind—if two parallel lines are closer than the skin’s elastic limit they’ll tend to merge as skin stretches; give at least 2–3 mm separation for medium lines and more for older skin.
- Print stencils on thermal paper at full size and test‑transfer on practice skins or cling film.
- Mark three registration dots with surgical marker so you can reapply perfectly if needed.
- Budget time for touchups—symmetry corrections are almost always needed once swelling resolves.
3. Caring
Aftercare is where lines survive or fail. Expect primary healing to take 10–21 days and deeper settling for up to three months; plan practical aftercare that protects geometry’s crisp edges during that window. In the first 48–72 hours keep the piece clean with a mild, fragrance‑free soap and pat dry—avoid over‑scrubbing dotwork because abrasion lifts tiny scabs and makes stippling uneven. Apply a thin layer of a recommended ointment (your studio’s protocol varies) for the first few days, then switch to an unscented, non‑petroleum moisturizer until fully healed.
Sun and friction are the real long‑term enemies. Keep fresh geometry out of direct sun while healing and use broad‑spectrum SPF after healing for the lifetime of the tattoo; UV fades crisp blacks and softens contrast, especially on fine lines. For placements that rub (waistbands, bra straps) schedule touchups after swelling resolves; these areas almost always need a second pass.
- Clean twice daily with lukewarm water and mild soap for the first week.
- Use a thin layer of ointment only for the first 2–3 days, then switch to an unscented lotion until healed.
- Avoid soaking (pools, baths) for at least two weeks; showers are fine if you keep direct high‑pressure spray away from the piece.
Final checklist and ethics Geometric and sacred‑geometry tattoos demand both technical precision and cultural awareness. Confirm client intent when using explicitly religious symbols like the Sri Yantra, and discuss cultural provenance openly—people bring meanings with them and clarity prevents missteps. Before the needle: verify your stencil scale at actual size, pick needle sizes based on line weight, book staged sessions for dotwork, and agree on a documented aftercare plan that specifies cleaning, ointment timing, and sun protection. Do those things and your geometry will read correctly, age well, and avoid the common pitfall: a mathematically perfect design undermined by rushed planning or lax aftercare.
Know something we missed? Have a correction or additional information?
Submit a Tip