Prime3D Uses Optical Mixing to Add Near-Photographic Color to FFF Prints
Prime3D cheats full-color FFF with optical mixing, turning ordinary models into near-photo prints, but the payoff comes with brutal waste on purge-heavy machines.
Prime3D turns color into a slicing problem, not a hardware problem
Prime3D does something clever enough to make you stop and squint at the screen. Instead of asking your printer to lay down true full-color plastic, it breaks color into tiny adjacent patches and lets your eye do the blending. That is the whole appeal: a plain FFF printer can start producing figurines, cosplay pieces, display models, and even lithophane-like art with a much richer look than the usual blocky multicolor result.
The tool comes from Josh at 3D Revolution and is free, open-source, and browser-based. Everything happens locally in your browser, so your STL files, painted models, and exported 3MF files are not uploaded to a server. In practice, that makes it easy to test without handing your files to a cloud workflow you do not need.
How the optical mixing trick works
Prime3D is not doing conventional full-color extrusion. Its approach is closer to pixel art than traditional multicolor printing. By placing tiny areas of different colors next to each other and varying their proportions, it creates the illusion of blended tones, the same basic idea that makes a screen image look continuous from normal viewing distance.
That is why the project is described as a local web tool for painting STL or pre-painted 3MF models and converting them into dithered color lines for printing in CMYKW filaments. In other words, the slicer is doing creative work that usually gets pushed into post-processing or separate decoration. The big practical catch is that the illusion only works if the model gives the software enough surface detail to work with.
Prime3D recommends a white base filament for the most vibrant results, which makes sense once you think about how optical mixing behaves on top of a bright foundation. The latest 0.7.8.5 update added support for importing pre-painted 3MF files and painting custom gradients, and the repository shows recent commits dated April 22, 2026, so this is very much an active project rather than a frozen demo.
Where the effect looks best
The sweet spot is curved models with dense mesh triangles. That gives Prime3D lots of tiny regions to place color, which is exactly what optical mixing needs to pull off the trick. Flat surfaces, by contrast, do not provide enough small regions for color placement, so the result will look less convincing and more obviously patterned.
That detail matters if you are thinking about real hobby parts. A helmet cheek curve, a stylized bust, a rounded creature model, or a decorative display object can hide the dither pattern far better than a boxy panel or a broad flat sign. If you want something that reads as near-photographic from a normal viewing distance, geometry is doing as much work as the color palette.
The promise here is obvious. A model that once would have needed decals, painted inserts, or a lot of hand-finishing can move closer to that finished look straight out of the printer. That is the kind of result that can make a print feel more like a display piece than a fabrication sample.
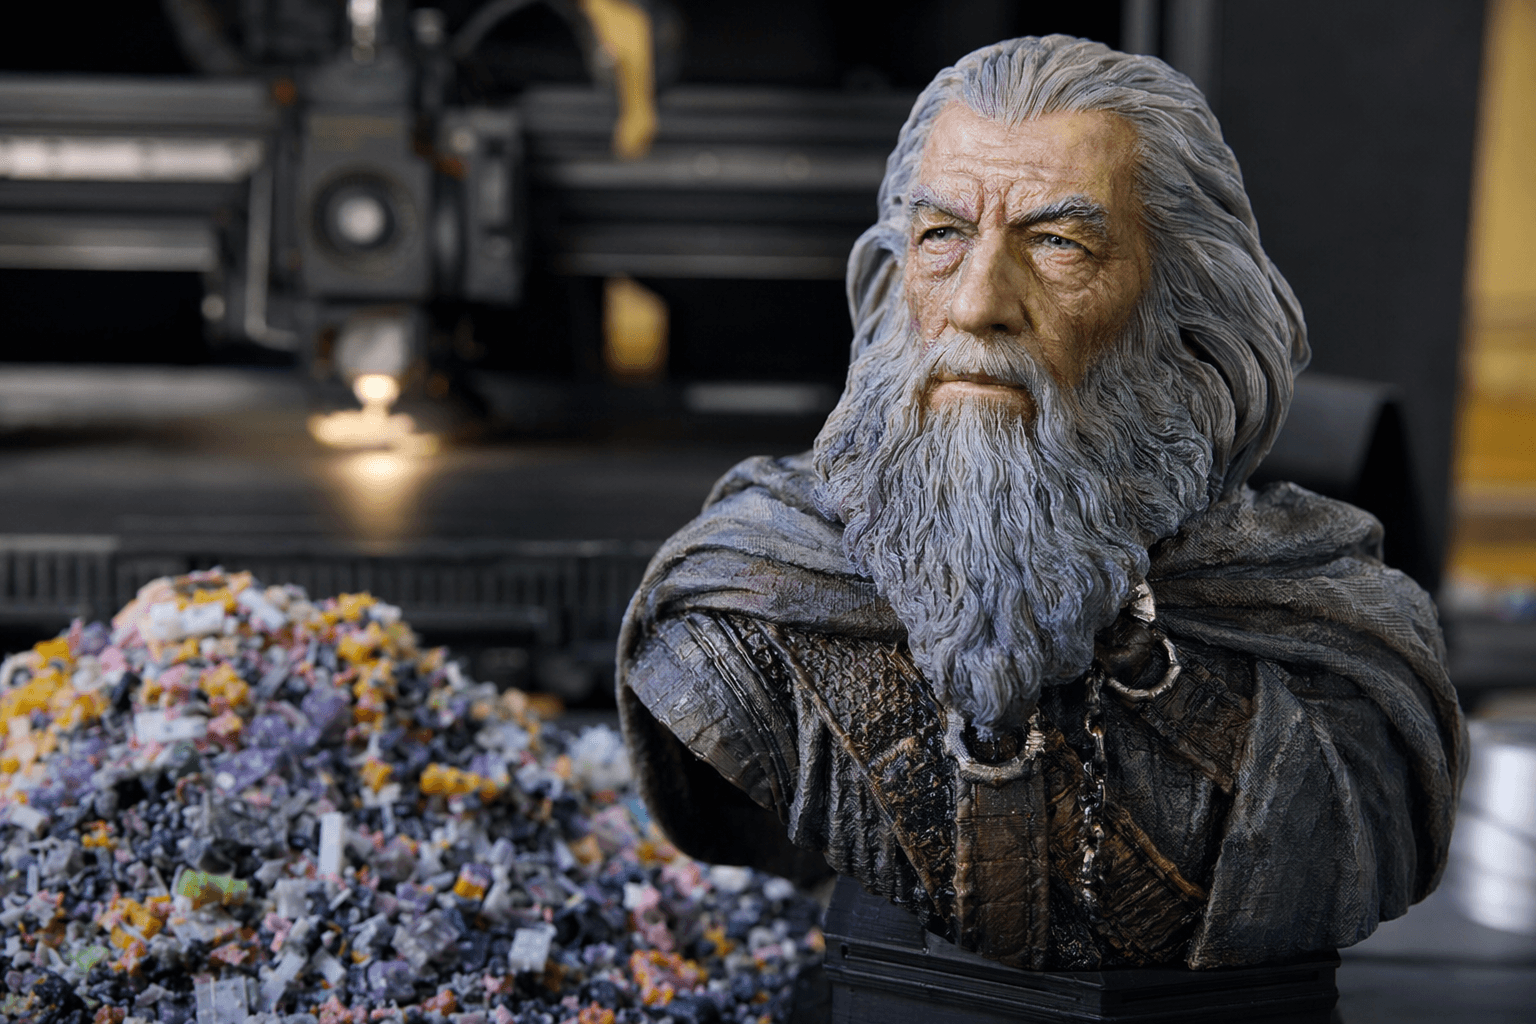
The hard reality: color beauty is expensive on purge-heavy machines
This is where the hype gets punched in the teeth. Prime3D may be clever software, but the math can still be ugly on a conventional filament-swapping setup. The article’s Benchy test is the cleanest proof of that: sliced at 0.08 mm layers, the file would take 34 hours to print and would use 437 grams of filament for a part that weighs only 14.13 grams. That is a 97 percent waste rate.
That number tells you exactly why this is not a simple “just run it through your AMS” kind of feature. Bambu Lab says multimaterial prints are very costly in time and materials because each filament change requires purging, and its documentation for the X1 notes a waste chute for purged filament when printing multiple colors with AMS. Prusa, meanwhile, describes multi-material slicing around a smart wipe tower designed to keep color transitions sharp while wasting as little filament as possible. Even when the workflow is well engineered, the purge tax is still real.
So Prime3D is not really about making purge-heavy systems magically efficient. It is about exposing how much of multicolor printing cost lives in the hardware and material-change path, not just in the art. If your printer has to constantly clear the nozzle, the beauty of the color effect can be eaten alive by lost time and wasted plastic.
Why tool-changers are the better fit
If you want this idea to become genuinely practical, the hardware needs to stop punishing every color transition. That is why the article points toward waste-free tool-changer systems or Vortek-style architectures. In those setups, color changes do not carry the same purge penalty, so the dithered image-style approach starts to look like a real workflow instead of an expensive proof of concept.
Bambu Lab’s H2C page pushes in that same direction with a purge-saving tool-changer approach for automatic multi-material, multi-color printing. The underlying message is simple: if the machine can switch materials without dumping a mountain of purge material, Prime3D’s optical mixing suddenly becomes much more attractive.
That is the key divide here. On an ordinary filament-swapping machine, the output may be beautiful but wildly inefficient. On a tool-changer platform, the same slicing idea could finally make near-photographic color feel like a normal part of the print pipeline instead of a special event.
Why the Benchy test is the right reality check
The choice of 3DBenchy makes sense because it is the benchmark everyone recognizes. Created by Daniel Norée, it is designed to test and calibrate 3D printers, and the file is now in the public domain. That makes it a useful comparison model for any new workflow claiming to improve visual quality or color handling.
If Prime3D can make a Benchy look dramatically more lifelike while keeping the underlying shape readable, that says something. But the benchmark also exposes the tradeoff in plain numbers, and those numbers are hard to ignore. When a tiny test ship turns into a 34-hour, 437-gram exercise to produce a 14.13-gram part, you are not looking at a casual everyday setting. You are looking at a very specific, very selective process.
What Prime3D really means for hobby printing
The big takeaway is not that ordinary FFF has suddenly become full-color printing. It has not. The real change is subtler and more interesting: slicing software is starting to carry some of the creative burden that used to belong to hardware, paint, or post-processing.
That opens a believable path to prints that feel closer to decals, gradients, and image transfer than to the usual multicolor stripe show. It is still niche, and the economics are brutal on the wrong machine, but the concept is strong enough to matter. Prime3D is one of those tools that hints at a future where the printer is no longer the only place where color gets decided.
This article was produced by Prism’s automated news system from verified source data, official records, and press releases, then run through automated quality and moderation checks before publishing. The system is built and supervised by the people who set the standards it runs under. Read our full AI policy.
Did this article answer your question?