Build a Boat Boarding Step for £10 Using Salvaged Wood
A half-day build with scrap wood and £10 of rope turns a clumsy pontoon drop into a safe, comfortable step — and it stows in your cockpit locker.
Stepping off a yacht onto a pontoon looks simple until someone with dodgy knees misses the landing, or a crew member is rushing to grab a line while the boat drifts. The gap between deck and pontoon is awkward by design: toerails, freeboard, and tidal variation conspire to make every departure a minor athletic event. A removable boarding step built from salvaged wood solves the problem for around £10, or nothing at all if your offcuts tin is well-stocked.
Mark Prior documented exactly this build in Practical Boat Owner, and the details are specific enough that you can replicate it in a weekend morning. The step hooks into existing aluminium toerail scupper holes, stores flat in the cockpit locker, and costs less than a marina coffee.
Why bother with a boarding step at all
The drop from deck to pontoon is rarely clean. It varies with tide, freeboard, and how heavily loaded the boat is, and it always involves a moment of committed weight transfer with nothing solid underfoot. For anyone with weak knees, that landing is genuinely painful. As the PBO piece puts it directly: "If you have weak or dodgy knees, the step takes the 'jarring potential' out of landing on the pontoon." But even for crew with no joint issues, a midpoint platform changes the whole dynamic of arrival and departure. It lets you step down in two controlled moves rather than one lurch, and it gives a crew member a stable footing to deal with lines before the boat has fully stopped.
The project description mentions Heather as a specific example: "It's therefore very easy for Heather (or anyone else, for that matter) to step onto the pontoon safely and do her crew bit of tying up the forward and aft lines." That casual "or anyone else" is the point. A good boarding step benefits every person on the boat, not just those with mobility concerns.
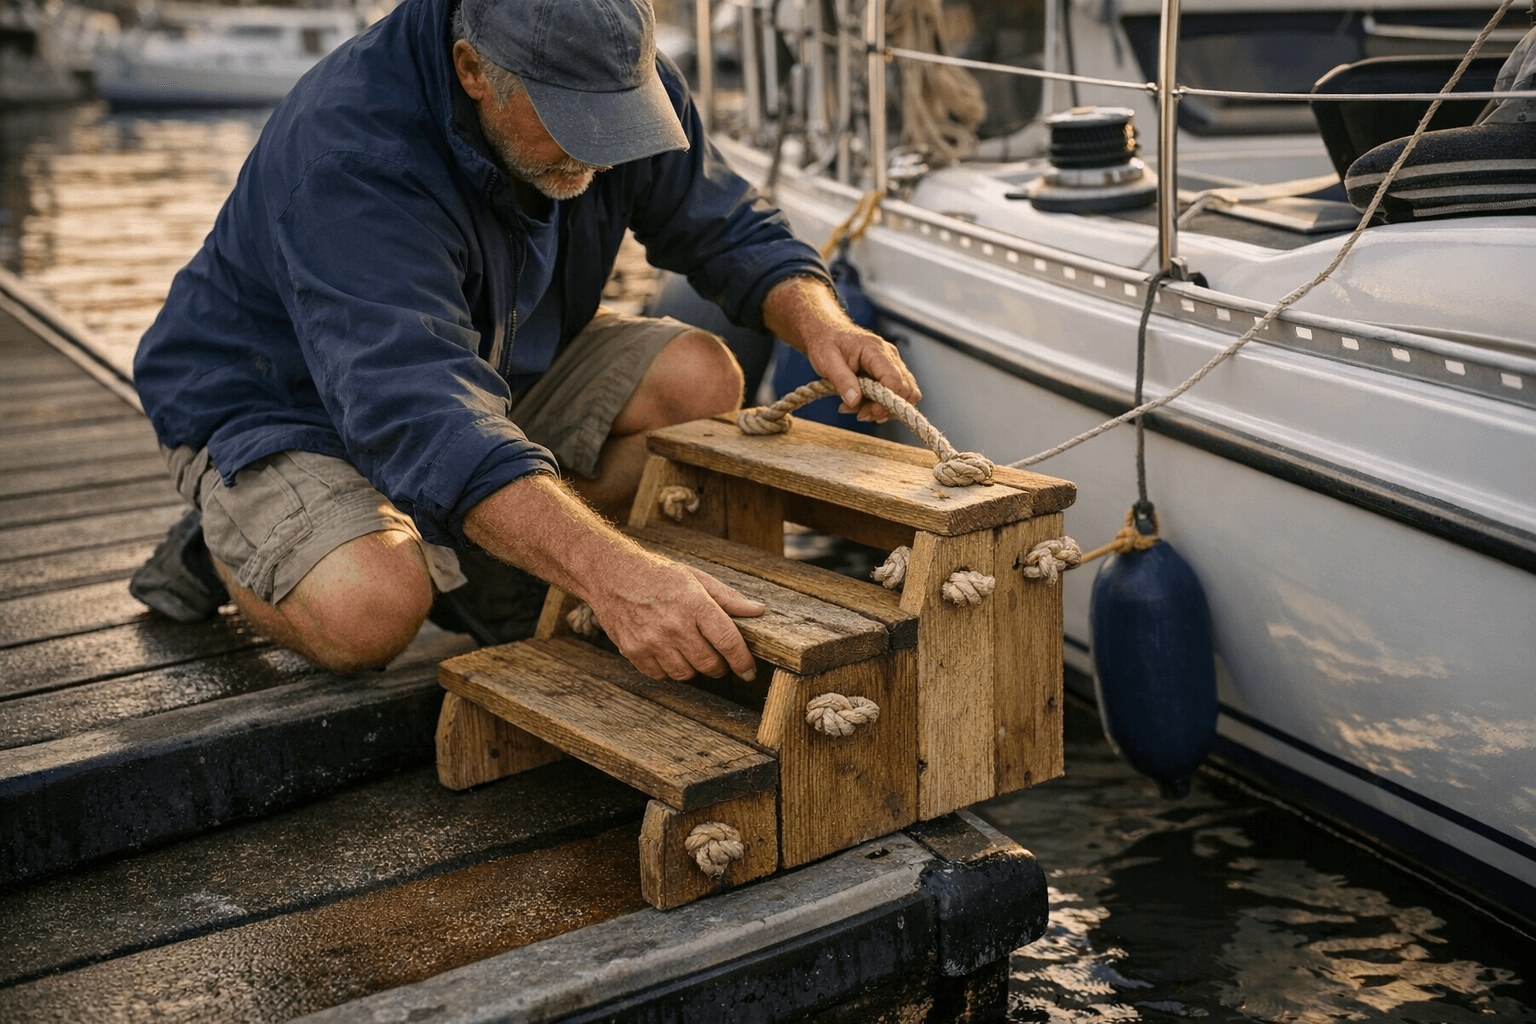
How the step fits to the boat
The design hinges on one clever piece of hardware: angled brackets that hook directly into the toerail holes already present on most aluminium toerails. On Mark Prior's boat, Klondike Kate, the toerail has scupper holes that accept the brackets perfectly. As he describes it: "Klondike Kate has aluminium toerails with scupper holes and my step neatly clips into these holes, making a rigid platform that falls halfway between the deck and pontoon."
That last phrase, "halfway between the deck and pontoon," is what makes the geometry work. You're not trying to build a step that reaches all the way to the pontoon surface; you're creating an intermediate platform that breaks the descent into two manageable steps. The result is stable and rigid, not wobbly, because it's supported by the toerail structure of the hull rather than hanging from a rope.
A rope lanyard with a snap clip provides a secondary retention line. "A rope lanyard with a snap clip secures the step to the boat, just in case it's dropped when attaching it to the toerail." Dropping hardware overboard during rigging is one of those things that happens to everyone eventually, and the lanyard costs almost nothing to add. Photograph credit for this detail goes to Thomas Parker, whose image of the lanyard rigged on a yacht's side makes the attachment method immediately clear.
Dimensions and how to adapt them
The specific dimensions Prior used are worth quoting in full, because they give you a concrete starting point even if your own toerail profile is different: "The dimensions to fit the toerail for my boat are 49cm wide, 38cm high, a step depth of 14.5cm and a total depth of 24cm – but these can be modified to fit other toerails on other boats."
Work backwards from your own toerail. Measure the height from your deck edge to the top of the pontoon at mean water level, halve it roughly, and that's your target platform height. Width should clear the toerail stanchion bases comfortably on both sides. The step depth of 14.5cm is a minimum for a confident foot placement; going slightly wider won't hurt anything structurally. The total depth of 24cm gives you the front-to-back dimension of the whole unit including the brackets.
Before cutting anything, check which holes in your toerail will accept the angled brackets. Not all aluminium toerails are identical: some have round scupper holes, some have slotted profiles, and older GRP boats sometimes have teak toerail with no holes at all. If your toerail doesn't have suitable holes, this design won't clip on cleanly, and you'd need to adapt the bracket geometry or add a through-bolt attachment instead.
Materials and what you actually need
The core materials are scrap wood and rope, which is why the cost is either £10 or zero depending on what you already have. The only components called out explicitly in the PBO piece are: scrap wood for the platform and frame, rope for the lanyard, a snap clip to attach the lanyard to the boat, and the angled brackets that hook into the toerail holes. The wood species and dimensions of the timber, the rope diameter, and the bracket specification are not detailed in the available source material, so those are calls you'll make based on what's in your workshop and what fits your toerail profile.
Practically speaking, you want timber stiff enough not to flex under a person's full body weight in transit. A hardwood offcut is ideal; a softwood will work if the dimensions give it enough section. Whatever you use, it's worth considering a sealing coat or paint finish for longevity, since the step will be exposed to salt water, UV, and regular handling. That detail isn't specified in the PBO project, but it's the kind of thing that separates a step that lasts a season from one that lasts a decade.
Storage and everyday use
When the step isn't deployed, it stows in the cockpit locker. That's important: a boarding step that lives permanently clamped to the toerail becomes a snagging hazard and takes a beating from weather and dock lines. Being able to clip it on in seconds, use it, and stow it immediately means it'll actually get used rather than left tied to a rail and forgotten.
The half-day build time is realistic for a project with no complex joinery. You're cutting wood to length, fitting brackets, adding a lanyard, and checking the fit against the toerail. Most of that time is measuring, test-fitting, and adjusting rather than actual cutting.
If you want to share your own project
Practical Boat Owner actively pays for reader-submitted DIY projects. If you build this step, refine the design, or come up with a variation that solves a different toerail profile, the submission process is straightforward: email pbo@futurenet.com with photos at the highest resolution you can manage. PBO pays at least £30 for each Practical Project published, which won't cover a boat mortgage but will easily cover the cost of the next project's materials.
The boarding step sits alongside a wider library of PBO DIY content including a bunk ladder for getting in and out of berths (built by Don Fitzroy Smith), carbon fibre spinnaker pole construction, and end spacers for spinnaker poles. The common thread is that these are practical builds with real dimensions and real costs, not aspirational projects requiring a full woodworking shop.
For most sailors, the boarding step will earn its keep the first time someone in the crew doesn't quite stick the landing onto a pontoon. At £10, it's the cheapest insurance you'll add to the boat this season.
This article was produced by Prism’s automated news system from verified source data, official records, and press releases, then run through automated quality and moderation checks before publishing. The system is built and supervised by the people who set the standards it runs under. Read our full AI policy.
Did this article answer your question?


