Build a Boat Swimming Platform, a Practical DIY Project for Owners
A swim platform can transform stern access, but only if you treat it like a structural upgrade. The real win is easier boarding without creating a flimsy, overloaded stern.
Build the platform for function first, not just looks
A decent swim platform is one of those upgrades that pays you back every time you step off the boat, haul a dinghy line, or climb back aboard with wet feet. The catch is that it is not a cosmetic add-on. Richard Johnstone-Bryden’s Practical Boat Owner guide makes the point clearly: this is a project a competent DIYer can handle, but only if the platform is treated as a proper structural and ergonomic change, not a piece of deck furniture bolted to the transom.
That distinction matters. A good platform changes how the stern works day to day. It makes swimming easier, boarding less awkward, and stern-to-dinghy life a lot calmer. A bad one adds weight, flex, and noise, then starts feeling like a liability the first time someone steps on it underway.
Why owners add one, and what you give up
The strongest argument for a platform is simple utility. On boats where the cockpit-to-water transition is high or clumsy, a bathing platform makes the stern usable instead of merely presentable. It also helps when you are handling a launched dinghy, because Cruising World notes that a wide aft beam can improve access to both a swim platform and a dinghy hanging off the back.
But every gain comes with a trade-off. A platform adds complexity, extra hardware, and a new load path on the stern. It also changes the way people move around the back of the boat, which means you have to think about grip, seating, ladder access, and the possibility of someone standing in the wrong place at the wrong time. If you only want a prettier transom, this is the wrong project. If you want safer, easier stern access, the work starts making sense.
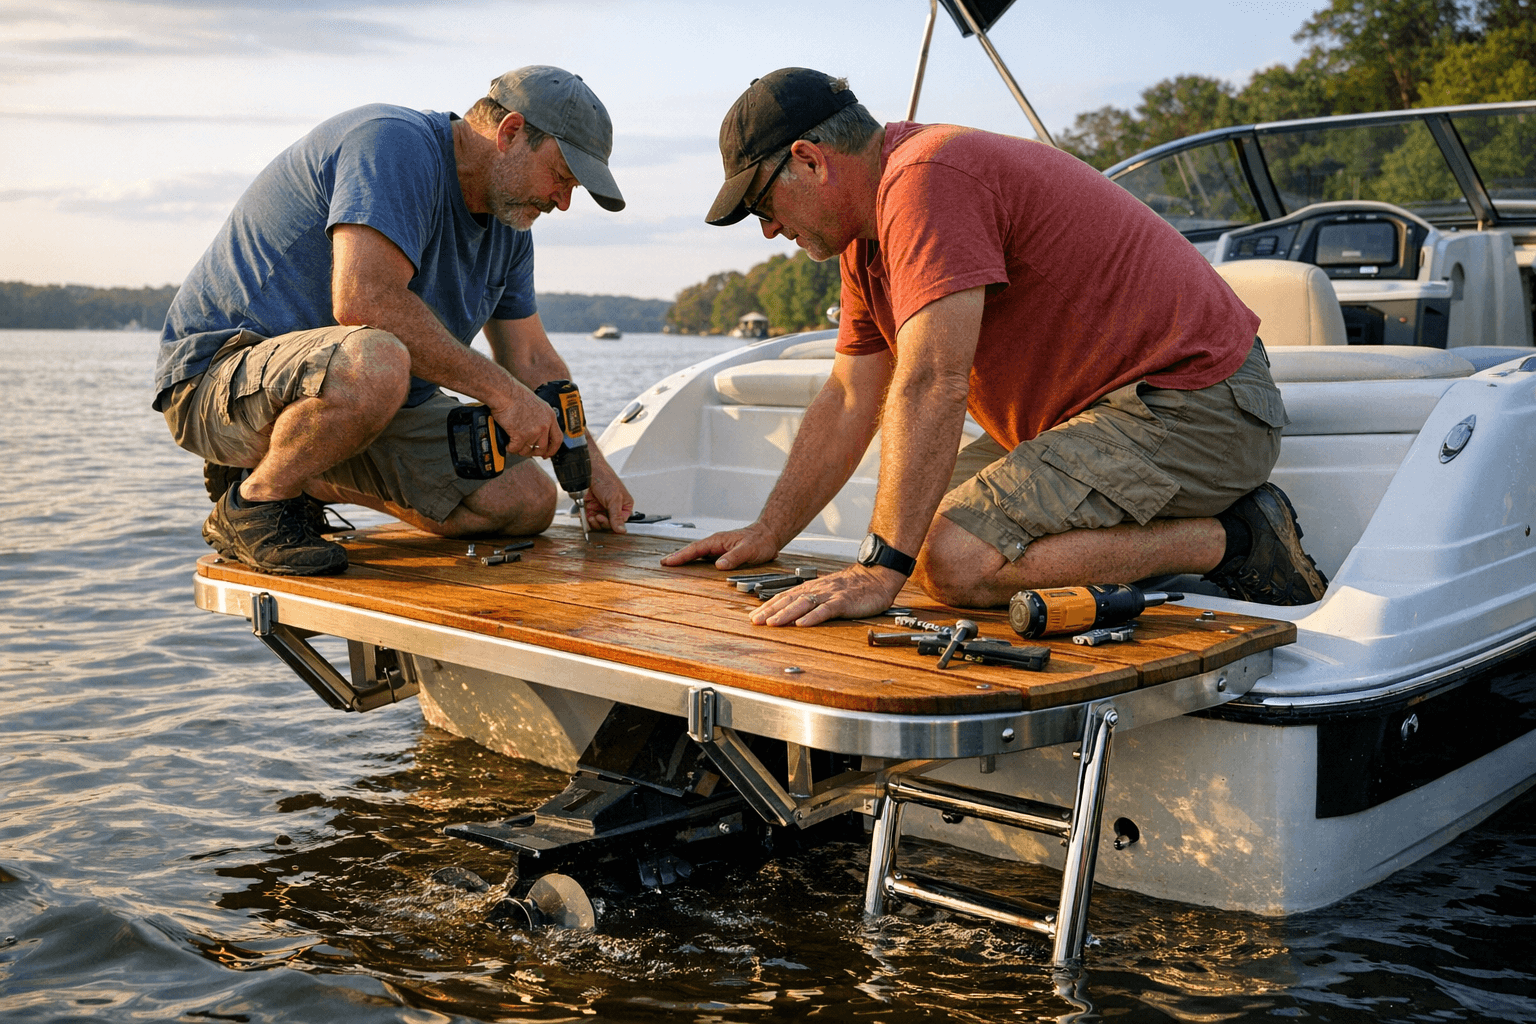
The materials and tools tell you what kind of job this really is
PBO’s build list is useful because it strips away the fantasy version of the project. You need wood, a jigsaw, a router, and help from a skilled stainless-steel fabricator. That mix says a lot. The owner can absolutely do the layout, shaping, and finishing, but the critical metalwork should be handled by someone who knows how to make brackets, align them correctly, and leave the platform solid in a salty environment.
That is also where a lot of homemade projects go wrong. People get the timber shape right and then cheap out on the metal, or they make brackets that look stout on the bench but do not fit the transom curve properly. Commercial builders favor non-skid surfaces and 316L stainless mounting brackets for a reason: traction and corrosion resistance are not optional on the stern of a real boat.
A practical shopping list looks more like this:
- Suitable marine-grade wood for the platform body
- A jigsaw for cutting the main shape
- A router for refining edges and fittings
- Stainless hardware fabricated to suit the hull
- Non-skid surface treatment where feet will land
- Time to dry-fit everything before final fastening
The stern structure has to carry the load
The most important mistake is assuming the transom can simply absorb the extra weight and leverage. One forum comment makes the warning plain: a transom not originally designed for a platform may need reinforcement and a tie-in to the hull structure, often with knees, to carry the load safely. That is not alarmism. It is what happens when a platform turns into a lever every time somebody steps on the outer edge.
This is where the project stops being a carpentry exercise and becomes a structural one. The added mass of the platform itself matters, but so does the dynamic load of people climbing on and off, children leaning on the outer rail, and boarding loads in chop. If the stern flexes, rattles, or shows movement under test pressure, stop and redesign before you ever trust it underway.
A good rule is to plan the mounting before you shape the finish. If the brackets, backing plates, and reinforcement strategy are not fully thought through, the prettiest timber in the yard will still make a bad platform.
Why older boats benefit most
The modern appeal of swim platforms says a lot about how boat design has changed. Correct Craft says it first incorporated swim platforms into boat design in 1952, and later production sailboats followed suit as sterns got wider and more open. Practical Boat Owner’s own glossary defines a sugar scoop as a transom extended or hollowed out to incorporate a bathing platform, which is really the integrated version of the same idea.
That history matters because plenty of older boats were launched before swim access became standard. A SailNet discussion notes that O’Day’s move from the O’Day 30 and 34 to the O’Day 31 and 35 in 1986 included a sugar-scoop, swim-platform stern. That kind of change shows why retrofit platforms still have a place: owners of older hulls often want the convenience newer boats were already being designed around.
Use the safety standards that actually help DIY builders
ABYC is useful here because it keeps the conversation grounded in real-world safety, not just style. The American Boat & Yacht Council says its standards are voluntary safety standards for recreational boat design, construction, maintenance, and repair, and more than 400 volunteers help update them. It also says boats using its standards are 43% to 47% less likely to have certain accidents and can reduce fatality risks by 26% to 58% compared with non-certified boats.
Those numbers are the share hook, but the bigger lesson is simpler: the stern is not a place to improvise. U.S. Coast Guard Boating Safety guidance says to establish clear rules for swim platform use, boarding ladders, and seating. It also says that if someone falls overboard, you stop the boat and keep the person in sight during recovery. That is the level of discipline a platform demands, because the platform changes where people gather and how quickly they can get in and out of the water.
A sensible plan for the DIY build
The cleanest way to approach this job is to think in stages, even if you are not following a rigid shop script. Start with the boat’s stern geometry and decide whether the platform is a true bolt-on or whether the transom needs reinforcement first. Then build the platform body, fit the stainless brackets to the actual curve of the boat, and test the fit before any final finish goes on.
After that, check the practical details that separate a useful platform from a sketchy one. Feet need traction, hardware needs corrosion resistance, and the platform must not interfere with ladders, rudders, backstays, or dinghy handling. If the result makes boarding easier, gives swimmers a stable step, and stays solid when loaded, you have built something worth keeping.
A well-done swim platform is not just summer candy on the stern. It changes how the boat lives at anchor, how people recover from the water, and how confidently you move around the back of the hull. Built carelessly, it feels flimsy and unsafe. Built with the right materials, the right metalwork, and a proper eye on loads, it becomes one of those upgrades that makes an older boat behave like a far more useful one.
This article was produced by Prism’s automated news system from verified source data, official records, and press releases, then run through automated quality and moderation checks before publishing. The system is built and supervised by the people who set the standards it runs under. Read our full AI policy.
Did this article answer your question?


